Curio 8.0 Release Notes
Release Date
October 11, 2012
Requirements
Curio 8 runs on macOS Lion (10.7) or Mountain Lion (10.8).
Important Notice To Upgraders
-
Curio 8 requires Lion or Mountain Lion!
-
Curio 8 has a brand new file format. Once a project is converted to Curio 8 it cannot be opened with earlier versions of Curio!
-
A number of features, like Dossier and Flashlight, have been removed from Curio 8.
-
You will need to reboot after installing Curio 8 to completely uninstall the old CurioService helper app. You will also need to use our new bookmarklet JavaScript.
Introduction
- Curio 8 requires Lion or Mountain Lion!
- Curio 8 has a brand new file format. Once a project is converted to Curio 8 it cannot be opened with earlier versions of Curio!
- A number of features, like Dossier and Flashlight, have been removed from Curio 8.
- You will need to reboot after installing Curio 8 to completely uninstall the old CurioService helper app. You will also need to use our new bookmarklet JavaScript.
Curio 8 is, by far, the most ambitious Curio release since its inception ten years ago.
The main goals were code modernization and robustness; interface modernization, simplification and usability; file format robustness and future-proofing; and major feature enhancements.
Why You Want This Release
- Designed specifically for Lion and Mountain Lion.
- Retina graphics so it looks wonderful on the new retina Macs.
- Huge code rewrite with major performance and robustness improvements.
- Fantastic new modernized and simplified user interface.
- New project file format designed for greatly increased robustness and awesome future features.
- Support for Evernote’s new OAuth login API which will be required on November 1, 2012 for all third party app access.
- Tons of new, incredible features and enhancements.
Curio
Introducing Curio
 Curio is now just Curio.
There are no more editions such as Core, Standard, or Professional.
No more feature comparison matrix.
No more figuring out what edition you need to trial or purchase.
No more crossgrades.
No more confusion.
Curio is now just Curio.
There are no more editions such as Core, Standard, or Professional.
No more feature comparison matrix.
No more figuring out what edition you need to trial or purchase.
No more crossgrades.
No more confusion.
Just one single absolutely amazing app.
Trials
Since Curio is distributed as a single application you no longer have to choose which Curio edition to trial. Simply download Curio and it will begin as a 25-day trial with all features enabled, after which time it will disallow saving and exporting.
 The trial process itself has been improved with no more annoying "X days remaining" dialogs, as the days remaining is displayed up in the window title bar in a subtle gray color, where a click brings you right to our online store.
As the expiration date approaches, the days remaining indicator will turn a shade of red to warn the user that the end of their trial is near.
Along similar lines, we also no longer show annoying dialogs prompting you for feedback.
The trial process itself has been improved with no more annoying "X days remaining" dialogs, as the days remaining is displayed up in the window title bar in a subtle gray color, where a click brings you right to our online store.
As the expiration date approaches, the days remaining indicator will turn a shade of red to warn the user that the end of their trial is near.
Along similar lines, we also no longer show annoying dialogs prompting you for feedback.
Lastly, on startup, we automatically open the Getting Started project in lieu of the old Welcome To Curio screen so you can jump right in and see a quick overview of Curio. The Getting Started project is also accessible via the Help menu.
Made For Lion and Mountain Lion
Major portions of Curio have been completely rebuilt to take full advantage of the latest Apple OS X releases.


- Curio 8 only runs on Lion or Mountain Lion systems, we’re using Apple’s latest API’s and frameworks to the max.
- Support for native full screen mode, with the new Curio user interface it’s wonderful!
- Curio’s formally custom autosave and window restoration code has been replaced with native functionality introduced in Lion.
- Curio is digitally signed with an Apple certified Developer ID for Mountain Lion Gatekeeper validation.
- Curio supports Mountain Lion’s new in-app methods for renaming and moving the opened project document via the File menu or the titlebar popup menu.
Contacts Access

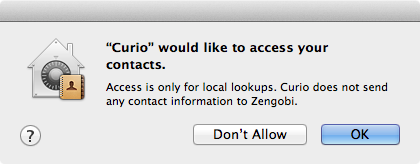
When you first launch Curio on Mountain Lion the OS will ask if Curio can have permission to access your Contacts (what used to be called Address Book). We use the Contacts framework to find out who "me" is, so we can populate the project’s Resources inspector with your name and email. We also use the Contacts framework when you double-click a dragged-in contact so we can launch Contacts and show that contact to you. That’s it. We don’t use Contacts for anything else. We certainly do not scan your contacts for any nefarious marketing reasons or to send any contact information to Zengobi’s servers.
Retina Ready

High-resolution images for the user interface are included so Curio 8 looks gorgeous on retina displays.
As you’ll learn below, Curio is now storing idea space previews as PDF which means the Organizer contents and Quick Look previews look much sharper on retina.
Curio 8’s pens & brushes (aka scribble mode) have been updated to work with retina displays. Likewise, the presentation mode transitions have been tweaked to work with retina, as well.
More Robust Code
Tons and tons of internal refactoring and rewriting have made it so Curio 8 is more streamlined and fully optimized.
- Built with the latest Xcode 4 release.
- 64-bit Intel only, no more 32-bit Intel or PowerPC support.
- Reduced use of 3rd party frameworks, now using more native controls.
- Compiled with Apple’s fantastic LLVM compiler which found dozens of potential trouble spots. Then the code was given an additional polish with Apple’s LLVM static analysis tool which found even more potential trouble spots and memory leaks.
- We went back to the drawing board on all user interface resources, so they could be reconstructed with simplicity in mind.
- Native gesture support, such as pinching to zoom in or out of an idea space and swipes to moves between idea spaces.
- Native graphics tablet support, instead of using Wacom Carbon hooks.
- Now using QTKit instead of old NSMovieView for more reliable movie and audio playback.
- Now using AVFoundation for better audio and video recording.
- Much smarter and more robust handling of background processing threads, operations, and dispatched requests.
- Greatly expanded the number of operations that happen in the background, all handled with Apple’s Grand Central Dispatch.
- More robust handling of file operations which impact the project document such as rename, move, save as, or duplicate.
- Much safer handling of asset renames with commits going straight to disk so you don’t end up with lost assets in the event of a crash.
- Troublesome undo stack corruptions have been squashed.
- Curio is now storing all aliases as security scoped bookmarks as well as normal, old-school aliases. This includes asset aliases, Project Center aliases, figure actions with file aliases, and jump target aliases. Security scoped bookmarks are new file references developed by Apple which will even work within a sandboxed Curio app, such as one sold at the Mac App Store.
- Using the latest Sparkle, for secure app updates, compiled as 64-bit: https://github.com/andymatuschak/Sparkle/tree/CodeSigning
- Using the latest Evernote API code compiled as 64-bit: http://dev.evernote.com/documentation/cloud/
- Using the latest BWToolkit UI framework compiled as 64-bit: https://bitbucket.org/bwalkin/bwtoolkit/
- Using the latest OmniGroup version of LinkBack, for inter-app embedding, compiled as 64-bit: https://github.com/omnigroup/LinkBack
- Using the latest ShortcutRecorder, for tag keyboard shortcuts, compiled as 64-bit: http://code.google.com/p/shortcutrecorder/
Faster Performance
Better, stronger, faster. Yes, it’s bionic.

- Curio 8 now performs many actions on background threads controlled with Apple’s Grand Central Dispatch technology.
- Support for simultaneously opening multiple files means startup is much faster as templates and stencils are loaded in the background.
- The various style galleries are much faster and generate cached previews on background threads.
- Favicons for web links and Quick Look previews for documents, WebViews, and WebArchives are now retrieved in the background thus no longer slowing down the UI. The previews are also stored to disk for immediate rendering upon project reload.
- When you Command-Tab back to Curio after visiting another application, we scan for any changes you may have made to files which are aliased or embedded as assets in your project. Previously we scanned all assets in your project checking last modified dates, which can be slow for users with hundreds or thousands of assets. Now we only scan the assets displayed in the current viewed idea spaces so the update check is instantaneous.
- Due to the new file format, Curio’s Quick Look plugin is now faster since it can use these easily accessible preview PDF files instead of loading up each idea space to extract its preview.
- The old asset inspector used to show a preview of the asset. This preview generation was a surprising performance hit particularly for busy idea spaces with lots of complex PDF’s as it was regenerated every time you changed selection, therefore that inspector preview has been removed from Curio 8.
More Robust File Format
All existing projects will be converted to the new Curio 8 file format as they are opened.
Once they have been converted they cannot be opened with earlier versions of Curio.
A zipped version of the original project is placed into the Trash before the conversion begins.
Curio no longer has a monolithic asset library containing all data. Instead all asset objects are written to disk individually and dynamically scanned and loaded on project open. The new resulting file package hierarchy is much more robust, much easier to browse via the iOS Dropbox app, and a step towards allowing collaborative editing of projects.
Idea Spaces
Idea space assets are stored within a package subfolder called Idea Spaces, where each asset is stored within subfolders made unique using the asset’s globally unique ID.
Within each subfolder you’ll find a preview named __Preview.pdf or __Preview.png.
Yes, this means you can see a preview of your idea space while browsing the project using the Dropbox iOS client.
For security, if your project is encrypted then idea space previews will be encrypted as well so they cannot be viewed outside of Curio.
 MyProject.curio
 Idea Spaces
- My IdeaSpace-98297b43-5eff-4c0c-8b27-13f304b6b356
 __Preview.pdf
- 98297b43-5eff-4c0c-8b27-13f304b6b356.data
- My IdeaSpace.curioIdeaSpace
Documents
Document assets are stored within a package subfolder called Documents, where each asset is stored within subfolders made unique using the asset’s globally unique ID.
Non-image objects which are displayed as previews in the idea space will store that preview as __Preview.png within the document asset’s folder.
- MyProject.curio
- Documents
- My Image-8c9997d3-06da-437c-808d-c72910385ab1
- 8c9997d3-06da-437c-808d-c72910385ab1.data
- My Image.jpg
- My Word Document-e2c60ae8-5f49-4757-b5a2-7092aed30dcd
- __Preview.png
- e2c60ae8-5f49-4757-b5a2-7092aed30dcd.data
- My Word Document.docx
Objects
All non-file assets, such as section, folder, and text assets, are stored as individual, uniquely named files in an Objects subfolder hierarchy.
- MyProject.curio
- Objects
- 0a
- 0a5cda11-0fdc-4ae2-8819-5fd0ef87ced2.data
- 0aaa5b50-f41a-4f58-842a-c0e264cc1956.data
New User interface
You’re going to love the new simplified, modernized, and gorgeous user interface! We used to hit you with over 100 buttons and controls on application startup so the new UI is like a calm breath of fresh air.
Toolbar
The new Curio 8 toolbar resides at the bottom of the window and contains the essential tools for controlling Curio:
- The Projects button brings up the Project Gallery window for opening and organizing existing projects or creating new projects. Hold Shift when clicking to instantly see the New Project window. Hold Option when clicking to see a fast access popup menu to quickly choose an existing project to open.
- The Organizer button reveals or hides the Organizer pane.
- The Add button is used to add a new item to the Organizer such as an idea space or, new in Curio 8, a rich text file, PDF, or image.
- The Tools palette allows you to select the active tool such as select, text, lines, shapes, pens & paint brushes, or eraser.
- The Insert button is used to insert a new figure into the current idea space including text, mind maps, lists, index cards, stencils, WebViews, video and audio recordings, and much, much, more.
- The Share button allows you to mail, print, export, or present your project, section, selected idea spaces, or selected figures.
- The Zoom slider gives the ability to precisely zoom in or zoom out of the current idea space. If you double-click or Option-click on the slider you will go to the actual size. If you zoom all the way out we’ll simply fit the entire contents to the window. You can also zoom using trackpad pinch gestures, or by holding the Option key while spinning your mouse scroll wheel. All the gallery windows within Curio also support the pinch and Option-ScrollWheel methods for zooming.
Inspector Bar
The cluttered, in-your-face inspector system that previously resided in the shelf is gone. We’re now using a vastly simplified inspector bar with detachable popovers instead which means you can keep the shelf area closed, clearing up valuable screen real estate.
Clicking on many of the inspector controls will reveal an iPad-like popover, as shown in the screenshot above. These popover windows can be dismissed by clicking the button on the inspector bar again, hitting the Escape key, or clicking on the background of the idea space. You can optionally drag a popover so it becomes a detached window where it can be placed anywhere on your screen. If you quit Curio with detached popovers still visible then they are restored upon re-launch.

The new inspector bar is also much smarter. For instance, if a table figure is selected then the inspector bar will reveal a table properties button and some handy buttons to add and remove table rows and columns. In that specific case, notice that some table buttons will change their functionality if the Option key and/or Shift key is held down.
In the inspector bar screenshot above you see the following groups of controls: style properties, figure properties, figure size, text properties, table properties & actions.
As always, hover the mouse over a button or control to get a handy tooltip.
Shelf
The shelf area has been consolidated and simplified. In the window screenshot shown above you see the icons for Status, Search, and Library, from left to right. More details below in the Status Enhancements and Library Enhancements sections.
Click a shelf button in the toolbar area to show that module. Click other shelf buttons to activate other modules. If you click the currently active shelf button again the shelf itself will hide.
Preferences
The Preferences window has been drastically simplified. Note that many of the items previously shown in the Preferences window have been moved to actions menus located more closely to their related elements. For example, preferences related to the Status shelf are now listed in the actions popup menu located in the Status shelf itself.
The Preferences window also contains a new area for managing your plug-in repositories, as described below.
Project Properties
The old Project Properties window has been simplified and converted into the new Project inspector popover, as detailed below.
Inserting Figures
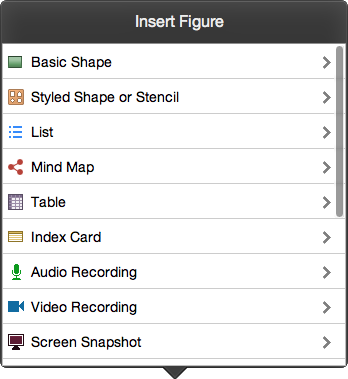
The new Insert button on the toolbar simplifies the process of adding items into Curio. With a single click you can see everything that Curio can add to an idea space: basic shapes, figures, mind maps, video recordings, etc.
Many of the items drill down into a gallery window allowing you easily see available styles and templates. Others drill down to reveal applicable options such as the input settings used for a new video recording. It’s extremely easy to use for beginners yet powerful enough for the experts.
As a shortcut, you can just hit i on the keyboard to bring up the Insert menu. You can even press the first letter of the item you wish to insert to instantly see that gallery. For example, quickly press i then m to immediately see the Insert > Mind Maps gallery.
Perhaps what’s most exciting about the new Insert popover is that it’s easily extensible. We have lots of ideas for new, amazing idea space elements that we’ll be adding in future releases of Curio.
As a note, you can still insert many items instantaneously, such as mind maps or lists, directly via the Insert menu item.
Easy Sharing

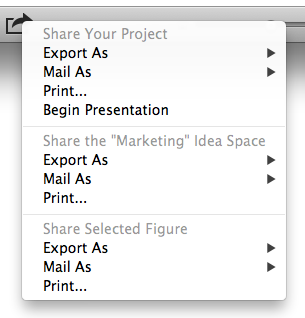
The new Share button is an awesome, easy-to-use method for sharing your Curio creations with others. Clicking it will reveal a popover containing every method for sharing what’s selected in Curio.
- First, options are listed for the currently selected section or project: printing, exporting (as image, PDF, HTML, RTF), mailing (as PDF or project), or presenting.
- Next, options for the currently selected idea spaces: printing, exporting (as image, PDF, HTML, RTF), or mailing (as PDF or project extract).
- Last, options for the currently selected figures: printing, exporting (as image, PDF, RTF), or mailing (as PDF). Based on the types of figures selected you may see additional options such as CSV exporting for tables and OPML and MMAP for mind maps.
Status Enhancements
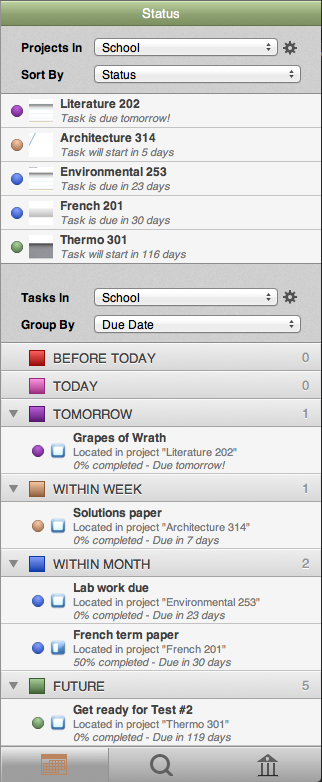
The much improved Status shelf has been heavily reworked and integrated with functionality from the old Project Center so with one glance you can check the status of your projects, at the top of the shelf, and your to-do tasks, located at the bottom.
Projects
- The projects area at the top of the shelf has been significantly improved over the old Project Center with new sorting techniques.
- The creation, modification, and removal of project categories is much more straightforward and less problematic. Note these categories are also used to organize the Project Gallery accessible via the Projects toolbar button.
- Preferences specific to Status are now accessible via the status items actions menu.
Tasks
- The tasks area and its background operations have been re-written to be more robust.
- The tasks list has been improved with the addition of percentage complete icons for faster at-a-glance checks.
- You can also click the action button in the tasks area to get an RTF export of the currently displayed task items either sent to the clipboard or to a specified file.
Colors
- Status due/starting colors have changed to red (yesterday), magenta (today), purple (tomorrow), brown (this week), blue (this month), green (future).
- The icon shown in the toolbar for the Status shelf is colored to alert you if items are due soon in the current project.
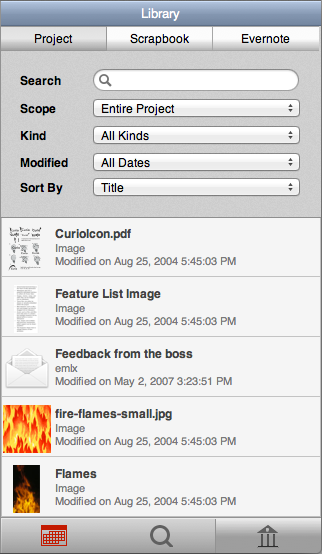
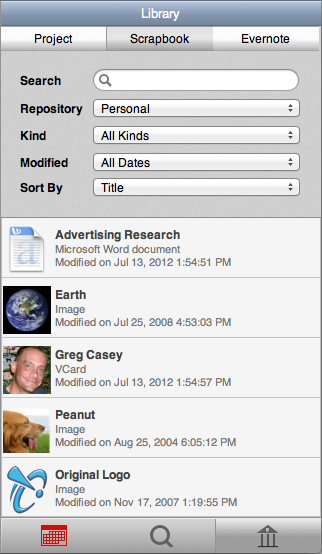
Library Enhancements
The new Library shelf now contains three tabs: Project, Scrapbook, and Evernote, which neatly map to your local, global, and cloud-based repositories of assets. The Project tab replaces the old Library splitview found in earlier Curio versions.
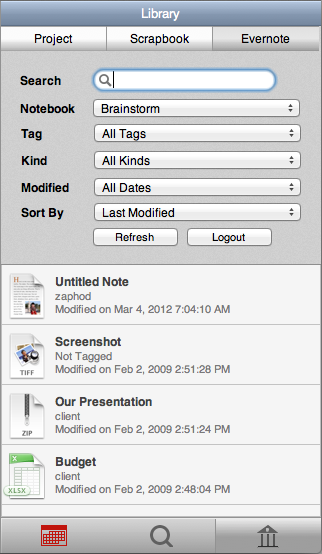
Evernote Enhancements

On November 1, 2012, Evernote will require that all third party apps, such as Curio, access the Evernote cloud using a new OAuth authentication process. Any third party apps using the traditional sign-in mechanism to the Evernote cloud will be unable to login at that time.
With this in mind, Curio 8 has been updated to use Evernote’s new login technique so you can continue to access your Evernote cloud notes for easy drag-and-drop into Curio.
Additional Tweaks
- We’re now linking to the very latest Evernote API library.
- Curio’s Evernote-related code has been cleaned up and made much more robust.
- The Evernote view itself matches the look and style of the Project library view and the global Scrapbook library view.
- New status lines on Evernote items indicate which items are being downloaded.
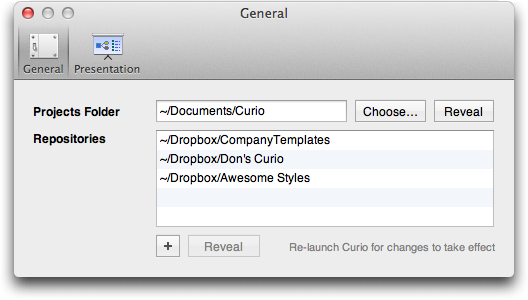
Shared Repositories
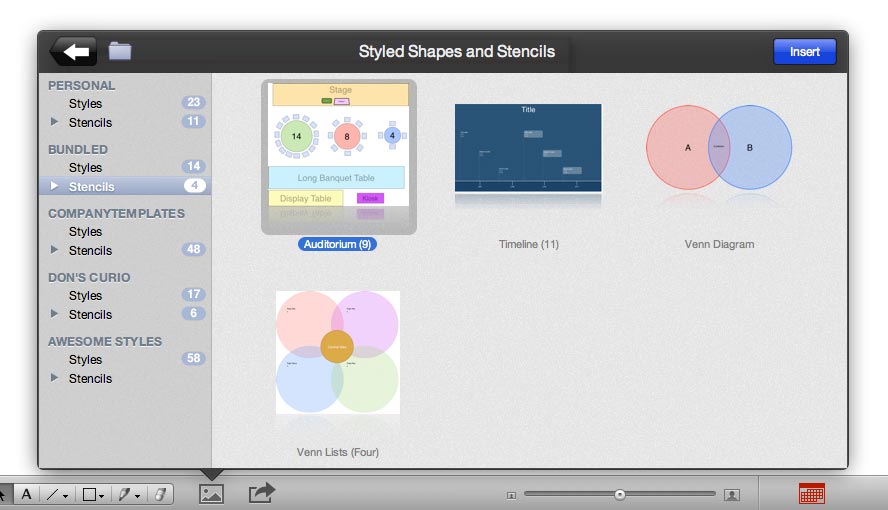
Curio now supports a powerful, extensible repository system.
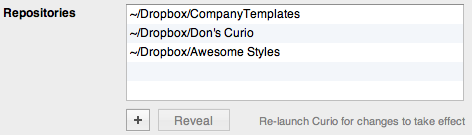
A repository is a folder structure that contains resources such as project templates, idea space templates & styles, figure stencils & styles, color swatches, external document templates (for Insert > Instant Document), HTML export templates, and Sleuth modules.
Curio includes a bundled repository and your personal repository is automatically created in ~/Library/Application Support/Curio/Repository as you create and save personal styles and templates.
Copying your repository to a publicly available server, such as a shared Dropbox folder or network server, allows you to share your resources with others. They simply need to add an entry pointing to that repository in their Preferences window, re-launch Curio, and all of your styles and templates will appear in the appropriate galleries and popups.
This is a wonderful and powerful way to share resources with students, colleagues, and friends, as users can add as many repositories as they wish.
Organizer Documents
As mentioned above, the Organizer can now contain much more than idea spaces and folders thus becoming a more versatile binder of notes and documents.
Drag one of the following files directly to the Organizer to make it available for viewing and editing (if appropriate) within the full bounds of the Curio window.
- RTF, RTFD, or plain text documents — Upon viewing, the inspector bar will reveal the appropriate font and text controls.
- Image files such as JPEG, PNG, and TIFF files.
- PDF files — Upon viewing, the inspector bar will reveal PDF page and annotation controls.
- Web links dragged in from your browser — Upon viewing, the inspector bar will reveal web surfing controls.
All dragged-in files will be embedded unless Option is held forcing the creation of an alias.
Changes made to editable documents will be saved automatically when you switch to another item in the Organizer or when you close the project. Renaming the title in the Organizer will rename the underlying file as well, if embedded.
One important note is that these Organizer documents cannot be printed, exported, or presented from within Curio. The Organizer is simply acting as a binder to collect these documents in your project. However, you can right-click on the item in the Organizer to open or reveal the file in the Finder using the context menu.
As a note, the Add button on the toolbar can be used to insert a blank rich text document to the Organizer so you can quickly take notes.
Organizer Filter Bar

A handy filter bar can be revealed by clicking on the little magnifying glass icon in the Organizer header.
A small pane appears under the Organizer where you can filter the contents of the Organizer by one or more criteria:
- By last modified date,
- By label,
- By tag,
- By title.
For instance, you can use the filter bar to show all idea spaces modified in the past 2 weeks; or all with a the label "Needs Client Approval"; or tagged with the "Important" tag; or with a title containing the word "lecture".
While a filter is active many Organizer options such as drag-and-drop moving are temporarily disabled until the filter is cleared.
On a related note, the new right-click popup menu for Organizer items, and the new meta inspector popover for Organizer items, have been significantly improved to encourage the use of labels.
Idea Space Split View
By incredibly popular request, Curio now supports a splitter in the main viewing area.
Hold down the Option key and click on an idea space or other Organizer item to open it in a split view on the right-side of the window.
You can also configure the split to be either horizontal or vertical via the View menu’s Set Secondary View Below or Set Secondary View On Side items. As a shortcut, Option-clicking on the splitter button in the Navigator Bar can also switch the split layout.
Navigator Bar
In the upper-right corner of the window you’ll find a new navigator bar for moving around your project.
Splitter
The splitter button is used to open up or close the secondary idea space split view. Option-click on this button to switch the secondary view between the side-by-side and above-below layouts.
Bookmarks
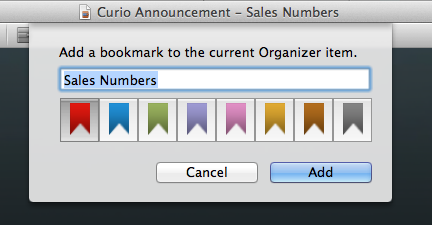
The bookmarks popup button can be used to create bookmarks to easily jump to points within your project. You can either create a bookmark to an Organizer item such as an idea space, or you can create a bookmark figure. A bookmark figure is a positionable figure which is placed into the current idea space and is useful if you want to mark a specific location within an idea space.
Both bookmarks and bookmark figures can be named and assigned one of eight colors for quick identification. All bookmarks are listed in the bookmarks popup in the navigator bar and can either be sorted by name or color.
To jump to a bookmark or a bookmark figure simply select the item in the bookmarks popup.
Option-clicking a bookmark figure’s adornment will cycle through the available bookmark colors.
To remove a bookmark, choose Remove Bookmark from the bookmarks menu. To remove a bookmark figure, select it on the idea space and press Delete.
Navigator
The navigator is a popup display showing the complete hierarchy of the current section or project so you can select and instantly jump to another Organizer item. In many cases you can leave the Organizer hidden and simply use the Navigator popup instead.
Previous/Next
The previous/next buttons are available to move to the previous or next item in the Organizer. If you hold Command down then the buttons change to indicate that clicking will move you to the first or last item in the Organizer. If you hold Option down then the buttons change to indicate clicking will move you backwards or forwards in history if you’ve been jumping around your project in non-sequential order.
Project Properties
The new project inspector replaces the old project properties window and includes items such as print margins and a project password.
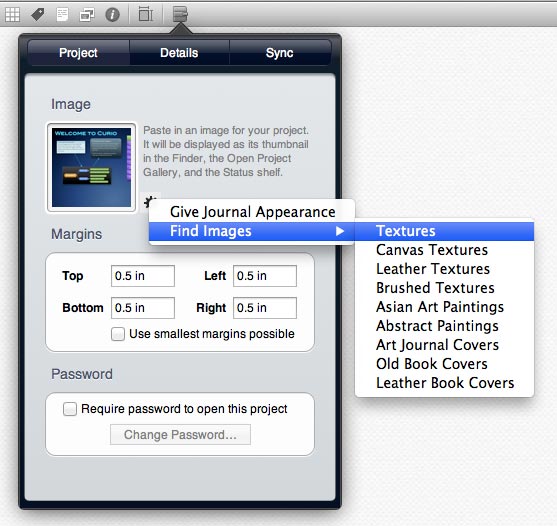
Project Image
You can replace the default project preview with an image of your choosing which will be used as the project thumbnail in the Finder, the Open Project Gallery window, and the Status shelf.
New in Curio 8 is a helpful actions popup menu next to the project image well. Here you will find quick access to popular textures and sample images via Google Image Search which you can copy and paste into the project image. You will also find an option to apply a journal appearance overlay complete with black bookmark and curved corners.
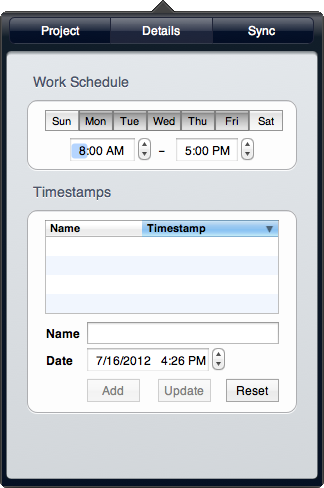
Project Work Schedule
Curio now allows you to set a project-specific work schedule including work days and daily start & end times for date calculations based on durations. Previously Curio only supported a global schedule that had to be shared between all projects. This made it difficult to support home and work projects, for example.
Calendar and Reminder Syncing (aka iCal Syncing)
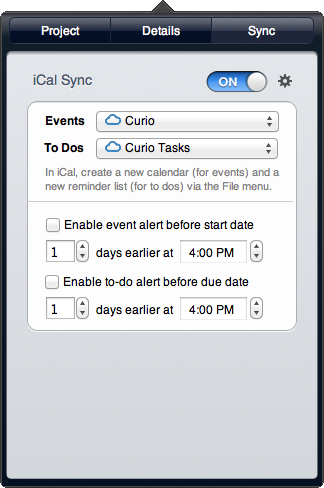
Calendar and Reminder syncing has been greatly improved with support for iCloud calendars and reminders.
Instead of creating the calendars for you, Curio simply allows you to specify the calendar to use for your events and the reminder list to use for your to-do’s. This means you can create calendars all set up for iCloud syncing and Curio will simply populate them with task information.
Note that iCal under Lion and Calendars+Reminders under Mountain Lion now requires separate calendars for events and for to-do’s (aka reminders), see this BusyMac blog post for more information.
In Lion’s iCal, create your new sync calendars by choosing New Calendar and New Reminder List from the File menu. iCal will require that they have different names.
In Mountain Lion this process is a bit different since the new Calendar app handles events and the new Reminders app handles tasks. So, in Calendar you’ll choose File > New Calendar and in Reminders you’ll choose File > New Reminder List. The names you enter will still have to be unique even though they are separate apps.
You can either make project-specific calendars or a common calendars for all your Curio projects. For example, you could create a Curio calendar and a Curio Reminders reminder list that you share with all your projects, or you can create project-specific Curio ProjectX and Curio ProjectX Tasks calendars.
There’s also a new preference you can set via the actions popup menu asking Curio to prefix the project name onto each synced task item. So, if you have an item called "Prepare budget" in the "Pepsi" project, the resulting exported item will be called "Pepsi - Prepare budget".
PDF Views
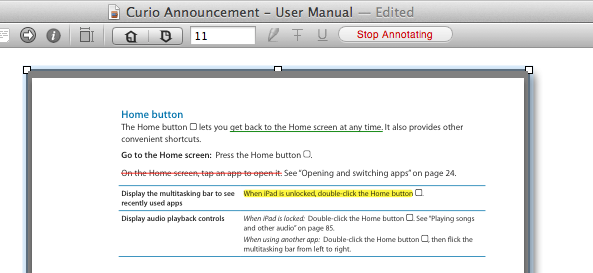
Selecting a PDF figure, or a PDF stored directly in the Organizer, will reveal a new PDF page navigation and annotations bar in the inspector bar area. Using these controls you can step backwards or forwards through the PDF or enter a specific page to view.
You can also enable annotations by selecting text in the PDF and clicking the new highlight, strikethrough, and underline buttons. These annotations are stored within the PDF document itself and visible in other apps such as Preview.
PDF figures can be resized and repositioned while they are active without having to stop the annotation session.
Web Views
Selecting a WebView figure, or a web link stored directly in the Organizer, will reveal a new web surfing bar up in the inspector bar area so you can control your web browsing experience for that web view. Double-clicking a WebView activates it and begins the web browsing session within the WebView until you stop browsing by clicking the button in the inspector bar.
You can now have multiple live WebView active simultaneously, and these live views can be resized and repositioned without having to stop the browsing session.
Insert YouTube and Vimeo Videos
Curio makes it incredibly easy to grab a YouTube or Vimeo video and stick it into a WebView for easy streaming into your idea space.
Choose YouTube Video or Vimeo Video from the Insert popover and Curio will ask you for the URL to the video and a size for the resulting WebView. Curio will then parse the URL to extract out the actual movie name then turn it into an embed URL. A WebView of the correct size is then created, the embed URL is set, and the resulting WebView is placed on your idea space ready for viewing.
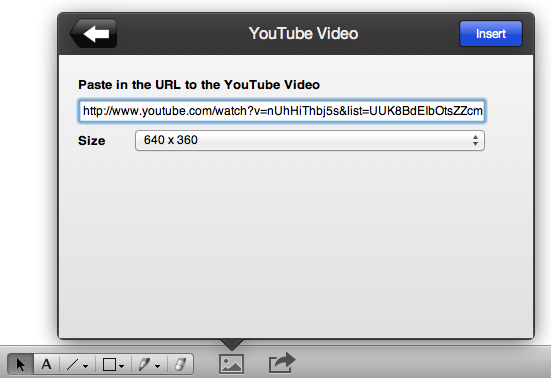
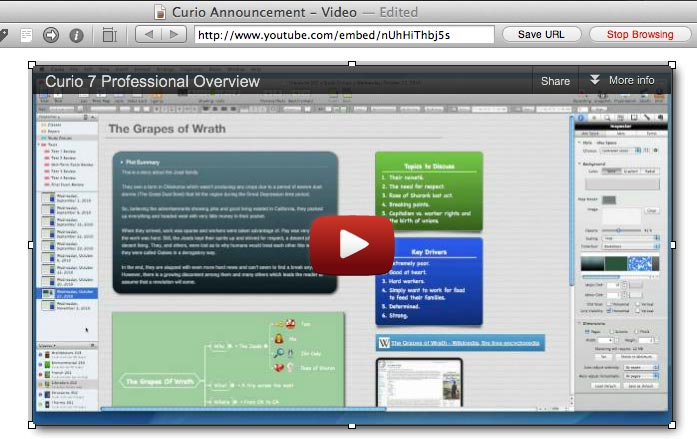
Figure Stacks
Curio now allows you to quickly flip through a stack of figures, such as index cards, arranged on the idea space.
Hold the Command-Option keys down and use your mouse scroll wheel to quickly scan through the stack of figures under the mouse pointer. Note the figures don’t even have to be selected beforehand.
Curio first determines what is the stack by looking at all figures under the mouse pointer and expands that set to include all figures those figures themselves overlap. Then, based on the scroll wheel direction, will flip the figures in their z-order so items are rotated from top to bottom or bottom to top.
This is an absolutely wonderful way to quickly zip through a stack of index cards!
Improved Audio/Video Recording
Curio 8 uses Apple’s new AV Foundation framework to provide extremely robust audio and video recording features.
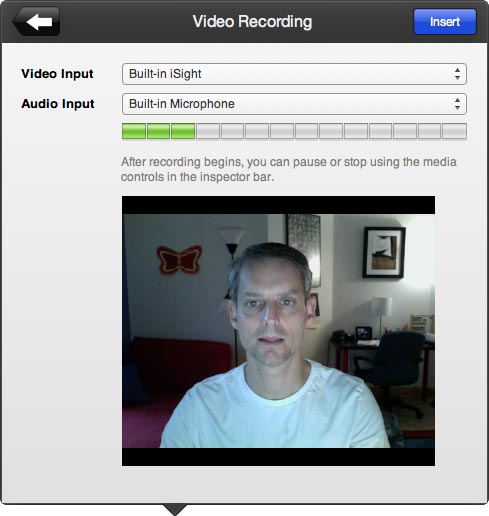
After beginning the recording via the Insert popover you will see a new floating preview window which you can place out of the way (it’ll remember this location) while recording.
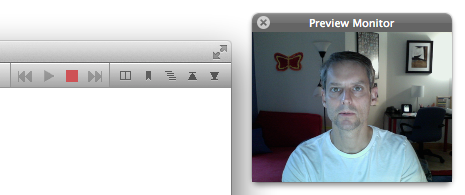
Curio 8 sports a new media bar so the stop button to end the recording is easily accessible even if you wander off to another idea space while taking notes.

The media bar is also used to play back video and audio assets within the idea space.
Smart Colors
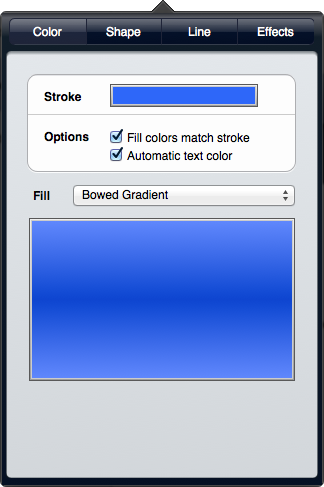
Curio’s Shape inspector popover has a couple of new options for automatic fill and text coloring.
Fill Colors Match Stroke — When checked the fill colors, including gradient colors, will change to match the specified stroke color.
Automatic Text Color — When checked the text color will automatically turn either black or white given the current fill color, even if a complex gradient fill is used.
If you manually choose a specific fill color or text color then the appropriate automatic checkbox is unchecked for you.
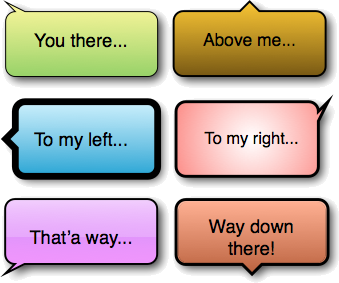
Speech Shape
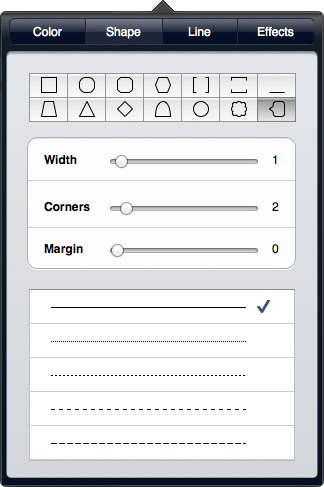
Curio has a new speech shape with an arrow which can be rotated around the figure via the Corners slider in the shape inspector popover.
Tag Enhancements
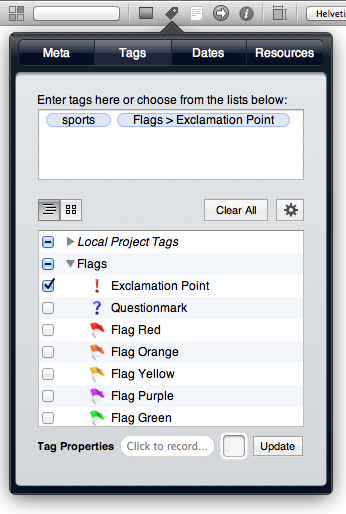
Tagging is much easier with a new tag text entry field with auto completion and refreshed tag picker. Simply start typing the tag name of an existing tag then choose it from the completion list that appears, or continue typing and hit Enter to create an on-the-fly local project tag.
The old, separate tag preferences window has been integrated into the tag display as well so you can add, modify, or remove global tag sets and tags via the actions popup menu in this inspector. Global tags have always supported image and hotkeys and now local project tags support them as well. You can also easily drag multiple images from the Finder into the new tags panel to add image tags to an existing tag set.
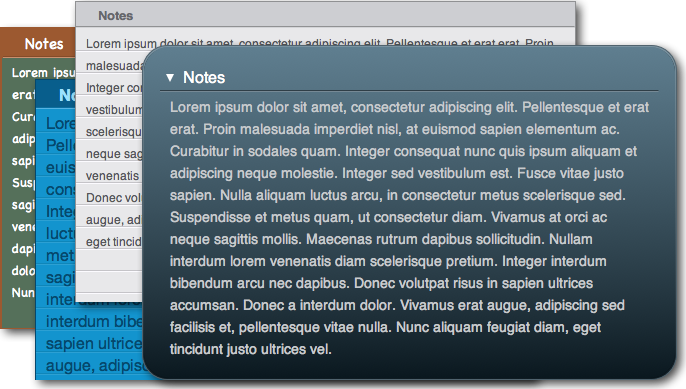
Notes Enhancements
The Notes inspector now reveals a fantastic new detached rich text editor with formatting toolbar and ruler.
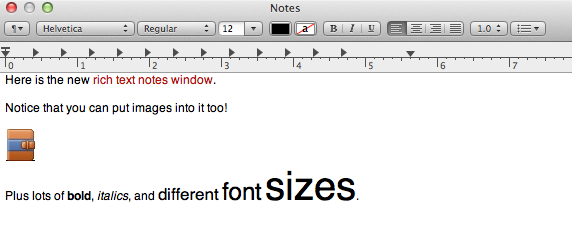
Your notes can now include rich text, images, tabbed text, font styles and sizes. Yippee!
Info Enhancements
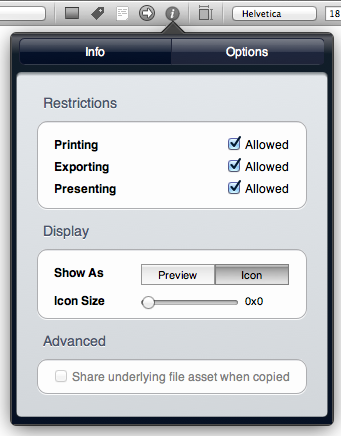
The Info inspector allows specifying more precise permissions such as printing, exporting, and/or presenting.
Resource Enhancements
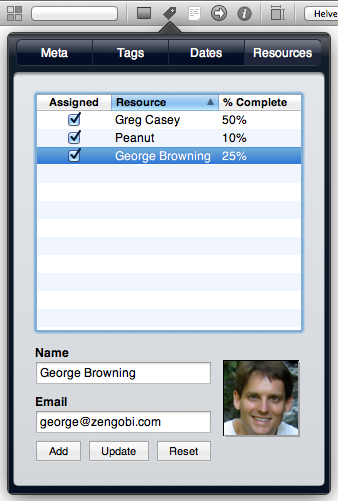
Managing assigned resources is now much easier as you can now add new resources to your project directly within the meta inspector. You can even drag-and-drop contacts from the Apple Contacts app (or Address Book app in Lion) into the resources area to quickly add new resources.
Date Enhancements
The date adornment next to a figure has been modified for full-day events, as follows...
If the due date is at midnight then the adornment reports the day before. For example, say in the date inspector for a figure you set the start date to June 6th at midnight and the due date to June 8th at midnight, thus it a 2-day duration. The resulting adornment will show "6/6 - 6/7" since that looks more appropriate (i.e. you have to work on the 2-day task on 6/6 and 6/7). This change was made so it matches what is displayed in applications such as Calendars or iCal where the task would be displayed from 6/6 to 6/7.
On a related note, we normally show date adornments with just the day and month but no year. If you want the year, we now have a hidden option which you can enable by typing the following in Applications > Utilities > Terminal: defaults write com.zengobi.curio "Display Year In Adornment" -bool YES
Other Meta Enhancements
Ratings
- Option-clicking a rating adornment will cycle through the possible ratings.
- Press 1-5 to assign a rating to any selected figures. Press 0 to make those figures unrated.
Priorities
- Option-clicking a priority adornment will cycle through the possible priorities.
Bookmarks
- Option-clicking a bookmark adornment will cycle through the possible bookmark colors.
List Enhancements
Inspector Bar Buttons
| Normal |  |
List Inspector Popover, Insert Child, Insert Next Sibling |
| Option Pressed |  |
List Inspector Popover, Insert Child, Insert Previous Sibling |
Notice that the Insert Sibling button can change depending on what modifier keys are held down on the keyboard.
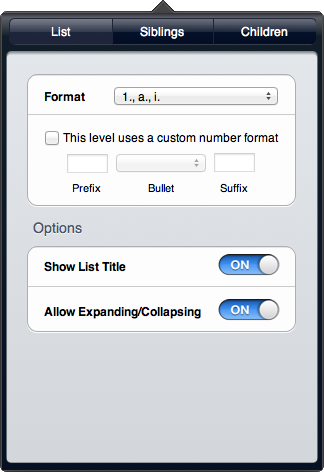
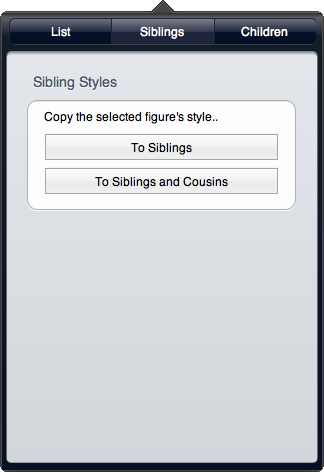
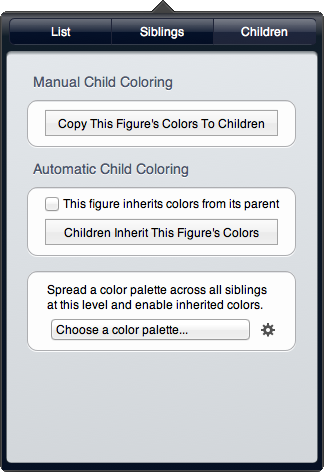
Inspector Popover
When you click on the List Inspector Popover button in the inspector bar you’ll see a tabbed popover appear as shown below.
Less Aggressive Styling
In the past, Curio had a system called "level styles" which was used to automatically apply styles to figures at a given hierarchical level. This was supposed to make styles super-easy but instead became a pain to work with in practice. Basically, we’ve learned that this feature was simply too aggressive, so it has been replaced with a manual method for controlling your styles.
Yes, this means you can finally modify a figure — make it bold, change its color, etc. — and not worry that the style change will be suddenly reflected throughout your list. Also, when modifying your list by dragging branches around we’ll leave their styles as-is and not impose new styles on them.
The only exception to this rule is found in the Children tab shown in the screenshot above. If you enable automatic inherited coloring then changing a parent’s color will obviously change its children’s colors. Hopefully that makes sense.
All that said, Curio will still intelligently style new objects added to your list. For instance, if you are currently editing a figure in a list that’s bold and has a checkbox and you hit Enter to add a sibling then we’ll automatically adopt that same style for your new item. Likewise, dragging a figure from the idea space or the Finder into your list will cause that new item to adopt the style of its sibling.
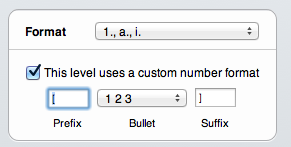
Custom Enumerators
Lists now support custom prefixes, bullets, and suffixes for a given hierarchical level.
Better RTF Exporting
Rich text and plain text exporting of lists now include the prefix enumerator with the output. Also, for rich text exports, the resulting RTF is compatible with Apple’s TextEdit allowing you to modify the prefix enumerators within TextEdit using the prefix popup in their ruler.
Mind Map Enhancements
Inspector Bar Buttons
| Normal |  |
List Inspector Popover, Insert Child, Insert Next Sibling |
| Option Pressed |  |
List Inspector Popover, Insert Child, Insert Previous Sibling |
Notice that the Insert Sibling button can change depending on what modifier keys are held down on the keyboard.
Inspector Popover
When you click on the Mind Map Inspector Popover button in the inspector bar you’ll see a tabbed popover appear as shown below.
Less Aggressive Styling
As stated above in the List Enhancements section, Curio’s styling is much less aggressive. Read the details above for more info.
Mind Map Boundaries
Curio mind maps now support boundaries. A boundary is a colored area that encloses a mind map parent figure and all of its children.
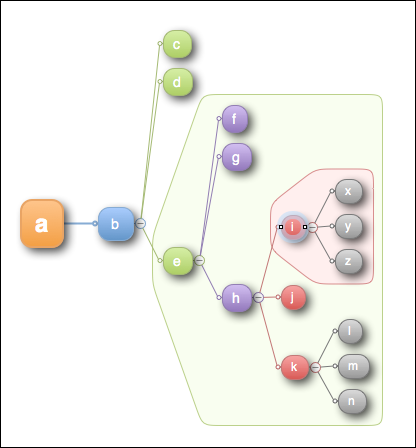
Selecting a parent item on the mind map and turn on the Draw Branch As Boundary option in the mind map popover inspector and the boundary shading will be displayed.

The color of the boundary is automatically determined based on the color of the parent figure itself.
Note that boundaries can contain other boundaries if you wish.
Mind Map Relationship Lines
Curio now supports much smarter snapping lines within collection figures which means mind map relationship lines are easier to draw.
Table Enhancements
Inspector Bar Buttons
| Normal |  |
Insert row above or column before while keeping table size constant |
| Shift Pressed |  |
Insert row above or column before while growing table size as needed |
| Option Pressed |  |
Insert row below or column after while keeping table size constant |
| Option-Shift Pressed |  |
Insert row below or column after while growing table size as needed |
The buttons, from left to right, are Table Inspector Popover, Insert Row/Column, Remove Row, Remove Column. However, the insert buttons can change depending on what modifier keys are held down on the keyboard, note the blue coloring and arrow changes when you press a modifier key.
Inspector Popover

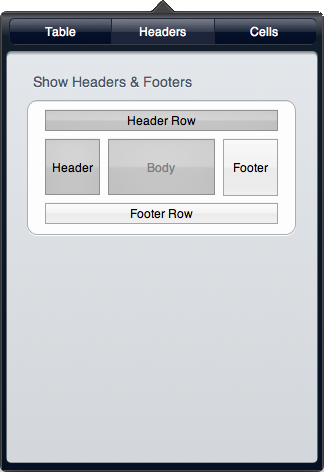
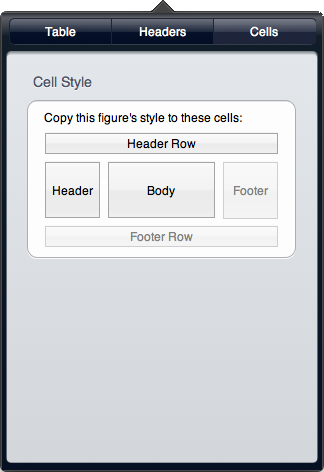
Less Aggressive Styling
Curio’s tables are now much less aggressive when you place items in cells. It will no longer override cell styles unless you manually apply a new table style or force a style change via the new Cells tab.
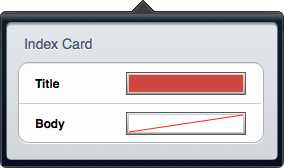
Index Card Enhancements
Inspector Bar Buttons
 |
Index Card Popover |
Inspector Popover
Text Highlighting

The text background color well (aka highlight color) in the inspector bar now remembers the last used color even between launches. Hold the Shift key and that color well will show the previously-used color — we default it with a nice light-yellow color — then clicking the button will apply that color to the new selection.
As always clicking the color well without holding Shift will show the normal color matrix so you can pick a standard color, and Option-clicking the color well will reveal the Apple Colors panel so you can choose any color.
Highlighting text is now super-easy and fast!
Gesture Handling
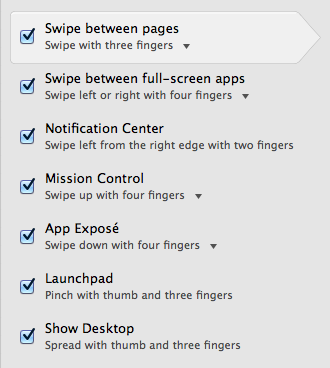
System Preferences
You’ll need to make a change in System Preferences so that Curio can actually receive 3-finger swipes, otherwise the Mac’s system receives them instead. Go into System Preferences > Trackpad > More Gestures and make sure your settings match those shown here.
In Gallery Windows
- Pinch/expand zooms the gallery (as does Option-ScrollWheel).
In Idea Spaces
- Pinch/expand zooms the idea space (as does Option-ScrollWheel).
- 3-finger swipe up/down goes to the previous/next Organizer item.
- 3-finger swipe left/right goes backwards/forwards in history.
In Presentation Mode
- Pinch/expand enables or disables scaling.
- 3-finger swipe up/down goes to the previous/next Organizer item.
- 3-finger swipe left/right goes backwards/forwards in history.
Pens and Brushes
Curio 8 supports a new smoothing algorithm to take care of the jaggies that used to appear when sketching.
Also, Curio’s sketching tools have been updated to work correctly with new retina displays. The canvas itself is still non-retina for maximum project compatibility between retina and non-retina devices and for reduced memory requirements.
Keyboard Shortcuts
- To show/hide the Organizer you now press Command-0.
- To show/hide the Shelf press Command-Option-0.
- As before, Command-F will show the search shelf and set focus on the search field. What’s new is that, after a search is performed and is now active, doing another Command-F will cancel the search.
Window Restoration

Curio is now using the standard OS X method to determine if window states should be saved and restored between launches.
You can enable or disable application window restoration via System Preferences > General then look at the Restore windows when quitting a re-opening apps checkbox in Lion or Close windows when quitting an application checkbox in Mountain Lion.
On-The-Fly
You can change this option on-the-fly when quitting Curio by holding down the Option key when choosing Quit. Notice that the Quit menu item changes to either Quit and Close All Windows if window restoration is normally enabled by default, or Quit and Keep Windows if window restoration is normally disabled.
Per Application Basis
If you’re like me you want window restoration off everywhere except for Curio. Fortunately, that’s easy to do.
Turn off window restoration in System Preferences then type the following in Applications > Utilities > Terminal: defaults write com.zengobi.curio NSQuitAlwaysKeepsWindows -bool YES
The next time you launch Curio you will have to open your project manually but, from now on, when you quit Curio all opened windows will be automatically restored upon relaunch. As a note, if you close all windows and then quit Curio then no windows will be automatically opened when you launch.
Getting Started
The old Welcome To Curio screen has been removed; it used to appear at startup for new users of Curio.
Instead we now automatically open the Getting Started project. This will happen the first time you launch a new major version of Curio so you can read about the new features.
You can also open Getting Started manually via the Help menu.
The Getting Started document has been dramatically overhauled to make it much more user friendly and to discuss the new user interface. Even if you think you know Curio, please take the time to step through the project to learn more tips.
Miscellaneous Tweaks
As usual, a number of miscellaneous features and tweaks have been added as well.
- A new Window > Window On Bottom menu option forces the active Curio window below all other application windows.
- The Arrange > Align menu has been re-organized and renamed to match similar options found in Apple Keynote. In the past the alignment options were only available if you had multiple figures selected, whereby choosing an alignment menu option would align the figures with the other selected figures (ex: all their left edges aligned with each other). Now, the alignment options are available even if just a single figure is selected in which case it will align that figure within the idea space bounds.
- The controls to set the print header and footer have been moved from the Preferences window to the Print dialog and PDF Export dialog, so it’s easier to change them on the fly.
- Presentation mode Core Image transitions are now faster and Quartz Composer transitions no longer have an initial flicker.
- We’re now using a nicer looking Jump Anchor image.
- We now auto-grow idea spaces horizontally and vertically by pixels by default instead of by printed page size.
- Sleuth is now listed under the Window menu instead of the toolbar: Window > Show Sleuth or Command-Option-?.
- WebViews now more reliably take snapshot pictures of their contents for better stored previews for the associated asset figure. These previews are now taken with a slight fade to them so it’s more obvious that the preview is being displayed. As always, double-clicking the WebView will hide the preview and begin the live browsing session.
- Quick render support, where shadows and gradients are temporarily removed when dragging items around, is now off by default since most Macs are fast enough to not need this. You can re-enable by typing the following in Applications > Utilities > Terminal: defaults write com.zengobi.curio "Quick Render Support" -bool YES
CurioService
In the past Curio has always included a CurioService.service helper application. It was automatically installed by Curio into your ~/Library/Services folder. Also, an alias entitled "Save to Curio Scrapbook" was created in the ~/Library/PDF Services folder which simply pointed to the CurioService helper application.
What Is CurioService?
The CurioService handled these events:
- It handled the "Save to Curio Scrapbook" menu choice found under the PDF button in application Print dialogs, allowing users to save a PDF of the current document to their Curio Scrapbook.
- It handled the curioservice:// bookmarklet allowing users to grab a web archive of the current browser window.
- It handled the Services "Add to Curio Scrapbook" menu which appeared if a selection was made in external applications, to add selected files to the user’s Curio Scrapbook.
When any of these events occurred the CurioService would first see if Curio itself was running. If so it would pass the required information to Curio for handling. Otherwise the service itself would handle the event by directly accessing the personal Scrapbook repository of the user.
Sandboxing and the Mac App Store
This approach is now a bit more complicated thanks to sandboxing and the Mac App Store.
Sandboxing is a technique introduced in Lion to restrict the capabilities of applications so rogue or hacked applications couldn’t cause widespread damage. All apps sold through the Mac App Store are now required to be sandboxed, and developers can create sandboxed versions of their apps for sale outside the Mac App Store as well. Of course, developers can continue to create non-sandboxed applications, at least for now. Curio sold through our own Zengobi Store is currently not sandboxed.
Here’s how sandboxing impacts CurioService:
- Sandboxed apps can no longer install items to ~/Library/Services or ~/Library/PDF Services.
- Even if you manually installed CurioService.service, it can’t communicate with a sandboxed app (unless the sandboxed apps asks for a temporary entitlement but, since it’s temporary, we can’t assume that entitlement will be available in the future). So it wouldn’t be able to tell Curio.app to handle events if Curio itself is running.
- For those times when Curio isn’t running, CurioService technically shouldn’t access the personal Scrapbook repository (in ~/Library/Application Support/Curio) since that’s owned by another app, aka Curio. In the world of sandboxing that’s a no-no.
Even for non-sandboxed versions of Curio we’d have to come up with a solution that is reliable in the long term. It may be inevitable that sandbox restrictions will be required in future OS X releases.
Our Solution
To fix this, let’s get rid of the CurioService and just use the Curio application itself!
On first launch, Curio will now automatically install an alias to itself into ~/Library/PDF Services. For Mac App Store versions of Curio, see below.
Now when you choose "Save to Curio Scrapbook" from a Print dialog, Curio itself will be launched and place the generated PDF into the Scrapbook. Yes, Curio will be automatically launched to do this. Interestingly this is also the solution Evernote came up with for their Mac app.
As an added bonus, you can now drag any file to the Curio dock icon even if we’re not running and we’ll stick a copy of the file into the Scrapbook. You can also select some text in most apps and, after holding the mouse pressed for a second, drag the selected text to the Curio dock icon and we’ll store it in the Scrapbook.
Note that if Curio is sandboxed, such as a version sold via the Mac App Store, then you’ll need to create the alias yourself:
- Go the Finder.
- Choose File > New Finder Window and find Curio in the Applications folder.
- Choose File > New Finder Window then hold Option while clicking the Go menu then choose the Library menu item.
- Within that Library window find the PDF Services folder, creating it if it doesn’t already exists.
- While holding down Command-Option drag the Curio application from one window to the PDF Services folder in the other window to create the alias.
- Rename the alias "Save to Curio Scrapbook".
For Upgraders
After launching Curio 8 at least once, you will need to reboot to completely uninstall CurioService from memory!
Curio 8 will automatically remove the old CurioService but, if you have any problems, it could be that Curio didn’t have permission to remove them so check ~/Library/Services and /Library/Services. The old CurioService won’t be able to work with the new asset library file architecture so don’t keep it around!
New Bookmarklet
The curioservice:// URLs have been renamed to curiocommand:// so you’ll need an updated bookmarklet:
javascript:window.location='curiocommand://grabWebArchive/url='+escape(window.location);
To quiclky create this bookmarklet simply drag this link (Copy to Curio) directly to your Safari bookmarks bar (in Safari, choose the View > Show Bookmarks Bar menu item if necessary).
What’s Been Removed
A number of features have been removed from Curio 8 in an effort to fine-tune its feature set:
- Dossiers are gone since idea space and list templates are simply more integrated with the rest of Curio. Existing dossiers are turned into RTF documents and inserted as a new first item in your Organizer.
- Publishing to MobileMe since Apple shut down MobileMe.
- Organizer hoisting in favor of project sections instead.
- Stencils shelf in favor of the Insert Styled Shape or Stencil gallery window.
- Mini-mode.
- Flashlight.
- NoteTaker importer.
- Organizer auto hide.
- Custom appearance themes.
- The jagged shape has been removed because it was too difficult to work with due to its inability to precisely render to a specific bounds. So any existing instances of a jagged shape are automatically replaced with the cloud shape.