Curio 7.0 Release Notes
Release Date
October 18, 2010
Requirements
Curio runs on macOS Leopard (10.5) or Snow Leopard (10.6) on PowerPC or Intel machines.
Feature Availability
Features only available in certain editions will be listed with color-coded words like this [ProStandardCore].
Important Notice To Upgraders
-
File Format Changes
While, for the most part, older projects edited with Curio 7 can be re-opened with earlier versions of Curio, there are several important points to consider.
If you use Curio 7's new Organizer sections or folders then older versions of Curio will not be able to read that project.
And, since flags have been migrated into tags, if you modify a figure's flags in Curio 7 then older versions of Curio will not be able to see those changes.
Thus, to guarantee backwards compatibility it is strongly suggested that you work with new test projects or copies of existing projects if you intend to trial Curio 7 before purchasing.
-
Galleries Displayed by Default
When you click the new idea space, list, mind map, table, or index card toolbar button you will now see the appropriate gallery window by default.
Holding the Shift key down when clicking the toolbar button will bypass the gallery and instantly create a default item.
You can toggle this Shift key logic by unchecking Curio's Preferences > Idea Space > Hold Shift to bypass galleries versus to show galleries.
If unchecked, clicking the toolbar button will instantly create a default item and holding Shift will display the appropriate gallery.
-
Return Key in the Organizer
Within the Organizer, pressing the Return key now renames an idea space instead of creating a new one.
This is similar to the Finder where pressing Return while a file is selected allows you to rename a file.
You can change this default within Curio's preferences.
-
Duplicating Assets
The Library now supports Edit > Duplicate so you can easily make copies of your embedded assets.
Since we support this new feature we have removed the confusing "Share when duplicated" checkbox from the Asset Figure inspector.
-
Calendar Controls
Note that the calendar controls in Curio 7 have been modified so you can change the dates and times directly within the control.
You can still make the popup date picker appear simply by double-clicking the control or holding the Option key down when clicking on the control.
-
Collapsing Mind Maps
Mind maps now shrink when a branch is collapsed.
You can change this default setting via Curio > Preferences > Idea Space > Mind maps shrink as nodes collapse.
-
Multi-touch Gestures
Multi-touch gesture support is now disabled by default if its senses that a Magic Mouse gesture simulation application is active (such as BetterTouchTool).
Some of those applications have issues which could end up corrupting Curio's internal undo stack (due to a beginGestureEvent sent without a corresponding endGestureEvent).
You can always force the enabling of gesture support in Curio's Idea Space Preferences but do this with caution if using an simulator since a corrupted undo stack will prevent undos from working correctly in Curio.
New Features
-
File Format Changes
While, for the most part, older projects edited with Curio 7 can be re-opened with earlier versions of Curio, there are several important points to consider. If you use Curio 7's new Organizer sections or folders then older versions of Curio will not be able to read that project. And, since flags have been migrated into tags, if you modify a figure's flags in Curio 7 then older versions of Curio will not be able to see those changes. Thus, to guarantee backwards compatibility it is strongly suggested that you work with new test projects or copies of existing projects if you intend to trial Curio 7 before purchasing. -
Galleries Displayed by Default
When you click the new idea space, list, mind map, table, or index card toolbar button you will now see the appropriate gallery window by default. Holding the Shift key down when clicking the toolbar button will bypass the gallery and instantly create a default item. You can toggle this Shift key logic by unchecking Curio's Preferences > Idea Space > Hold Shift to bypass galleries versus to show galleries. If unchecked, clicking the toolbar button will instantly create a default item and holding Shift will display the appropriate gallery. -
Return Key in the Organizer
Within the Organizer, pressing the Return key now renames an idea space instead of creating a new one. This is similar to the Finder where pressing Return while a file is selected allows you to rename a file. You can change this default within Curio's preferences. -
Duplicating Assets
The Library now supports Edit > Duplicate so you can easily make copies of your embedded assets. Since we support this new feature we have removed the confusing "Share when duplicated" checkbox from the Asset Figure inspector. -
Calendar Controls
Note that the calendar controls in Curio 7 have been modified so you can change the dates and times directly within the control. You can still make the popup date picker appear simply by double-clicking the control or holding the Option key down when clicking on the control. -
Collapsing Mind Maps
Mind maps now shrink when a branch is collapsed. You can change this default setting via Curio > Preferences > Idea Space > Mind maps shrink as nodes collapse. -
Multi-touch Gestures
Multi-touch gesture support is now disabled by default if its senses that a Magic Mouse gesture simulation application is active (such as BetterTouchTool). Some of those applications have issues which could end up corrupting Curio's internal undo stack (due to a beginGestureEvent sent without a corresponding endGestureEvent). You can always force the enabling of gesture support in Curio's Idea Space Preferences but do this with caution if using an simulator since a corrupted undo stack will prevent undos from working correctly in Curio.
With Curio 7 we have made it even easier to dive in and instantly create something spectacular! New galleries, templates, styles, and stencils plus dozens of new features and enhancements permit you to concentrate on your ideas, notes, and research and use Curio to create effortless, amazing project notebooks.
Project Sections[ProStandard]
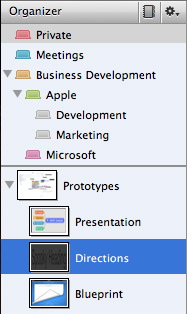 Curio 7 adds project sections to help you organize your larger projects.
What's a section? To reflect a real-world metaphor, if a Curio project is a binder, then a Curio section is a tabbed section within that binder. However, unlike real-world sections, Curio sections can be arranged hierarchically with any number of levels.
A student may have a section for each subject they are taking: Calculus, French, History, Chemistry, etc.
A product manager might create a more complex section hierarchy like this:
- My Notes
-
Development
- Meetings
- Specs
-
QA
- Meetings
- Resources
-
Marketing
- Meetings
- Analysis
-
Sales
- Meetings
- Data
-
Support
- Meetings
- Customer Feedback
Using Sections
Click the Sections button on the top of the Organizer to display the new Sections panel at the top of the Organizer.
Create new sections via the right-click context menu or Organizer menu. You can delete a section using the Delete key. Use the Tab or Shift-Tab key to indent or undent sections, or simply drag-and-drop them into position.
When you click on a section the Organizer is refreshed to only show those idea spaces which belong to that section. Creating new idea spaces will automatically insert them into the current section.
You can use cut/copy/paste to move idea spaces or folders into a section. You can also drag-and-drop those items into a section, holding Option down if you wish to create copies. If you release a drag on top of section then the dropped items will be appended to the end of the section. However, if you pause while hovering over the section then it will automatically open allowing you to place the dropped items into a specific location within that section's idea space hierarchy.
When printing or exporting, you can generally choose between the selected idea spaces or all the idea spaces in the current section. We consider a section a heavyweight division of your project since you can't print or export multiple sections simultaneously.
You will see the section name in several places within Curio such as the title bar (for the current idea space or folder), the Status shelf (for the items listed in the current project), and the Search shelf (for found items).
It's important to note that you aren't required to have a section within your project. You are free to create sections only if you need the additional hierarchical organization.
Organizer Folders
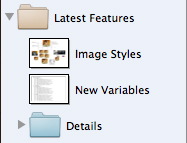 To continue the real-world metaphor started above, if a Curio project is a binder and a Curio section is a tabbed section within that binder, then a Curio folder is a manilla folder within that tabbed section.
Where sections are heavyweight divisions of your project, a folder is an extremely lightweight Organizer grouping.
For example, where a section is perfect for dividing a project into different departments as described above, a folder would be more appropriate when simply grouping a series of related idea spaces.
To create folders right-click in the Organizer or use the Organizer main menu. Use the Delete key to delete folders, Tab/Shift-Tab to indent and undent, and drag-and-drop to rearrange.
Clicking on a folder won't display anything within the main part of the Curio window because there's nothing to display. And, if you click on a folder to print or export it, Curio will automatically assume you want to print or export the contents of the folder.
You can use cut/copy/paste or drag-and-drop to move or copy items into folders (press the Option key while dragging to copy).
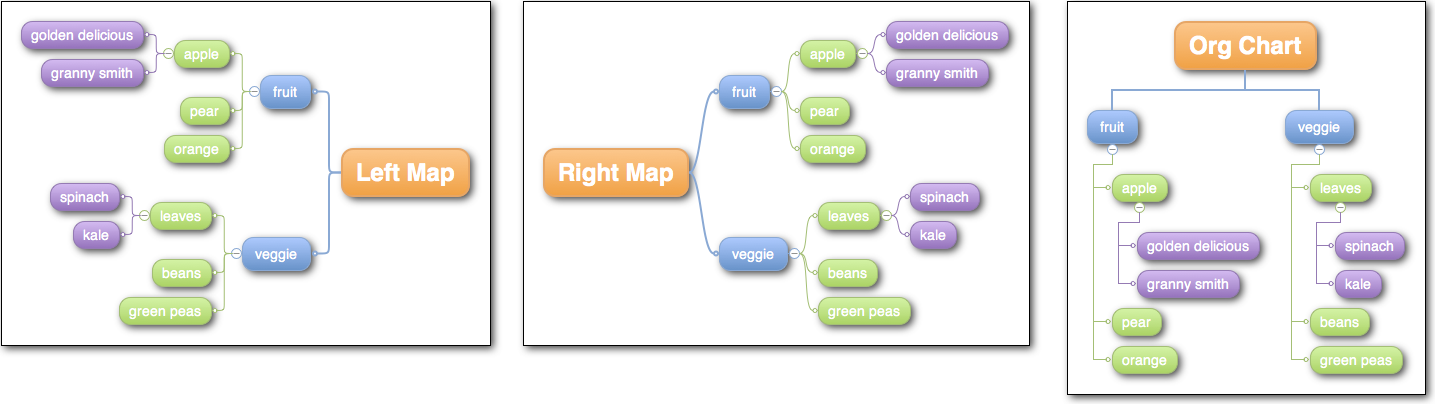
Left Map, Right Map, and Org Chart Mind Map Arrangements
By extremely popular request, in addition to the standard radial map, Curio 7 adds left map, right map, and org chart arrangements to mind mapping! Use the Mind Map inspector panel or simply right-click on the mind map figure to specify the arrangement and line style.
Advanced Tags With Image and Hotkey Support
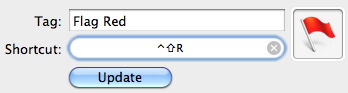 Global tags have gotten quite a bit cooler!
The big news: you can now associate an image with a tag via the Curio > Preferences > Tags dialog. Then once a tag is associated with a figure the tag's image will appear as an adornment next to the figure. When you hover your mouse over a tag's icon then you will see the tag name associated with that image.
There's more: you can now associate a hotkey shortcut with a tag. Make "Home" be ⌃⇧H and "Work" be ⌃⇧W. All user created hotkeys must use the Control-Shift (⌃⇧) modifier keys, and Zengobi will make sure to use other modifiers so we don't step on each others toes.
Tag images and keyboard shortcuts are displayed in the Inspector Bar and the Tags inspector. The Status shelf could already group by tag set and will display tag images if they exist, as well.
Since tags now have associated images, the old flags system is no longer needed. The previously bundled flags are now a bundled tag set called, appropriately enough, "Flags". And, on startup, we'll import all existing custom flag sets that you may have created and turn them into tag sets.
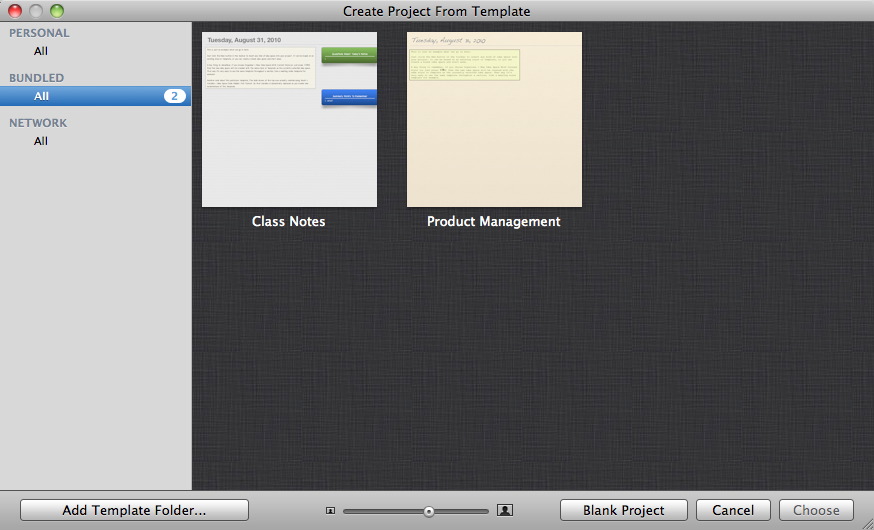
Project Galleries With Bundled Templates
Curio 7 now supports project templates and its new Project Gallery makes using and organizing these templates quick and easy. A project template is essentially a project that you plan to use over and over again. Your project template can contain boilerplate idea spaces, folders, sections, figures, or anything else! Examples include New Client Design Project, Marketing Plan, Course Notes, Lab Notes, etc.
Creating Project Templates
If you'd like to create a project template from the currently opened project, simply choose File > Save As Project Template. Your project should be saved to the ~/Library/Application Support/Curio/Project Templates folder although you can create subfolders under that directory to further organize your templates.
You can also drag-and-drop a Curio project file from the Finder directly to the right-side of the Project Gallery window to copy it in as a project template.
Using the Project Gallery to Create New Projects
Choose the File > New Project menu item and the Project Gallery's Template Chooser will appear.
On the left side of the Galley, the available project templates are organized by Personal, Bundled, and Network groupings. Personal contains templates you create, Bundled contains templates that Zengobi includes with Curio, and Network is an optional repository located on a shared network server at your workplace or school. You define the network path via Curio Preferences.
On the right side of the Gallery, previews for the available project templates within a selected grouping will be displayed. Simply double-click the preview to create a new project with that template. For additional details, press the Spacebar to see a large Quick View preview of the selected template and scroll through its idea spaces. You can use the Delete key to delete selected templates.
You can further organize your personal project templates by creating custom folders on the left side of the Gallery. A project template can only be included in one folder as they reflect the actual folder hierarchy in your ~/Library/Application Support/Curio/Project Templates folder. After creating a new personal template folder, you can drag a template from the right side of the Gallery into a folder to move it. You can also drag a copy of template from a Bundled or Network group into your Personal folder if you would like to make changes to it. To edit a personal template simply right-click on the template and choose Edit Template, or press the Delete key to delete it. You can also double-click on a personal template folder to edit its name, or press the Delete key to delete it.
Note the handy "Blank Project" button at the bottom of the window so you can quickly create a blank project. You can also choose File > New Blank Project menu item to bypass the Project Gallery altogether.
Using the Project Gallery to Open Projects
Choose the File > Open From Gallery menu item and the Project Gallery's My Projects window will appear.
On the left side of the Galley, your personal project categories are listed under My Categories. These categories are identical to those created via the Project Center panel. You will also find several Smart Categories such as all recently opened projects.
On the right side of the Gallery, previews for the projects within the selected category will be displayed. Just double-click a project preview to open that project. For additional details, press the Spacebar to see a large Quick View preview of the selected project and scroll through its idea spaces. To edit a personal template simply right-click on the template and choose Edit Template. You can use the Delete key to delete selected project templates which will move those projects to the Trash.
You can further organize your projects by creating additional project categories on the left side of the Gallery. A project can exist in more than one category, so after creating a category, you can drag a project from the right-side of the Gallery into your "Active", "Senior Year", and "School" categories to associate it with all three categories. You may also right-click on a preview to make these associations. And, you can drag-and-drop a Curio project file from the Finder directly to the right-side of the Project Gallery window to add it to the current category. Clicking on a category name on the left side of the Gallery will only show projects associated with that category. You may also double-click on a category to edit its name, or press the Delete key to delete it.
Note the handy "Open Other" button at the bottom of the window so you can open an existing project using the standard Open dialog. You can also choose File > Open menu item to bypass the Project Gallery altogether.
Idea Space Galleries With Bundled Styles & Templates
Working with idea space styles and templates is now easier and more intuitive than ever thanks to Curio 7's new Idea Space Gallery.

To review, an idea space style defines the look of the idea space including attributes such as grid settings and background color. On the other hand, an idea space template includes not only the look but also any placeholder items such figures, images, and collections. A style is applied to an idea space where a template is simply a copy or instantiation of the original.
Note that while all editions can use idea space styles, only Curio Pro supports idea space templates. [Pro]
Using the Idea Space Gallery
With Curio 7, you can now use our elegant Idea Space Gallery to view, organize, and use your idea space styles and templates.
| Action | Toolbar Button |
|---|---|
| Create an idea space via the Gallery | New |
| Quickly create an idea space with the current style or template | Shift+New |
| Quickly create a blank idea space | Option+New |
Note, you can change the Shift key logic in Curio's preferences if you wish to only show the gallery when Shift is pressed instead.
On the left side of the Galley, the available styles and templates are organized by Personal, Bundled, and Network groupings. Personal contains items you create, Bundled contains items that Zengobi includes with Curio, and Network is an optional repository located on a shared network server at your workplace or school. You define the network path via Curio Preferences.
On the right side of the Gallery, previews for the available styles or templates within a selected grouping will be displayed. Simply double-click the preview to create a new idea space with that style or template. To edit a personal template simply right-click on the template and choose Edit Template. You can also use the Delete key to delete selected personal styles or templates.
You can further organize your personal templates by creating custom tags on the left side of the Gallery. For example, you can drag an idea space template from the right side of the Gallery into the "Favorites", "Papers", and "Work" tags to associate it with all three tags. You may also right-click on a preview to make these associations. Clicking on a tag name on the left side of the Gallery will only show templates associated with that tag. You may also double-click on a tag to edit its name, or press the Delete key to delete it.
Creating Idea Space Styles
To create an idea space style right-click on the idea space in the Organizer or on the background of the idea space and choose "Save As Idea Space Style", or choose the Organizer > "Save As Idea Space Style" menu from the main menu.
Applying Idea Space Styles
If you would like to change the style of an existing idea space then right-click on its background and choose "Apply Idea Space Style...". Then double-click on a preview to use that style.
Creating Idea Space Templates [Pro]
To create an idea space template right-click on the idea space in the Organizer or on the background of the idea space and choose "Save As Idea Space Template", or choose the Organizer > "Save As Idea Space Template" menu from the main menu.
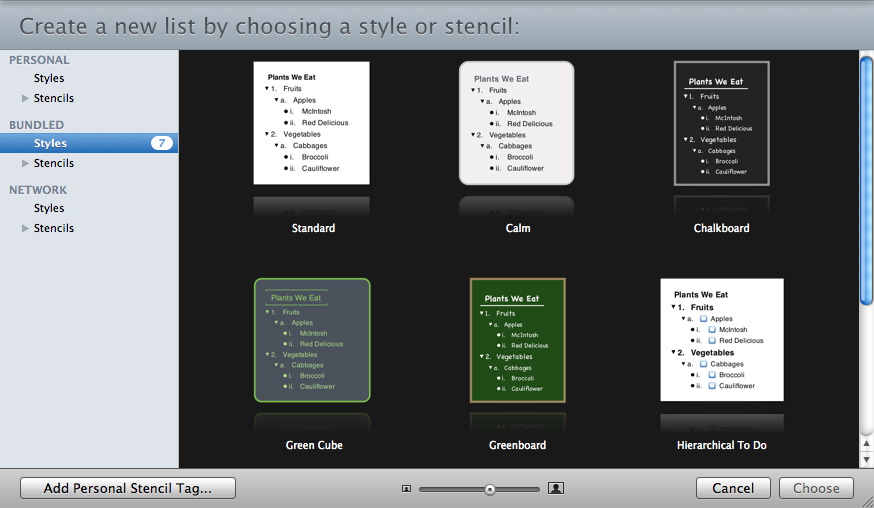
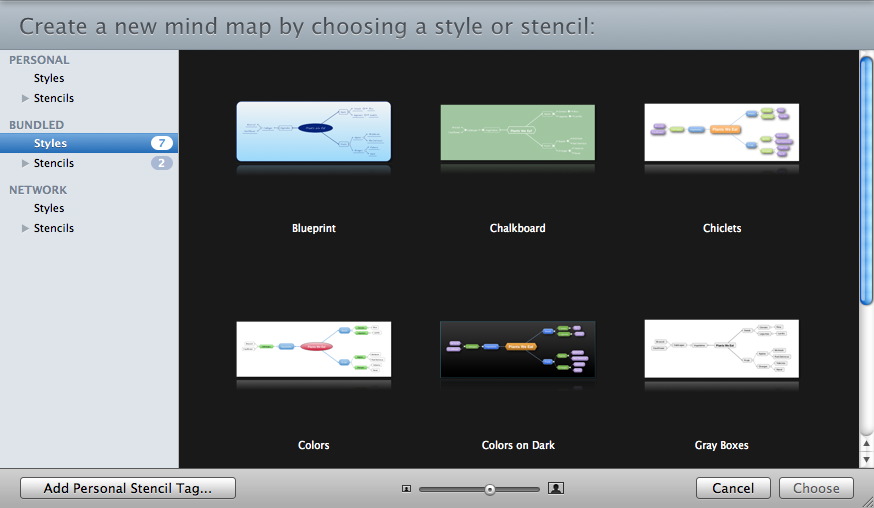
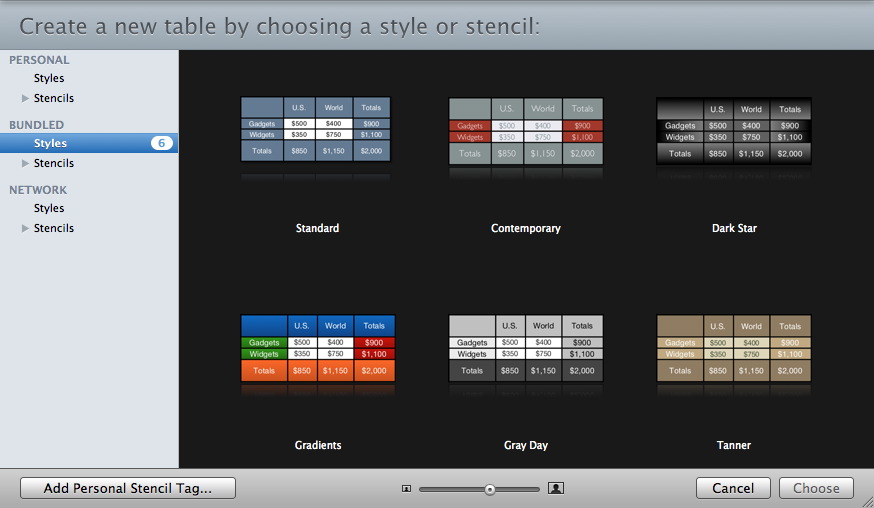
Figure Galleries With Bundled Styles & Stencils
Curio 7 also introduces figure galleries so you can easily use and manage your figure styles and stencils.
To review, a figure style defines the look of the figure including attributes such as colors, fonts, shading, and line style. On the other hand, a figure stencil includes not only the look but also any placeholder items such text or images. A style is applied to a figure where a stencil is simply a copy or instantiation of the original.
Note that while all editions can use figure styles, only Curio Pro supports figure stencils. [Pro]
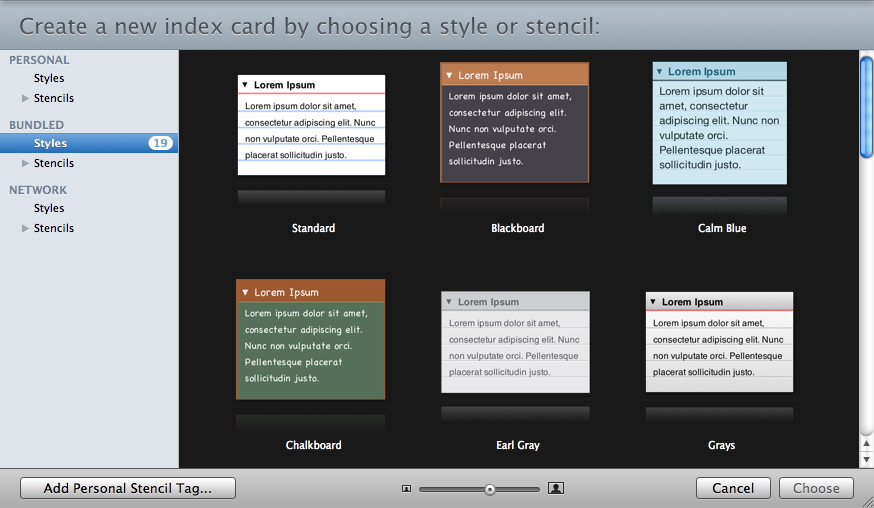
Using the List, Mind Map, Table, or Index Card Gallery
To view the styles and stencils associated with a particular type of collection figure just click the appropriate toolbar button. For example, to bring up the List Gallery simply click the List toolbar button. Note, that if you wish to bypass the gallery and instantly create a default collection figure then hold down the Shift key when you click on the toolbar button (you can change this logic in Curio's preferences).
On the left side of the Galley, the available styles and stencils are organized by Personal, Bundled, and Network groupings. Personal contains items you create, Bundled contains items that Zengobi includes with Curio, and Network is an optional repository located on a shared network server at your workplace or school. You define the network path via Curio Preferences.
On the right side of the Gallery, previews for the available styles or stencils within a selected grouping will be displayed. Simply double-click the preview to create a new collection figure with that style or stencil. To edit a personal stencil simply right-click on the stencil and choose Edit Stencil. You can also use the Delete key to delete selected personal styles or stencils.
You can further organize your personal stencils by creating custom tags on the left side of the Gallery. For example, you can drag your ultimate brainstorming mind map stencil from the right side of the Gallery into the "Favorites", "Brainstorming", and "Design" tags to associate it with all three tags. You may also right-click on a preview to make these associations. Clicking on a tag name on the left side of the Gallery will only show stencils associated with that tag. You may also double-click on a tag to edit its name, or press the Delete key to delete it.
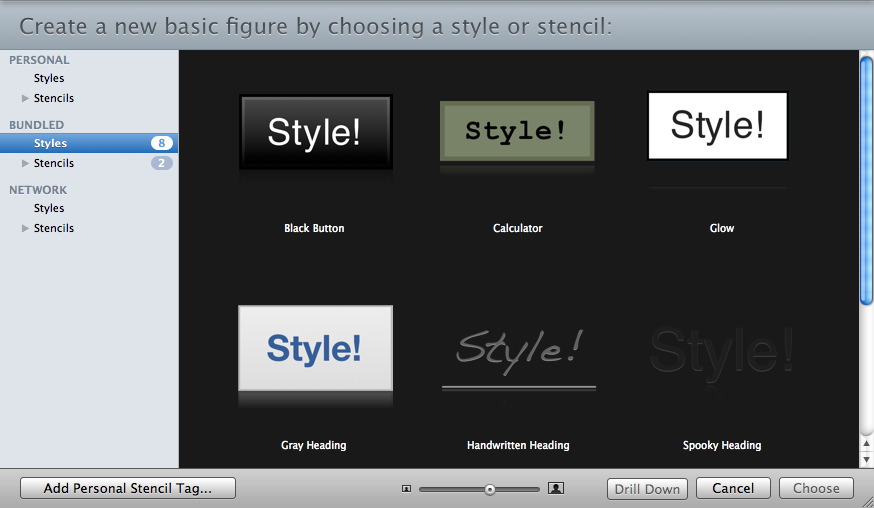
Using the Figures Gallery
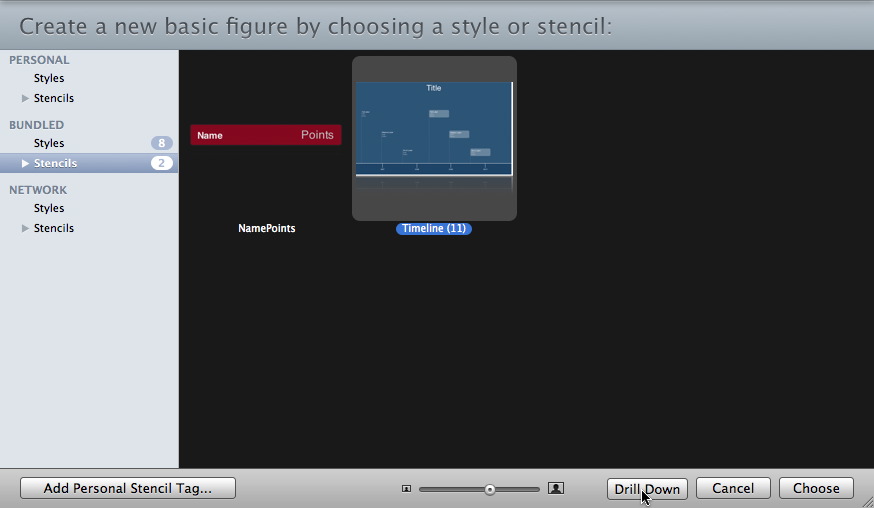
To view your basic figures and stencils that aren't list, mind map, table, or index card collection figures, click the Figures toolbar button.
The Gallery appears showing basic figure styles, plus all non-collection figure stencils in your Personal, Bundled, and Network repositories, including complex stencils which are stencils that contain more than one top-level figure.
If the selected item is a complex stencil you can either choose the entire stencil for your idea space, or click the Drill Down button to choose a specific figure within the stencil. Note that you may still find the Stencils shelf useful if you need to drag-and-drop lots of items from a complex stencil into your idea space.
Creating Figure Styles
To create a figure style right-click on the figure or collection figure and choose "Save As Style".
Applying Figure Styles
If you would like to change the style of an existing figure or collection figure then right-click on it and choose "Apply Figure Style...". Based on the selected figure, a Gallery window will appear showing you applicable Basic Figure, Image, Line, Mind Map, List, Table, or Index Card styles along with their previews. Then double-click on a preview to use that style.
Creating Figure Stencils [Pro]
If you'd like to create a stencil from an existing figure or collection figure then right-click on it and choose "Save As Stencil".
Creating Complex Stencils [Pro]
What if you'd like to create a stencil containing more than one top-level figure?
Say you have a Landscaping stencil where you have dozens of figures representing different types of flowers, shrubs, trees, rocks, and paths. Those could each be individual stencils perhaps tagged with a stencil tag to group them together. However, then they lose the visual grouping that existed in your carefully arranged idea space with flowers in one area, shrubs in another, etc. So, turn the whole thing into a complex stencil where all of those items are added as arranged into a single stencil. Then you can simply use the Drill Down button in the Figures Gallery, or double-click the stencil in the Stencils shelf, to drill into the stencil to find a specific contained figure.
You can create a complex stencil using one of these techniques:
- Multi-select several figures on the idea space, then right-click and choose "Save As Complex Stencil".
- To save everything in your idea space, right-click on the idea space in the Organizer and choose "Save Contents As Figure Stencil" or choose the Organizer > "Save Contents As Figure Stencil" menu from the main menu.
- Drag the idea space from the Organizer into the Stencils shelf.
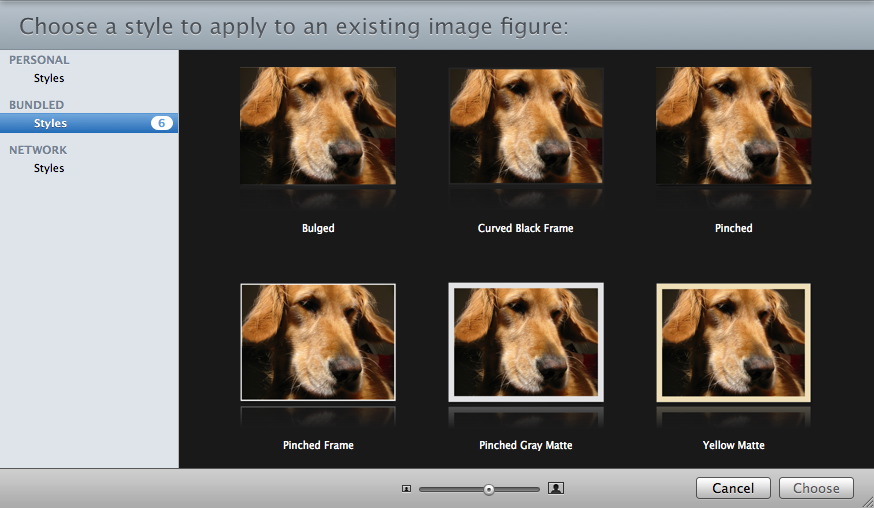
Image Figure Styles
Image figures, or technically all figures which show a preview, now have their own style group called Image Figures to separate their styles from Basic Figures. Even better, Curio includes several bundled image styles to make your images and photos really pop!
To create an image figure style, just change any attributes of an existing image figure such as border, margin, pen color, fill color, and shadowing, then right-click and choose Save As Image Figure Style.
To apply an image figure style, right-click on an image or photo on your idea space and choose Apply Image Figure Style to choose a style from the Gallery.
Time Support for Start and Due Dates[ProStandard]
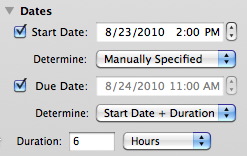 By default, a time of 12:00 midnight is associated with your start and due dates.
However, with Curio 7 you can now change the time to a specific start and due time.
By default, a time of 12:00 midnight is associated with your start and due dates.
However, with Curio 7 you can now change the time to a specific start and due time.
All times are considered floating times, therefore they are time zone independent. This means that a task ending at 4:00 PM will end at that time regardless of where you were when you created the task or where you are currently.
Minutes, hours, and years have been added as valid duration units. So, for example, you can now specify that a task will take 30 minutes to complete.
New Preferences
 In Curio's Preferences you can now specify working days and working times.
The default is Monday - Friday, 8:00 AM - 5:00 PM.
In Curio's Preferences you can now specify working days and working times.
The default is Monday - Friday, 8:00 AM - 5:00 PM.
Automatic Date Calculations
All of Curio's automatic date calculation routines have been updated to support the hour and minute granularity and the new flexible working days and times.
They are also smart about ignoring times when appropriate: if the start time is outside of your working times then it allows the end time to be outside the working times, as well. For example if you set up a task to begin on Monday at 12:00 midnight and ask it to be 6 hours long then it will end at 6:00 AM. However, if the 6-hour task was set to begin at Monday at 2:00 PM then it will end at 11:00 AM on Tuesday since the working times will be considered.
Curio's duration display is now much smarter as well. If a due date is determined by some means other than start date plus duration then Curio will now calculate and display the duration and the most appropriate duration units, automatically. For example, if you manually change a due date, then the duration and duration units will change from hours to days to weeks automatically, based on whatever's most appropriate.
UI Changes
Note that the calendar controls in Curio 7 have been modified so you can change the dates and times directly within the control. You can still make the popup date picker appear simply by holding the Option key down when clicking on the control.
iCal Syncing
When syncing with iCal if an event begins and ends at 12:00 midnight then it is considered an all-day event, otherwise the specific times are used when creating the iCal event.
Curio communicates with iCal through Apple's CalendarStore framework. Apparently the current system time zone is forced upon events coming over via CalendarStore and there's no way to change it to floating programmatically, even though it supports floating events via the iCal user interface. This means that if you set a Curio figure to a 4:00 PM floating due date and you happened to be in the Eastern Standard Time zone then it will be created as 4:00 PM EST in iCal. If you fly to California and change your Mac's time zone to Pacific Standard Time then the iCal event will suddenly be due at 1:00 PM. If you frequently change your computer's time zones then you may need to use Curio's Reset Calendar to force iCal to adjust to the correct times.
New iCal Sync Options Plus Support for Start and Due Date Times[ProStandard]
In addition to times being supported for start and due dates, as mentioned above, Curio 7 adds some new iCal sync options in the Project Properties window.
By default, any Curio figures with a start date automatically turn into iCal events. You can change this so they are created as iCal to-do items.
Also, by default, any Curio figures with only due dates automatically turn into iCal to-do items. You can change this so they are created as iCal events. If the item has a due date time of midnight it will be creates as an all-day event, else the time is used for the event.
Of course if the items doesn't have a start or due date then it has to be an iCal to-do item since events require dates.
Collapsible Index Cards
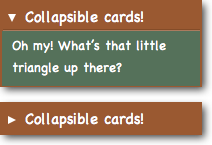 You can now collapse and expand index cards simply by clicking on the little expand/collapse disclosure triangle next to the index card's title.
Like list items, you can also just press the spacebar when the index card is selected to toggle its expand/collapse state as well.
You can now collapse and expand index cards simply by clicking on the little expand/collapse disclosure triangle next to the index card's title.
Like list items, you can also just press the spacebar when the index card is selected to toggle its expand/collapse state as well.
Customizable Shadows, Advanced Shadow Effects, and Text Shadows
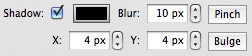 By extremely popular demand, you can now specify the shadow color, blur size, and x and y offsets.
This allows you to create any number of special shadow effects, including those which follow the CSS3 text-shadow and box-shadow style formatting options.
By extremely popular demand, you can now specify the shadow color, blur size, and x and y offsets.
This allows you to create any number of special shadow effects, including those which follow the CSS3 text-shadow and box-shadow style formatting options.
Advanced Shadow Effects
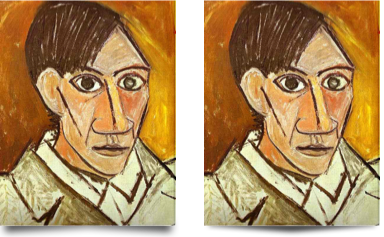 We also added support for a couple of new advanced shadow effects appropriate for photo and other images.
- A pinched shadow looks like the figure has been placed on a tabletop where only the bottom corners of the figure are slightly raised from the surface, like you're pinching the edges and lifting them up.
- A bulged shadow, is the opposite of a pinch: here the bottom center of the figure is slightly raised from the surface, like you're creating a bulge in the center of the photo.
Both of these effects are in contrast to a normal shadow which looks like the entire figure is floating off the surface.
These effects are only available for filled, rectangular shapes with no curved corners. After enabling an effect you can adjust the margin, pen border size and color, and fill color settings to make a nice frame and matte for your photo or image.
Text Shadows
 The figure's shadow attributes described above are applied to the figure itself if the figure is filled, otherwise they are applied to any text within if the figure is unfilled.
But, until now, you couldn't have both a shadowed figure and shadowed text.
Now you can!
The figure's shadow attributes described above are applied to the figure itself if the figure is filled, otherwise they are applied to any text within if the figure is unfilled.
But, until now, you couldn't have both a shadowed figure and shadowed text.
Now you can!
Curio 7 introduces text shadow controls including color, blur, x & y offsets which are completely independent of the figure's shadow values, so you can have both figure shadows and text shadows for amazing effects!
Advanced Gradients and Advanced Fills
4-Point Axial Gradients for Figures
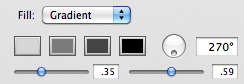 Sure your basic gradient has a start color and an end color and looks just fine.
But when you add up to two more stop points to the mix you can make some amazing gradients!
Sure your basic gradient has a start color and an end color and looks just fine.
But when you add up to two more stop points to the mix you can make some amazing gradients!
4-Point Radial Gradients for Figures
You can now fill your figures with radial gradient fills. And, just like with axial gradients, you can specify up to four color stop points when defining your gradient.
Advanced 1-Click Figure Fills
Next, Curio 7 adds a couple of easy 1-click advanced fills where you choose just a single color and Curio will automatically create a super-fancy combination of gradients to perform the fill:
- Button: a smooth central gradient with inset border gradients similar to the buttons demonstrated within Apple's MobileMe web interface.
- Glossy: a beautiful glossy gradient with highlighting to make your shapes jump off the page demonstrated at Cocoa With Love.
Here are some examples:

Idea Space Background Fills
Idea space backgrounds now support 4-point axial or radial fills, as well!
Richer Text Figures
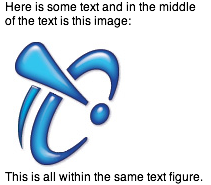 Text figures can now include embedded images!
This is a very popular request and means that you can finally copy and paste a selection of images and text from an application such as Safari and then paste the result as a single text figure within Curio, instead of having the images separated into separate asset figures. Note that we are limited to what a text figure can lay out in OS X so while it's not a perfect reproduction of a rich web view (use an embedded WebView or a WebArchive or even a PDF for that) it is much closer to that rendering than before.
Extract Images
Since those images in the text figure aren't included in the asset library, they aren't considered true image asset figures. However you can always cut the image out of the text figure and paste it directly onto the idea space if you want that. Or, right-click on the text figure and choose Extract Images and all images will be extracted automatically.
Quick Text Figures
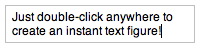 You'll love this one:
If the Select tool is active in the toolbar, simply double-click on the idea space background to quickly create a new text figure.
Or double-click and drag to specify a width for the new text figure.
And, like text figures created with the Text tool, if you click away without entering any text then that empty text figure is automatically removed.
You'll love this one:
If the Select tool is active in the toolbar, simply double-click on the idea space background to quickly create a new text figure.
Or double-click and drag to specify a width for the new text figure.
And, like text figures created with the Text tool, if you click away without entering any text then that empty text figure is automatically removed.
Customizable Shelf
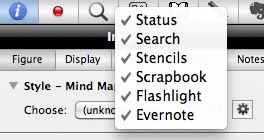 You can now customize which modules are displayed in the shelf simply by right-clicking on the shelf tabs.
If you don't use Flashlight or you aren't on Evernote then you can now easily hide those modules.
You can now customize which modules are displayed in the shelf simply by right-clicking on the shelf tabs.
If you don't use Flashlight or you aren't on Evernote then you can now easily hide those modules.
Also, if you find you don't need the Stencils shelf due to the new Figures Gallery then you can easily hide that, as well.
Smarter, Customizable Inspector Bar
The Inspector Bar is also much improved.
 The first change was adding another color well with handy highlighting colors for text figures — a very frequent request.
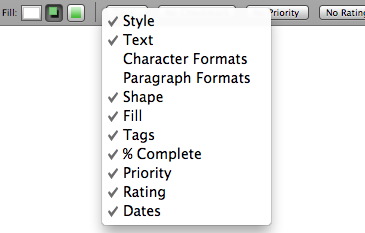 Next, we made inspector bars customizable simply by right-clicking on the bar.
You can add and remove inspector bar modules so you can show or hide more inspector controls to your preference.
Next, we made inspector bars customizable simply by right-clicking on the bar.
You can add and remove inspector bar modules so you can show or hide more inspector controls to your preference.
Curio 7 also adds a new inspector bar when any brush or pen tool is activated so you have all the controls you need at your fingertips. And, since you no longer need to see the Inspector when scribbling, we automatically hide the shelf and, while we're at it, the Organizer and Library so your drawing area is as large as possible. When you stop scribbling by selecting another tool we automatically restore those views to their previous states.

Smarter Inspectors
Curio 7's inspectors are now even more context aware. For instance, you only see the List inspector if a list figure is selected. This means the inspector tabs are cleaner and less cluttered.
Plus we've re-arranged some items to make them more accessible and easier to use such as creating a simplified Style inspector at the top for easy access.
Attached Figure Improvements
You create an attached figure by selecting or editing an existing figure then clicking on the idea space background while holding down the Command key. The result is a new text figure attached to the previous figure with a nice directional line connecting the two, optionally nondirectional if Command-Shift is held or bidirectional if Command-Option is held.
Previously this trick would only work with text figures. However, Curio 7 adds some new enhancements.
If a collection figure, such as an index card, list, mind map, or table, is selected or is being editing then using the trick above to create an attached figure will now create another collection figure of the same type, once again connected with the appropriate directional line.
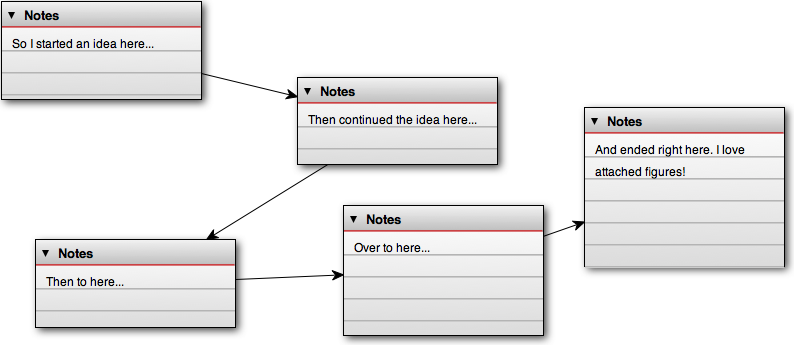
This is a wonderful and incredibly fast way to create interconnected index cards, lists, mind maps, and tables!
Note this enhancement only works if the Select tool (the mouse pointer tool) is selected on the toolbar. If the Text tool is selected then the created attached figure will always be a new text figure.
Enhanced Color Wells
As a handy shortcut, with any color well hold down the Option key when clicking to immediately bring up the standard Apple color picker instead of the Curio color matrix.
Major Performance Improvements
Mind Maps
Radial mind map balancing has been greatly optimized to avoid costly and annoying re-layouts.
- Caching is used to avoid re-balancing when figure sizes are not actually changed, such as when a checkbox is simply checked.
- When editing, only nodes on the same side of the mind map are re-balanced and only minor forces are re-computed to make the layout extremely fast.
- Only when editing is completed, or if level style attribute changes are made, will all nodes go through a complete re-balance.
Tables
Many tables operations are now much, much, much, much, much faster.
Idea Spaces
Dragging around asset figures, especially PDFs, is now much faster.
Importing
Nice speedups for bulk-loading lots of stuff. For instance, when importing Notetaker NTML notebooks.
Context Menu Enhancements
Mind Map Figures
Right-click on a mind map to quickly switch arrangements (radial, left map, right map, org chart), line styles (straight, curved, etc), or branch colors without going to the inspector.
Asset Figures and Library Assets
If you right-click on one or more asset figures in an idea space or assets in the Library you now have some new or updated menu options:
- Reveal in Finder is now available even for embedded assets.
- Copy to Desktop will create copies of the selected assets to your Desktop.
- Mail as Attachment will create a new mail message with the selected assets as attachments. If more than one asset is selected then a zip file is attached with the assets archived inside.
New Evernote Shelf Enhancements[ProStandard]
When dragging an Evernote note out of the shelf into your idea space, it is normally copied into your project. You can now hold down the Option key while dragging to move it to your project, automatically removing it from the Evernote cloud.
You can also select an Evernote note item in the shelf and press the Delete key to remove it from the Evernote cloud.
If an Evernote note item has a source URL associated with it then the resulting figure will automatically be associated with that URL as well. Simply double-click the figure in the idea space to open the URL. If the note is a file, like an image file, then right-click and choose Open File With Finder to open it with the Finder.
We also fixed a bug where if you dragged in notes from Evernote with one-word titles, Curio would inadvertently consider that an URL figure.
Numerous advanced preferences have also been added to Curio's Evernote functionality including logging and tagging options. See the Evernote section in the Curio User Manual for more information.
Lastly, we're now using version 1.15 of Evernote's API which appears to be more robust than earlier versions.
Automatically Saved Untitled Projects
Curio now avoids John Gruber's infamous Untitled Document Syndrome.
In Curio 7, you can designate two special folders in our General Preferences. The first is the folder Curio will present to you when you choose to save a project. The default is ~/Documents/Curio. The second is the folder Curio will use when temporarily saving untitled projects until you either save or discard them. The default is ~/Documents/Curio/Untitled.
When you create a new project with Curio 7 it will be placed into the untitled folder on your hard disk with autosave automatically enabled.
While the Curio title bar will still report the name of your project as "Untitled", the project itself will be stored in the untitled folder with a name based on the current date and time. For instance, "Jun 6, 2010 11_47_40 AM".
When you save or discard the project, this temporary project file will be automatically removed. However, if the power goes out or some other disaster happens, you can simply find your project in the untitled folder with all your most recent changes in place.
By the way, if you really want to, you can turn off autosave for new projects in Curio's General Preferences. You can also override a specific project's autosave setting via the File > Project Properties panel.
A brief tangent to explain Curio's autosave system...
Curio will attempt to autosave 30 seconds after the last editing activity. Curio will then wait until you are not making any changes for a couple of seconds before writing the changes to disk. That way, Curio doesn't save while you are actively typing or moving figures around. However autosave could still occur when performing non-editing functions such as scrolling, switching idea spaces, selecting figures, quick zooming, or even pausing while you are editing a text figure.
For named projects (those that are not Untitled), you can also force a save by choosing File > Save on your own. For an Untitled project this will simply bring up the standard Save dialog allowing you to save the project with a specified name.
However, even autosave as a safety mode for named projects: it won't autosave when you close the project or quit Curio. Instead it will ask if you want to save those most recent changes. That way if you do something catastrophic which is not undoable, like if you inadvertently delete a bunch of idea spaces, you have 30 seconds to quit Curio and choose to discard those changes.
New Dynamic Variables
Curio 7 adds more variables to the Insert > Variable menu!
Project Variables
In addition to the current project title, you can now output the project's creation date/time and last saved date/time.
Section Variables
You can now output the title of the section that contains the current idea space.
Idea Space Variables
In addition to the current idea space title, number, and date/time added, you can now output the date/time it was last modified.
Figure Variables
In addition to the current date/time added, you can now output the date/time it was last modified.
Full Dates
For all date variables we now also support the Full format as specified in your Text Formats part of System Preferences, which generally includes the day of the week.
New Window Arrangements
The Window menu now has several new options for resizing and positioning the active window on the screen.
- Center Window (⌃⌥⌘C) centers and expands the window on the screen. We love this feature.
- Left Half (⌃⌥⌘←) resizes the window so it's half the width of the screen then scoots it to the left side of the screen.
- Right Half (⌃⌥⌘→) resizes the window so it's half the width of the screen then scoots it to the right side of the screen.
- Top Half (⌃⌥⌘↑) resizes the window so it's half the height of the screen then scoots it to the top of the screen.
- Bottom Half (⌃⌥⌘↓) resizes the window so it's half the height of the screen then scoots it to the bottom of the screen.
Curio also has a new ability to position the active window on top of all other windows.
- Window On Top (⌃⌥⌘T) makes the window always on top of all other windows, even other application windows.
New Startup Options
In Curio's general preferences, you can already specify whether Curio should re-open your last opened project(s). Now a new popup allows you to specify what Curio should do if you don't want that to happen or if there are no projects to re-open:
- Do Nothing
- Create a Blank Project
- Create a New Project via Template Chooser (a button exists on this dialog to let you switch to an Open Project dialog instead)
- Open a Project via Project Gallery (a button exists on this dialog to let you switch to an Create Project dialog instead)
Additional List Features
- Choosing Arrange > Collect into List, or clicking the List button while holding down the Option key, will collect all selected figures into a list and parse carriage returns and tab indentions to automatically reconstruct a hierarchy within the new list.
- For OPML exports the <head> section is now always included even if the list doesn't have a title as per the spec.
- If you hit return or command-return when an image in a list or mind map is selected then a new sibling item will be created under the image.
- Fixed a formatting error when placing an outline created with Word into Curio using "paste as list".
Additional Mind Map Features
- Choosing Arrange > Collect into Mind Map, or clicking the Mind Map button while holding down the Option key, will collect all selected figures into a list and parse carriage returns and tab indentions to automatically reconstruct a hierarchy within the new mind map.
- Prune to Linked Collection now creates jump actions which are relative to the project instead of including absolute paths to the project so the jumps will work correctly even if the project is renamed.
- Currently if you type a lot in a mind map node we'll automatically impose an auto-wrap width to make the figure look nice. Now, we'll automatically revert the figure to no fixed width (aka natural size) if you remove enough text to shrink below that forced width.
- Added lots of new bundled color palettes for even more branch colors accessible via the Advanced Hierarchy Properties inspector.
- Smarter auto-coloring of the central root node when a branch color is applied.
Additional Index Card Features
- When copying index cards as text all returns entered in the body text are left intact instead of being auto-removed.
Presentation Mode Enhancements[Pro]
- New more robust Apple Remote handling code for presentation mode. [Pro]
- If you alt-tab away during Presentation Mode and then come back, focus is placed back on the presentation view so it can handle key presses.
- If you have multiple monitors and you try to start presentation mode again while already in presentation mode—perhaps by clicking the Presentation toolbar button—then the presentation is stopped.
Line Figure Enhancements
- If you've re-defined the default line format then Curio will correctly use the factory default when drawing attached figures with lines.
- Fixed a situation where sticky lines might not update correctly when the idea space is first loaded.
- More consistent use and handling of head and tail with regards to standalone line figures and to line figures used for attached figures.
Image Figure Enhancements
- Files with .3gp extensions are now recognized as movie files and will play within the Curio idea space if double-clicked.
- Images are now rendered correctly with their DPI taken into consideration. Therefore, 96 DPI images will be a bit larger which is the way Preview works. Also invalid DPIs are safely handled as well.
- Better support for images taken by the iPhone which may include internal orientation meta data so they are automatically flipped or rotated as appropriate.
Sleuth Enhancements[ProStandard]
- Added Fotopedia as a new image search site.
- Added Shutterstock as a new image search site.
Stencils Shelf Enhancements[Pro]
The Stencils shelf now supports Personal, Bundled, and Network repositories. Personal contains stencils you create, Bundled contains stencils that Zengobi includes with Curio, and Network is an optional stencil repository located on a shared network server at your workplace or school. You define the network path via Curio Preferences.
The Stencils shelf also includes a new Type popup allowing you to filter the available stencils by Simple or Complex and even by collection type such as List or Mind Map.
Scrapbook Enhancements[ProStandard]
The Scrapbook shelf now supports Personal, Bundled, and Network repositories. Personal contains scrapbook assets you create, Bundled contains assets that Zengobi includes with Curio, and Network is an optional scrapbook repository located on a shared network server at your workplace or school. You define the network path via Curio Preferences.
Dossier Enhancements[Pro]
- Added Novel as a new dossier template.
Additional Features
- Embedded WebViews now support downloading to your Downloads folder.
- You can press { and } (aka Shift-[ and Shift-]) to decrease and increase the margin of the selected figures.
- The Library now supports Edit > Duplicate so you can easily make copies of your embedded assets. Since we support this new feature we have removed the confusing "Share when duplicated" checkbox from the Asset Figure inspector.
- If you have jump actions, jump targets, or idea space links that take you to another project which has been moved, Curio will now ask if you would like to fix, delete, or leave those broken aliases when opening the project.
Notable Fixes
- Duplicating figures and dragging figures around collections no longer overwrite the contents of the general clipboard.
- Smarter validation of Organizer menu items so they are enabled or disabled even if the Organizer doesn't have focus.
- Much better handling when trying to add/remove projects from the Project Center's "Opened Recently" pseudo-category.
- The popup menu for the View toolbar button now correctly shows the current show/hide state of the Shelf, Organizer, Project Center, etc.
- The Status shelf now handles idea space titles that have embedded carriage returns.
- Mouse movements not over the idea space itself will be ignored so you won't see odd tooltips or snap guides when over the toolbar or shelf, for example.
- Re-saved the embedded museum movie in the Sample Gallery project so it's a .mov file instead of .mp4 which was apparently causing some problems with playing it via the embedded QuickTime player within Curio and Snow Leopard, although it worked just fine in Leopard.
- Found and fixed an area where the undo stack could get corrupted if items are moved on the idea space. Finally found this one!
- Percent completion rollups to parent nodes now work as they should if intermediary nodes exist which aren't displaying checkboxes.
- Fixed sneaky exception which could occur when deleting multiple idea spaces.
- Fixed problem where Inspector Bar tooltips were appearing in odd places.
- Removed the white margin around the HTML export template so the resulting idea space body image fills the whole HTML page.
- Fixed a problem when trying to undo a figure move when that figure move caused the idea space itself to auto-grow.