Curio 10.0 Release Notes
Release Date
November 9th, 2015
Requirements
Curio 10 runs on macOS Yosemite (10.10) or El Capitan (10.11).
Important Notice To Upgraders
- Curio 10 runs on macOS Yosemite (10.10) or El Capitan (10.11)! It does not run on earlier releases of OS X.
- Curio is now using Apple's modern AVKit framework for audio and video playback on idea spaces instead of the deprecated, QuickTime-based QTKit. AVKit supports most modern media types but may not support older formats supported by QuickTime or installed QuickTime extensions. Those older media items will no longer play within the Curio environment so you will have to right-click and launch them with the Finder to play them, instead. Alternatively, you can use the OS X tool qtmodernizer to convert your legacy media files to a modern, supported format and then add those converted files into your Curio projects.
- Curio no longer supports exporting to Apple's discontinued iPhoto app.
- Curio no longer supports the long-discontinued Apple remote controls.
- Curio no longer supports a Scrapbook: instead that functionality is handled by the new Local library shelf and the Curiota companion app, as detailed below. Your old Scrapbook will be converted into a Curiota Scrapbook collection.
Features
- Curio 10 runs on macOS Yosemite (10.10) or El Capitan (10.11)! It does not run on earlier releases of OS X.
- Curio is now using Apple's modern AVKit framework for audio and video playback on idea spaces instead of the deprecated, QuickTime-based QTKit. AVKit supports most modern media types but may not support older formats supported by QuickTime or installed QuickTime extensions. Those older media items will no longer play within the Curio environment so you will have to right-click and launch them with the Finder to play them, instead. Alternatively, you can use the OS X tool qtmodernizer to convert your legacy media files to a modern, supported format and then add those converted files into your Curio projects.
- Curio no longer supports exporting to Apple's discontinued iPhoto app.
- Curio no longer supports the long-discontinued Apple remote controls.
- Curio no longer supports a Scrapbook: instead that functionality is handled by the new Local library shelf and the Curiota companion app, as detailed below. Your old Scrapbook will be converted into a Curiota Scrapbook collection.
The release is packed with incredible new functionality and oodles of tweaks and enhancements!
Curiota
 Curiota is a fantastic new — free — companion product that integrates with and extends Curio's functionality and connectivity.
It is available as a separate download exclusively from the Apple Mac App Store.
![]()
Curiota in a Nutshell
Curiota runs all the time, stays out of the way, and provides numerous ways for you to collect notes, files, and research, including several script-based methods for power-users.
Once Curiota is installed, Curio will instantly recognize it and provide access to its collections using the new Local Library shelf, which is detailed below.
For this first release of Curiota the primary goal is to be a flexible and lightweight conduit for getting data into Curio. Curiota also takes over many services that used to be managed by Curio itself including the Scrapbook and Scrapbook-related features. In fact, your old Curio Scrapbook will be converted to a Curiota "Scrapbook" collection.
The Big Features
- Lightweight and Always Available
- Instant Rich Note Submission (the window is resizable and always on top)
- Add Files, Images, and Text via Drag-and-Drop to the Curiota Menu Bar Icon
- OS X Services Support
- OS X Share Button Support
- Save PDF to Curiota
- Bookmarklet
- AppleScript/JavaScript Support
- Integrates with Curio via the new Local Library Shelf
- Support for Synced Data Storage
- Open Data Formats + Open Directory Structure + No Database = No Vendor Lock-in (it's your data)
- Available from the Mac App Store as a Separate Download
Separate Download
Why a separate download? Because we want to be able to add features quickly and more rapidly than if it were embedded within Curio itself. With the Mac App Store process handling all updates, Curiota can be neatly updated behind the scenes, automatically, as we add new features.
And more features will be appearing soon! Stay tuned!
Curiota Documentation
Curiota has oodles of useful features, so please read all the details to get a complete overview.
Stacks
Curio proudly introduces Stacks, a new integrated collection perfect for visual task tracking!
As you might guess, a stack collection will arrange contained items... in a stack. The widths of all contained figures will be increased to the width of the stack, appropriately sizing images proportionally. If you resize the stack, the widths of all figures within will resize as well.
Stacks are best suited for organizing text, image, and file asset figures.
Think of stacks as a personal Trello or similar stack-based task tracking app or service.
Working with Stacks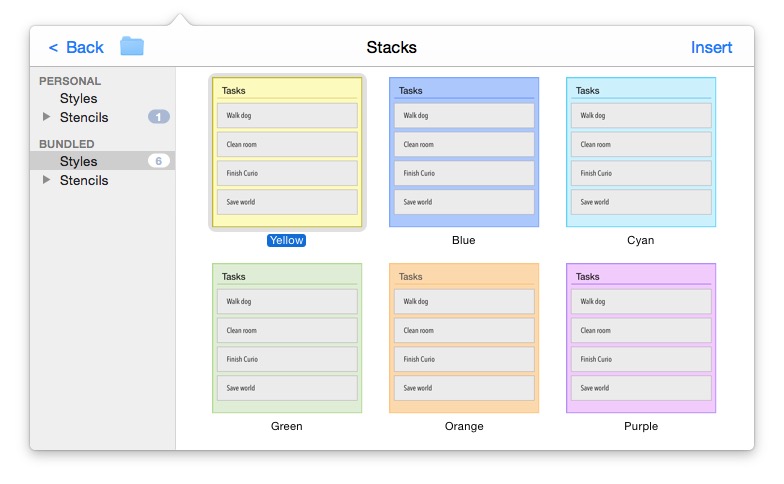
Creating a Stack
Create a stack using the Insert toolbar button to see the new stack gallery.
As a note, you can press I to bring up the Insert popover then press K to instantly select the Stack option.
You can also use the Insert > Stack menu item.
Adding Items
To insert your first item just double-click within the stack. If an item is selected or is being edited then press ⌘-Return (Command-Return) or ⇧⌘-Return (Shift-Command-Return) to insert a previous or next sibling.
You can also drag in figures from other collections or from the idea space itself, or drag in items from outside of Curio such as from the Finder or Safari.
Collect into Stack
You can select multiple figures on your idea space and choose Arrange > Collect Into > Stack to move them all into a new stack collection.
Exporting
Select a stack and export it via the Share toolbar button as text, OPML, or a mind map format.
Expand/Collapse Support

You can collapse and expand titled stacks by selecting the stack figure and tapping the Spacebar. As a note, when expanding after a collapse the stack is sized to its minimum size necessary to enclose its contained figures so this is also a handy way to "shrink to minimum".
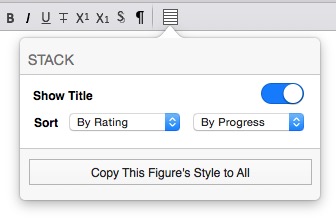
Stack Sorting
By default, you can manually rearrange items in the stack. Just drag items up and down the stack to arrange them in any order you wish.
However, you can also tell Curio to keep the stack automatically sorted by title, creation date, modification date, due date, start date, start date or end date if already started, percent completed, priority, or rating. You can specify a secondary sort as well. Make a change to a figure and instantly the figures rearrange based on the sorting rule.
Smart Tag Inheritance
Stacks have two special, very important characteristics:
- Curio will ignore stack titles in the Status shelf (when grouping by tag) or on the Search shelf (when searching for tags).
- Items within the stacks will automatically inherit the title's tags.
Huh?
This means you can construct a series of stacks, where the title of the stack has an associated tag (like those below), and simply drag-and-drop items from one stack to another. Those items will instantly inherit the title's tag and appear in the Status shelf with the correct associations.
So, if you want to promote a task from Ideas to Pending then just drag it from one stack to the other and, internally, Curio will handle changing the tag associations automatically, instantly updating the Status shelf.
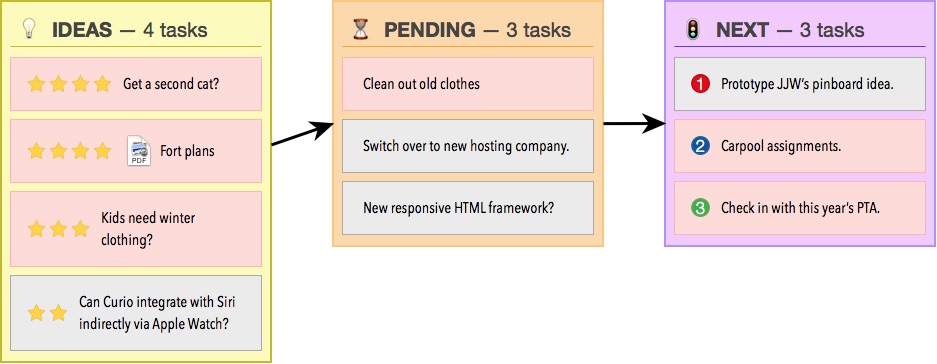
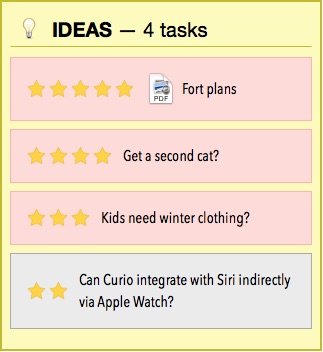
Some notes on the example workflow above...
- The Ideas stack is auto-sorted by rating and the Next is sorted by priority. The actual workflow is larger than pictured above with Active, In Flight, and Done stacks as well, each sorted using different techniques. For example, once a task is in Active I assign a start date and duration so I sort that stack by Start Date.
- I used a salmon-colored figure style for personal tasks and the gray-color style for work tasks just as an experiment mixing different types of tasks on the same stack workflow.
- A stack stack accepts the normal methods for inserting a new item such as double-clicking within the stack to create a simple text figure or using the Insert toolbar button to insert a new figure of a certain style.
- That said, I personally used the Edit > Duplicate (⌘D) feature quite a bit to create new figures using the same style as another one. Of course the stack will automatically grow as needed to hold new items.
- You can also Option-drag (or Copy/Paste) a figure from one stack to another to quickly create a duplicate.
- The Format > Copy Style (⌥⌘C) and Format > Paste Style (⌥⌘V) commands are a quick way to style a figure based on another figure.
- Creating that stack workflow above was easy to do with the handy Arrange > Align > Top and Arrange > Distribute > Horizontally menu items. Sticky lines going between the stacks automatically line themselves up as the stacks grow or shrink.
- The titles for those stacks use the extremely cool new FigureTagName directive, which you can learn more about below.
- One of the stacks above has been added as a new bundled stack stencil. Simply insert it using the gallery then apply a style or style it manually.
Stack Toolbar Icon
If you find yourself using stack collections frequently, note that you can customize the toolbar and add a dedicated Stack button so you can quickly bring up the Stack gallery. Or hold the Shift key when clicking the button to instantly create a brand new stack collection on the current idea space with the default style.
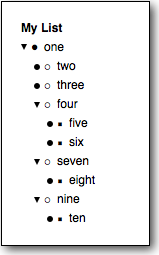
Mind Map & List Sorting
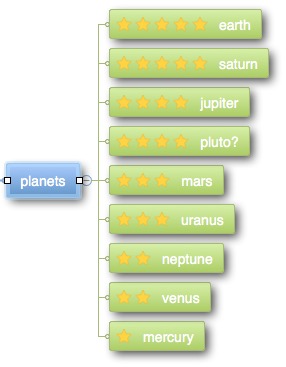 Both mind map and list collections can now have sorted branches!
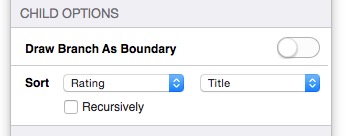
How to Sort
Select a parent node in either a list or mind map then check out the collection's Children inspector panel. Choose a primary sort: by title, creation date, modification date, due date, start date, start date or end date if already started, percent completed, priority, or rating. You can optionally specify a secondary sort criteria, as well.
Instantly the children of the selected node will be sorted. Even better, as you change the figures, the nodes will be dynamically re-sorted is necessary.
If you check the "recursively" checkbox then children of the children will sort themselves with the same sort criteria.
Date Calculations: Safety First!
Note, however, if any child figure uses a Start Date calculation based on a sibling then sorting will not occur with those children. Why? If, based on sorting rules, figures jumped around based on title or priority, then at could have an unintended consequence on all your figure dates! Basically, we're assuming you placed those figures in specific precedence ordering — buy groceries then make dinner — and we don't want an automatic sorting to spontaneously ruin that ordering.
Drag-and-Drop
Of course if you drag-and-drop or add new items to a sorted collection then the nodes will be automatically repositioned as necessary to maintain the sort order.
iMindMap Import/Export Support
 Curio 10 can now import and export mind map files generated with the extremely popular iMindMap app for OS X and iOS.
Import
Curio's iMindMap import support is a great way to start a mind map on your iPad and then continue work in Curio when you get back to your Mac. The import will bring in node title, start/due date, percent complete, and priority information. Just drag-and-drop the iMindMap file directly into your idea space and it'll be turned into a native Curio mind map.
Export
To export a Curio mind map in iMindMap format, select the mind map within Curio and use the Share toolbar button. Currently Curio can export the title, start/due date, and a handful of flags. (To be honest, we're also exporting percent complete and priority but, for some reason, iMindMap is ignoring it.) After opening an exported mind map from Curio in iMindMap, you may need to force a re-layout by clicking the Clean Up toolbar button just to make sure everything is positioned properly.
Special Notes
Note that formatting and layout information such as fonts, shapes, coloring, and positions are not imported or exported. Instead, after import, the default Curio mind map style is applied and the mind map is automatically laid out. Also currently Curio doesn’t import or export images or other asset files (aka attachments).
MindNode Import/Export Enhancements
Zipped File Handling
 MindNode is another extremely popular format which Curio has supported since Curio 9.
We've added additional support for this format in Curio 10, as follows.
MindNode is another extremely popular format which Curio has supported since Curio 9.
We've added additional support for this format in Curio 10, as follows.
MindNode files can either be an OS X package file (which is technically a folder hierarchy but appears to the user as a normal file) or, with more recent releases of MindNode, a zipped file (which internally contains the folder hierarchy).
In both cases the file extension is .mindnode.
Curio 10 adds support for the newer zipped file format to its existing support for the package format, when importing a MindNode file via drag-and-drop to an idea space, When exporting a mind map as a MindNode file, Curio will default to a zipped file format although you can override this with the MindNode Exports As Package advanced setting.
MindNode 2 Format
Curio also supports the slightly-altered format introduced in MindNode 2. Formerly a node title was either plain text or RTF-formatted text. With MindNode 2 it could now be HTML-formatted text, as well, so Curio supports all three possible text formats.
OPML Import Robustness
The OPML format, for hierarchical data such as lists and mind maps, contains a header title element then a nested series of outline elements. Generally for a list or mind map the title of the list or central topic of the mind map becomes the title element and the nested outline elements are all of its children.
However, some apps (such as MindNode) may export an OPML file with both a title element and an identical top-level outline element. The result, after importing into Curio, would be a mind map with a central topic that has a single child identical to the central topic, and then, under that child, the rest of the tree.
Curio will now detect this situation during import and adjust the resulting tree structure as necessary so you don't see this oddity.
List Enhancements
Line Spacing

You can now adjust the spacing between sibling items in a list via the List inspector.
Even Cleaner Bullet Lists
Remember how Curio 9 took care of the dreaded "double-bullet" issue:
| Curio 8 Bulleted Lists | Curio 9 Bulleted Lists |
 |
 |
Much cleaner, right?
Well, now Curio 10 makes it look even better by taking care of the dreaded "disclosure+bullet" issue:
| Curio 9 Bulleted Lists | Curio 10 Bulleted Lists |
|
 |
Note this only affects bulleted lists, not enumerated or custom prefixed lists.
Other Mind Map & List Enhancements

New Children Auto Inherit This Figure's Colors Checkbox
Previously Curio's list and mind map inspectors had a button which said Children Auto Inherit This Figure's Colors. Pushing it would immediately set all the children so their This figure inherits colors from its parent checkbox was set and make it so any new children you created would also automatically have that checkbox set.
This was very handy... until you wanted to turn it off.
You could uncheck the individual children checkboxes but, still, any new children you created would immediately get that checkbox set.
So, in Curio 10, we've changed this so turning on this parent functionality is now a checkbox instead of a button. Unchecking it will immediately uncheck all children inherit checkboxes as well as clear the the internal flag that was causing new items to inherit by default.
Context Menu Additions
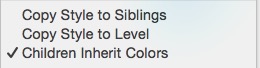
You can now right-click on a node in the mind map or list and choose Copy Style to Siblings or Copy Style to Level to quickly copy a figure's style to its immediate siblings or to all the figures at this hierarchical level (i.e. the figure's siblings and cousins).
It also supports a new checkbox toggle for children auto inherit colors from parent.
Level, not Cousins
As a note, previously Curio referred to immediate siblings as siblings, but figures at the same hierarchical level but with different parents as siblings & cousins. This was technically correct but cousins is a bit confusing to comprehend, so now Curio just calls all of those items as items on the same level. Hopefully that's a bit more clear.
Table Enhancements
Fit and Distribute Rows and Columns
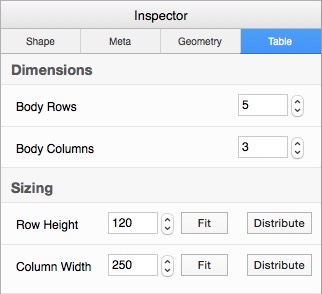
Fit
Curio can now resize one or more row heights so they fit the contents of the tallest cell. Likewise, Curio can now resize one or more column widths so they fit the contents of the widest cell.
Begin by selecting either the table itself, if you want to fit all rows or columns, or select specific cells within the table, to fit specific rows or columns. Then press the appropriate Fit button in the Table inspector.
Distribute
Similarly, Curio can now evenly distribute the heights or widths of the selected rows or columns (or all rows or columns) so they each have the same value.
Begin by selecting either the table itself, if you want to distribute all rows or columns, or select specific cells within the table, to distribute specific rows or columns. Then press the appropriate Distribute button in the Table inspector.
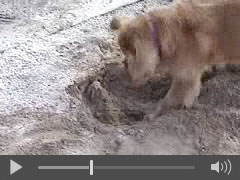
Resizing Tweak
In the past when you resized a table's row or columns, that row or column changed its size but the overall table size stayed the same. Curio did it like this because Keynote tables worked the same way.
Now, however, Apple has changed resizing in the latest Keynote so it will resize the table while you are resizing the row or column. This does seem much more friendly so Curio now works this way as well.
But we still wanted to give customers a way to resize just the row or column, while keeping the overall table size the same. So, if you hold the ⌥ (Option) key down while resizing we'll keep the table size as-is, which comes in handy from time-to-time.
Here's a movie which demonstrates the new functionality:
Pinboard Enhancements
Expand/Collapse Support
You can now collapse and expand titled pinboards by selecting the pinboard figure and tapping the Spacebar. When expanding after a collapse the pinboard is sized to its minimum size necessary to enclose its contained figures so this is also a handy way to "shrink to minimum".
Arrow Key Support
You can now use the arrow keys to move items around the pinboard when stacking is not enabled. When stacking is enabled the arrow keys change which item is selected.
Nicer Drag and Drop
The items in a pinboard are no longer dimmed as you drag them around.
Album Enhancements
Expand/Collapse Support
You can now collapse and expand titled albums by selecting the album figure and tapping the Spacebar.
Tag Emoji
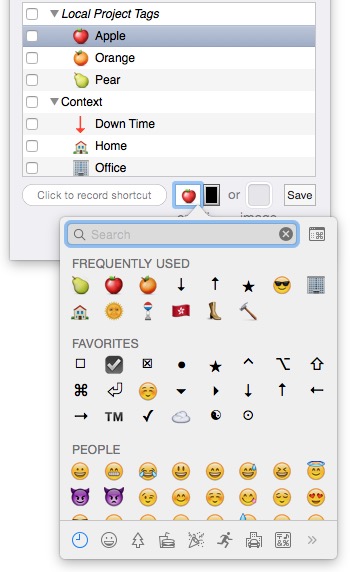
You can now associate an emoji or Unicode symbol with a tag!
Bring up the tag inspector and press ⌃⌘Space (Control-Command-Space) to make the standard OS X Character Viewer popover appear. Then double-click on an emoji or symbol to insert it into the field. (You can also simply paste a character into that field.)
Symbol Coloring
Notice the little color well next to the emoji/symbol field? If you insert a symbol into the field, such as a star or arrow, then you can ask Curio to color that symbol with a specified color. As an example, notice the Down Time's arrow is colored red in the screenshot above. For those items that are colored, we also give them a slight drop shadow just to make them look a bit nicer.
Note that this coloring trick only works with Unicode symbols; Curio can't color emoji since they are generally multicolored already.
 Better Than Images
One of the main reasons to support emoji is to encourage everyone to migrate away from tag images. Tag images are still supported, but unlike most images, emoji scale beautifully, consume very little disk space, and OS X includes loads of them! For these reasons, all of Curio's bundled tag images have been converted to emoji and many new Flags have been added.
Existing Tag Images
Curio 10 will not let you set both an emoji and an image, however if you would like to do so, perhaps so you can share projects with colleagues still on Curio 8 or 9, then you can override this with the Allow Tag Emoji+Image advanced setting. Note that if both are in place Curio 10 (and above) will always render the emoji.
Upgrader Notice: Flags Tag Set
When you first launch Curio 10 we'll add emoji to all the tags in the bundled Flags tag set. We've also added some new tags to that set. Any keyboard shortcuts you've set up will be maintained and existing tags that you've added to Flags will be neatly merged.
Once you've purchased Curio 10, and aren't simply running a trial, Curio will ask if it can remove the old flag images from any tags that have associated emoji, in order to conserve space. The only reason you might say no is if you intend to continue sharing projects with Curio 8 or Curio 9 colleagues.
Shareable Global Tags
Curio supports two types of tags:
- Local Project Tags — these are stored within an individual project.
- Global Tags — these are tags grouped within tag sets that are either bundled with Curio or created by the user and can be used in all of your projects. The figure stores a reference to the global tag but the information regarding the tag itself resides in your Application Support folder.
Sounds good... what's the problem?
This was a nice arrangement until you decided to share a project that contained figures associated with a custom global tag. Why? That user wouldn't have the same tags stored in their Application Support folder so those global tags would simply not appear when they viewed the project in Curio.
Embedded tag set extracts to the rescue!
Now, in Curio 10, we fixed this issue by embedding an extract of any referenced global tag sets within the project file package. This means, if you use one of the tags in a global tag set, that entire tag set is stored within the extract file. So, for example, if you use GTD > Active tag then that tag and all the other tags within the GTD tag set are stored within the extract file which is then embedded into the project package.
Using Extracted Tag Sets
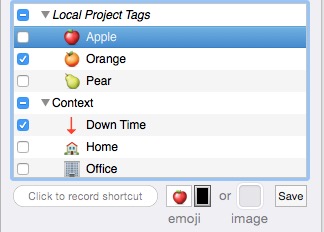
 With this feature Curio users can now exchange projects with other users who can now see and, perhaps more importantly, check or uncheck, global tags.
In the Meta inspector, that user will see the local project tags, then any extracted tag sets (colored with gray text), then their own personal global tag sets.
With this feature Curio users can now exchange projects with other users who can now see and, perhaps more importantly, check or uncheck, global tags.
In the Meta inspector, that user will see the local project tags, then any extracted tag sets (colored with gray text), then their own personal global tag sets.
The user can check or uncheck an extracted tag set tag, but they can't add, modify, or remove any tags from that tag set, since they only have access to an extracted, read-only copy.
For example, here we see a project shared by someone else. In the meta inspector we see the project's Local Project Tags, then an Animals extracted global tag set stored within the project, then our own Context global tag set. Since it's an extract tag set, we can check or uncheck tags within Animals but we can't add delete or rename those tags or add new tags to that tag set.
Extracted tags are one key reason why switching from tag images to tag emoji is so important. You don't want projects inflating in size due to storing dozens of large tag images in tag extract files.
By the way, if you don't want to embed extracted tag sets perhaps because you never shared your projects then you can use the new Embed Tags Extract File advanced setting to disable this functionality.
Importing Extracted Tag Sets
If there's an extracted tag set that you'd like to use in your own projects then you can select it in the meta inspector and import it into your own global tag sets via the actions menu. All internal identifiers are kept the same so you can continue to share projects with your colleagues that use that same tag set.
Meta Enhancements
{%FigureTagName} Variable
Use the new {%FigureTagName} variable (either typed manually or inserted via the Insert menu or the Insert > Variable gallery) to display the name of the tag associated with the figure. If more than one tag is associated with the figure then only the first tag's name is displayed.
You can see a use for this new variable in the Stacks section above where we made text of the title: {%FigureTagName/uppercase} — {%ContainerFigureItemCount} tasks.
New Variable Directives
All variables now support optional directives which can be appended to the variable name.
/uppercasewill uppercase the result of the variable./lowercasewill lowercase the result of the variable./capitalizewill capitalize the result of the variable.
For example, {%FigureTagName/uppercase} will take the tag name "Ideas" and uppercase it to "IDEAS".
Percent Complete Tweak

The meta inspector's percent complete area now has buttons so you can quickly insert 0%, 25%, 50%, 75%, 100% complete.
Tag Fixes
- Curio is now (finally) ordering the tag image adornments (the little flag images displayed next to a figure) in the same order they are displayed in the Tags inspector. With this change, figures that use the same tags will arrange them in the correct order, instead of a random ordering.
- When adding tags and tag sets the inspector will now automatically highlight and begin editing that new item so you can quickly change it.
Local Library Shelf
The Local library uses the power of Spotlight to quickly find files on your hard disk using a number of criteria including text, tags, modification date, and kind of file. When searching for text Curio can search just file titles or also include the actual content of the files. The results can be sorted by file title, last modified date, creation date, or file size.
(This is similar to the old Flashlight shelf that Curio used to have but now much more powerful.)
Custom Folder Scopes
You can direct Local to search your entire Mac, or restrict the scope to your Home folder and any folders it contains. Even better, you can extend this with additional custom scope folders. For example, you might add your Dropbox folder, your Google Drive folder, and a personal project folder.
You can also specify if the given scoping folder should be searched recursively.
This makes the Local library perfect for showing a custom "inbox" of files you want to act on.
Works With Curiota
The Local scope popup will also list all the notes and files found in your Curiota Inbox. It will also list any Curiota collections, such as your pre-Curio 10 Scrapbook repository which was automatically converted into a Curiota collection named "Scrapbook".
Example Uses
- List all notes added to Curiota, sorted by last modified date.
- Find all images modified in the past 2 weeks.
- Find all files with a tag "school" created in the past month.
- Find all files in your ~/Dropbox/Research folder, sorted by last modified date, so you can quickly see your latest research notes that you filed away using your iPad.
- Find all files added recently to your custom "inbox" folder.
Working with the Local Library
Copy, alias, or move files into your idea space with a quick drag-and-drop. You can double-click a file in Local results to open it, right-click to open it with a selected app or reveal it in the Finder, press Space to get a Quick Look preview, or press Delete to move the file to your Trash.
 Important!
As mentioned above, the Local library shelf uses the OS X Spotlight service to find notes and files.
It cannot search into locations hidden from Spotlight using System Preferences > Spotlight > Privacy.
Stencils Library Shelf
Curio has a Stencils shelf!
Yes, we had it long ago but it was decommissioned when we introduced Curio 8's Insert gallery since you could just insert stencils from there. However, for those that use a lot of stencils, having a shelf where you can very easily drag-and-drop from is invaluable. As a result, the old code was brought back and refactored to work within Curio 10's environment.
What's a Stencil?
A stencil is a boilerplate figure that you can easily add to your idea spaces again and again.
Simple Stencil
If a stencil is made up of a single figure, then it is called a simple stencil. Note that this even includes a grouped figure which may contain figures within the group. At the top level, this is still a single figure thus a simple stencil.
Complex Stencil
Alternatively, if a stencil is made up of multiple figures, then it is called a complex stencil. An example is a landscaping stencil which consists of several figures (included grouped figures) which represent different types of plants, trees, flowers, and hardscape.
Examples
Here are some other examples:
- Boilerplate text items of various font size and shape enclosures.
- Various types of lines and arrows drawn using different colors and endpoint styles.
- Geographic maps.
- Floor plan or interior design elements.
- Network diagram elements.
- User interface design elements.
- Website design elements.
Creating a Stencil
To create a stencil, select one or more figures on your idea space, then right-click and choose Save as Figure Stencil. If you selected a collection, such as a mind map or list, then the context menu item would say Save as Mind Map Stencil, for example.
You can also right-click on an idea space in the Organizer and choose Save Contents as Figure Stencil and it will save the entire contents of the idea space as a figure stencil. And now with the Stencils library shelf, you can also do this by drag-and-dropping an idea space from the Organizer directly to the Stencils shelf.
Internally, Curio will create a copy of those figures and store them in your Personal repository.
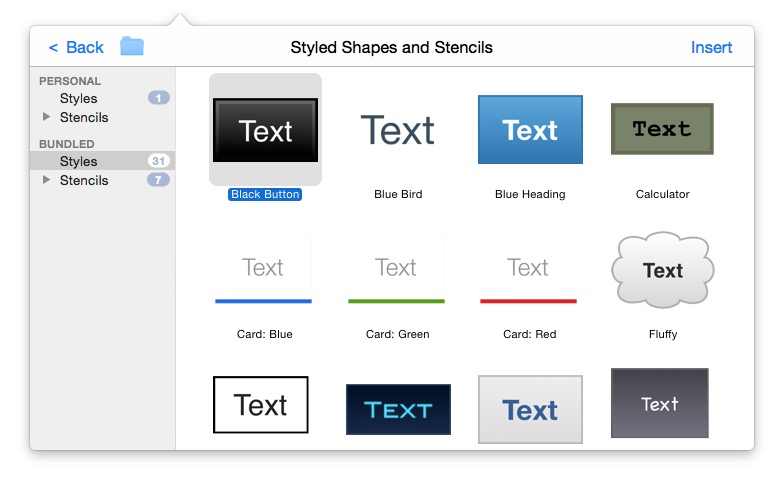
Using Stencils
With the Insert Gallery
To use a stencil you can use the Insert gallery by choosing Styled Shape or Stencil, or a specific collection type such as Mind Map. In the gallery that appears, you'll see a Stencils option on the far left under your available repositories, such as Personal and Bundled. Next, select a particular stencil, click the Insert button, and it will appear in your idea space. If the stencil is a complex stencil, you can double-click to drill down into the stencil to insert one or more of its individual figures.
With the Stencils Library Shelf
With the Stencils library shelf this is even easier: just drag-and-drop a stencil from the shelf to your idea space. Double-click or use the Drill Down into Complex Stencil button to drill down into a complex stencil, such as the landscaping example above, to select individual figures within the stencil.
As you can see, if you're inserting lots of stenciled figures, this is much faster than going through the Insert gallery.
It is important to note that the Stencils library does not show collection stencils, such as mind map stencils. For that, you would still need to go through the appropriate Insert gallery.
Working with Personal Stencils
Personal stencils can be associated with one or more tags to help with organization. For example, you may create tags for "School", "Home", and "Work". You can then associate stencils with tags by right-clicking on a stencil in the shelf.
To change a personal stencil's tag associations, right-click on it and choose a tag. To edit a personal stencil, right-click on it and choose Edit Stencil. To delete a personal stencil, select and press the Delete key.
Organizer Aliases
You can now create aliases to idea spaces or other Organizer items within the Organizer. So, for example, you can now easily create a folder of idea space aliases pointing to idea spaces scattered throughout your project.
Creating an Organizer Alias
To create an alias, simply drag-and-drop a selection of idea spaces, Organizer documents, or Organizer folders, to another location within the Organizer while holding down the ⌥⌘ (Option-Command) keys on your keyboard. When you release the mouse, aliases for all of those items will be created at the drop location.
Organizer Alias Properties
An aliased item looks identical to the real idea space or Organizer document but there are some key points to note:
- You'll know it's an alias because its title is italicized and its preview icon has a little alias curl in the corner.
- The title of the alias can be renamed to anything you wish and it will not change the original.
- Everything else is linked to the original: preview, color label, tags, notes, etc. If you change either the original or an alias then they all change.
- You can right-click on an alias and jump to the original.
- Duplicating an alias creates another alias to the original, it doesn't create an alias to the alias.
- You can hierarchically organize aliases just as you would any other Organizer item, including adding idea spaces as children under the alias.
- You can delete an alias and this will not impact the original.
- However, if you attempt to delete the original, Curio will warn you that aliases exist and will be broken if you continue. Curio will not auto-remove aliases because they themselves might have children. The alert will also give you the option of jumping to the alias so you can delete it manually.
YouTube and Vimeo Video Enhancements
Curio's support for YouTube and Vimeo videos has been dramatically improved.
Inserting via the Insert Gallery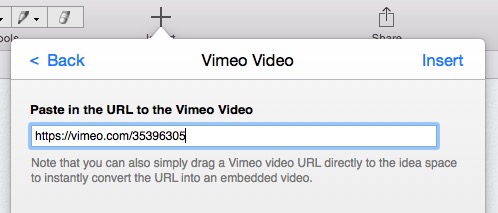
You can still insert video using Insert toolbar and the YouTube Video or Vimeo Video selection. Simply paste in the video URL (such as https://www.youtube.com/watch?v=NQ7kqwbqeiI or https://vimeo.com/35396305) and click Insert.
In the past you were required to also choose a size for the video. Now, however, a default size of 640x360 is automatically used and you can resize the resulting video figure to anything you wish simply by dragging the figure resize handles. (Technically there are new YouTube Size and Vimeo Size advanced settings if you want to change this default.)
Speaking of resize, videos are automatically set to resize proportionally so you can easily resize the video while keeping the same aspect ratio.
Inserting via Drag and Drop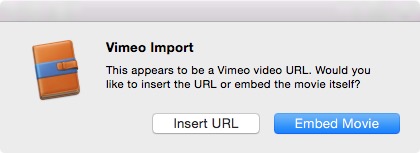
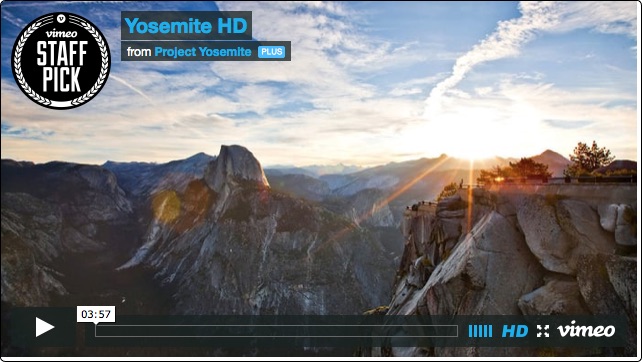
But now it's even easier to insert a YouTube or Vimeo video... just drag-and-drop!
Drag in a YouTube or Vimeo video URL from your browser directly to the idea space and Curio will ask if the URL should be inserted or if the video itself should be embedded.
Ta da! Instant embedded video.
As described above, you can resize the created video figure to any size you wish.
Dimming or Not
These videos are rendered in a WebView and, normally, Curio dims the placeholder image for the WebView. This is a hint to the user that they need to activate the view first, by double-clicking on it, which actually loads the contents of the web page, and then allows the user to begin playback.
However, we've had requests to not dim these placeholder images specifically for video WebViews.
So Curio now supports the new Dim Video WebView Poster Images advanced setting
 |
 |
| Dimmed Placeholder | Undimmed Placeholder |
Interface Enhancements
New Inspector Shelf Panels
- Curio now includes a Style inspector shelf panel that appears if an idea space or figure is selected.
- A new Text panel now appears on the shelf if you select a figure.
- And the pinboard, album, and index card figures now have a tab on the inspector shelf.
Of course, you can continue to use the controls and popovers on the inspector bar if you wish, either in addition to or instead of those on the inspector shelf.
Cleaner Galleries
Curio's various figure and idea space galleries are now using a clean, white background instead of the heavier black coloring. The controls at the top (Back, show repositories toggle, title, and Insert) are all now aligned correctly.
Zoom
Curio has a new zoom popup which takes up less room that the old slider. However, the zoom slider is still available via customize toolbar. In fact, Curio supports having either, neither, or both the zoom popup and zoom slider if you wish!

- Curio now uses the same keyboard shortcut as the iWork apps to zoom: hold ⌥⌘ (Option-Command) while scrolling vertically with the Magic Mouse or trackpad to zoom in or out on the idea space or in the idea space and figure galleries.
- Due to that change above, the shortcut to quickly flip through a bunch of overlapping figures is now just the ⌥ (Option) key while scrolling with the Magic Mouse or trackpad.
- On a related note, Curio now zooms with much finer precision when zooming into an idea space with the ⌥⌘ Magic Mouse or trackpad.
- Lastly, using the ⌥⌘ Magic Mouse or trackpad method for zooming in a gallery view is now more reliable.
New Inspector Bar Icons
Updated the inspector bar icons to a more modern style which look much nicer especially on Retina Macs.


New Status Icon Coloring
In earlier versions of Curio, the Status toolbar icon was tinted to reflect the status of your tasks (e.g. a red tint if you had overdue items). However, when the Status toolbar item was clicked on, it was tinted the standard blue coloring to show its selection state, but this effectively hid the overdue coloring.
With Curio 10, a colored status dot is now displayed in the corner of the selected or unselected icon, so we don't interfere with selection tinting.
 |
 |
| Unselected Status Toolbar | Selected Status Toolbar |
Projects Toolbar Button
The behavior of the Projects toolbar button has been changed to make it more useful.
| Keys Pressed When Clicking | Result |
| None | Open project quick pick list |
| ⌥ | File > Open Project Gallery... |
| ⇧ | File > New... |
| ⇧⌥ | File > New From Project Template... |
You can swap the Open handling via the Projects Button Open QuickPick advanced settings.
Customized UI Colors
We've tweaked the inspector UI colors a bit to make them more pleasing with fewer jarring contrasts. Likewise the inspector heading font, size, and colors have been tweaked a bit as well.
Power users can customize some of Curio's colorings and interface properties by following the steps listed in the new User Interface advanced settings.
Presentation Mode Enhancements
Spacebar Expanding/Collapsing
During presentation mode you can now use the Spacebar to toggle the collapsed state of an item in a mind map or list. This includes use of Option-Spacebar to collapse or expand a branch and its children, plus Shift-Spacebar to collapse or expand all branches at this hierarchical level.
Mind Map Pre-Collapse
Before Curio displays an idea space during presentation mode it can pre-collapse all mind maps using the new Presentation PreCollapse Mind Maps advanced setting
Drag Asset Figures Out of Curio
You can now drag an asset figure, such as a document or image figure, from a Curio idea space directly out to the Finder, your Desktop, or another application. However, so as not to interfere with figure movement and autoscrolling within the idea space you will have to carefully follow these steps:
- Begin by selecting a single asset figure on the idea space.
- Hold ⌥⇧⌘ (Option-Shift-Command) and click and begin dragging the already-selected figure. Notice that instead of dragging the figure itself around the idea space you are now dragging a file representation of that figure.
- This is the important part: release those keys now that you've started dragging. You can continue dragging and drop it anywhere on your Desktop, a Finder window, or any other application.
The sole purpose of that magic 3-key combination is to tell Curio to place the asset figure's file URL on the dragging clipboard, instead of tracking a normal figure movement. It's important to release those keys after you've started the drag operation but while you're still dragging, otherwise the destination application will try to interpret those keys as a forced move, alias, or copy of the file but Curio only supports a copy of the file out of the project.
Hyperlink Titles
Previously if you copied a figure or idea space (via Edit > Copy As > Hyperlink) the title of the hyperlink was simply the long URL itself.
Now Curio places some additional information on the OS X pasteboard for those apps that look for standard "URL name" fields.
Based on the destination of the hyperlink you could end up with several link title example scenarios:
- A link to an asset figure on the idea space:
Curio project "Pepsi Campaign" > "Sales Numbers.xls" - A link to a collection figure with a title on the idea space:
Curio project "Pepsi Campaign" > "Mind Map - Test Subjects" - A link to a text figure on the idea space:
Curio project "Pepsi Campaign" > "Here are some notes that I wan…" - A link to a figure with no title (unlikely, but just in case):
Curio project "Pepsi Campaign" - A link to an idea space:
Curio project "Pepsi Campaign" > "Sales"
When determining a title of a figure or idea space, Curio will only grab the first line (if multi-line) and will truncate any figure text beyond 50 characters.
Calendar & Reminder Syncing Enhancements
Now Using EventKit
Curio is now using Apple's EventKit framework instead of the old, deprecated CalendarStore framework for syncing to the OS X Calendar and Reminders apps.
While this wasn't a painless transition, the end result is much faster and now supports event and task times reliably so we're no longer truncating those off. Also we're able to queue up lots of changes and perform a single commit so the result is much faster operations for projects with dozens of synced items.
Reminders Date Setting
As requested in the forums you can now request Curio to use the end of the previous day for tasks in Reminders using the new Reminder Due Date Midnight Adjust advanced setting.
Movie Figure Enhancements
Now Using AVKit
Curio is now using Apple's AVKit framework instead of the old, deprecated, QuickTime-based QTKit framework for media playback.
Inline Movie Controls
AVKit includes spiffy, inline controls for scrubbing and controlling playback. These controls will appear briefly when playback begins and then fade away automatically. They will reappear if you move the mouse back over the figure.
Portrait Orientation Detection
In addition, AVKit does a more reliable job at rendering portrait-orientation movies taken with mobile phones as portrait instead of landscape.
Working with Older Media Formats
While AVKit supports most modern media types it may not support older formats supported by QuickTime or installed QuickTime extensions, so you may have to open those media files via the right-click context menu's Open with Finder option. Alternatively, you can use the OS X tool qtmodernizer to convert your legacy media files to a modern, supported format and then add those converted files into your Curio projects.
Organizer Tweaks & Fixes
- The Add popover now draws correctly without "ghost" gray box artifacts.
- The Organizer now handles duplications of Organizer documents, such as RTF documents, correctly.
- Right-clicking and sorting Organizer siblings now works correctly for those items under a parent idea space or folder.
Library Tweaks & Fixes
- You can now Edit > Duplicate (⌘D) an asset in the Library to create a duplicate, and Curio now appends the word "copy" to the duplicate's title.
- The Library will no longer assume duplicated assets are orphaned assets if you don't drag it to an idea space before closing the project. Previously Curio would auto-remove those asset duplicates if they weren't promptly used.
- Any files you drag directly into the Library (perhaps from the Finder) will also be kept safe from that auto-removal process.
Grab Web Archive Tweaks & Fixes
The Grab Web Archive feature now forces an internal WebKit page layout, if necessary, to make sure CSS styling is in place. Notice this difference in the Zengobi company page on our website in the screenshots below. Previously, in some cases, the internal capture occurred before the layout of the page had been performed. Now if a layout is needed then we tell WebKit to do it now, before the capture.
Curio 9 Web Archive Curio 10 Web Archive 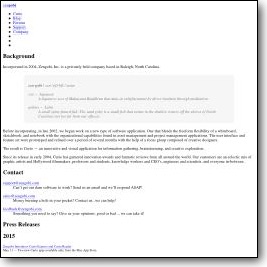
- An issue where the Grab Web Archive feature did not work on Retina Macs has been fixed. It now grabs a sharp, correctly cropped image.
Figure Tweaks & Fixes
The cylinder shape now has a nice, curved bottom instead a flat bottom:

- Fixed issues with the super/subscript buttons on the inspector bar not working correctly.
- The time-based figure variables now update more reliably as the idea space is changed.
- Fixed issue where the glow around a figure was sometimes clipped.
- Fixed odd drop placement offsets when drag-and-dropping figures from collections to the idea space.
- New support for the Shadow Color advanced setting for those that want to override the default.
Export Tweaks & Fixes
- HTML Export now exports correct image map coordinates when the Export entire idea space (don't clip unused) checkbox is checked.
Mail Enhancements

Smarter Parsing of Mail Message Headers
When you drag a message from Mail into Curio we embed the message into your Curio project. The newly created figure for that message displays the subject, from, and date fields. Curio parses the raw message for this information and now properly decodes quoted-printable and base-64 encoded subject and from fields and converts the internal date into a displayable format. The result is much better handling of messages particularly those containing international characters.
Postbox Integration
Curio's Postbox integration AppleScript has been updated to fix some compatibility issues.
Technical Improvements
Built For OS X Yosemite and OS X El Capitan

The Curio codebase has been updated to work with OS X Yosemite (10.10) and OS X El Capitan (10.11).
- Curio 10 is built with the latest Xcode 6 release.
-
Curio 10 also compiles as cleanly as possible with the just-released Xcode 7 with a few notes:
- Apple has removed the 10.10 SDK and we're not ready to rewrite some items (specifically a few cases where we're still using cell-based table/outline views) to build against the 10.11 SDK.
- We did build and test with Xcode 7's fantastic new Address Sanitizer feature to try to find any memory bugs in Curio. Fortunately, it's looking quite clean with no errors found!
- For safety's sake we're sticking with Xcode 6 until Xcode 7 is a bit more mature and any bugs or other issues in the compiler are taken care of by Apple.
- With a deployment target of 10.10 or above we removed or modified many calls which are now deprecated by Apple, thus ensuring our codebase is clean and as up-to-date as possible. This is actually quite significant because a couple of large, internal frameworks were inadvertently shielding themselves from deprecated warnings so the result was hundreds of warnings we had to resolve with more modern methods. For example, Curio is now completely weened off the libcrypto and libssl (OpenSSL) libraries, in favor of the newer CommonCrypto.
- For you Xcoders out there, historically we have generally compiled with -Wall which catches the most grievous warnings. However, we're now using -Weverything which enables every warning supported by the Clang compiler, which resulted in hundreds of new warnings that we tackled. Yes, many were rather pedantic, but the majority were definitely worth addressing.
- That said, there were some -Weverything warnings we had to disable for now: -Wno-objc-interface-ivars -Wno-direct-ivar-access -Wno-objc-missing-property-synthesis -Wno-format-nonliteral -Wno-gnu-statement-expression -Wno-float-equal -Wno-assign-enum -Wno-switch-enum -Wno-nullable-to-nonnull-conversion -Wcast-qual. We'll re-enable those warnings as we continue to fine-tune and refactor our codebase.
- We added the Xcode warning Overriding Deprecated Objective-C Methods, which apparently is a special case not included with -Weverything, so we find out if we're overriding (not simply using) a deprecated method. Finding out if we're overriding a deprecated method, perhaps for a custom user interface element, is important because that means Apple will stop calling that method at some point in the future and our override would be bypassed.
- Curio is no longer using the deprecated CalendarStore framework, for syncing events and tasks to the Calendars and Reminders apps. Instead we're using the EventKit framework which is code-shared with iOS. This was a major coding task but we're happy to be on the new framework. More details in the Calendar & Reminder Syncing Enhancements section above.
- Curio is no longer using the deprecated, QuickTime-based QTKit framework for media playback. Instead we're using the AVKit framework which is code-shared with iOS. While AVKit supports most modern media types it may not support older formats supported by QuickTime or installed QuickTime extensions, so those must be launched via the Finder for playback. More details in the Movie Figure Enhancements section above.
- Lastly, we also performed an in-depth Xcode Static Analysis on our code to find any potential memory leaks, uninitialized variables, dereferenced null pointers, or other problems and addressed all of the found issues.
Updated 3rd Party Frameworks
Curio 10 includes the latest releases of several embedded 3rd party frameworks.
- Now using Sparkle 1.12, which manages Curio's ability to check for and safely and securely install application updates. There are tons of fixes and improvements since the old 1.6 version we had been using.
- Now using PXSourceList 2.0.5, which manages the Organizer's outline view. This is a major rewrite of the old 1.x version we had been using with lots of features and fixes.
- Now using PFMoveApplication 1.16, which handles Curio's install into the Applications folder, up from the old 1.10 version we had been using.
- Now using LinkBack (last updated on September 18, 2013), so it contains the latest tweaks and fixes. This code framework was last updated by OmniGroup who has generously taken over LinkBack development. Note that it's important that other app vendors use this latest framework as well for maximum compatibility.
Speed Improvement: Idea Space Previews
The Good
Beginning in Curio 8, Curio began to generate PDF previews for each idea space in your project.
These previews would reside within the project's file package alongside the idea space's data file in a file called __Preview.pdf.
They're useful when showing idea space previews within the Curio interface, and for emergency recoveries.
When we introduced the PDF Mirror feature in Curio 9, it took advanced of this ready-made PDF file to quickly compile a summary PDF file for the entire project containing these individual PDF's. This is wonderfully useful when syncing to Dropbox for viewing on an iOS device, for example.
The Bad
However, for certain complex idea spaces that contain high resolution images or multiple PDF documents the resulting idea space preview PDF's can be (a) very slow to generate, and (b) very large in file size. This was a rare occurrence for most customers, but for those it did impact it was incredibly annoying.
The Fix
With Curio 10 we're now defaulting to compressed JPG images for previews, unless PDF Mirroring is enabled. In addition, Curio now offers a Preview File Extension advanced setting so you can force Curio to use JPG, PDF, or even PNG.
Here are the results with a complex test idea space containing two dozen high resolution images:
- PDF: the resulting preview file for the idea space is 133 MB (!) and takes 9.0 (!) seconds to generate. Note, however, that the resulting PDF has selectable text and zooming into text and high resolution images renders perfectly (that's why the resulting file size is so large).
- PNG: the resulting preview file for the idea space is 3.5 MB and takes 0.3 seconds to generate. This is technically a lossless format, but zooming into text and images will still be blurry.
- JPG: the resulting preview file for the idea space is 345 KB (yes, kilobytes) and takes 0.3 seconds to generate. This is a lossy format, but you probably won't notice the lost detail (I honestly couldn't). The default JPG compression is 0.5 which is medium aggressive, although you can modify this with the Preview JPEG Compression Factor advanced setting.
Of course, for the majority of idea spaces PDF previews are just fine and you won't encounter delays like this, as this is an exceptional idea space test case, but we want to optimize Curio as much as possible. Thus the safest route is using JPG and automatically switching to PDF only if PDF Mirroring is enabled.
One More Thing...
That PDF file size still bugged us so there's one more tweak we made: we now write the PDF to disk via a simple ColorSync filter which compresses it as much as possible while still preserving zoomability. Here's the result:
- Compressed PDF: the resulting preview file for the idea space is 41 MB and takes 9.4 seconds to generate. The result still has selectable and perfectly zoomable text and zooming into the high resolution images still looked perfect to my eye. So a bit slower to generate but much smaller in size.
So now when generating PDF previews, Curio automatically enables this compression but you can disable it with the Preview Compress PDF advanced setting. Alternatively, you can tell Curio to use a custom ColorSync Quartz filter that you create if you're feeling particularly adventurous. Just write to Zengobi for details.
Security Scoped Bookmarks and Aliases - Revisited... Again!
Curio uses aliases to files in four key areas:
- Tracking aliases to project asset files that you dragged in while holding the ⌥ (Option) key down.
- Tracking projects displayed in the Projects gallery and the Status shelf.
- Tracking files specified by the Open File figure action.
- Tracking destination project paths for jump targets (such as jump actions, jump anchors, and idea space links) that jump to another project.
Aliases? Bookmarks?
The original Mac OS (a.k.a. pre-OS X!) create the concept of a file alias decades ago. It's used by the Finder in Mac OS and in OS X, and the same underlying functions are used by Curio to create, track, and resolve external file references.
While Apple continues to support alias functionality they are strongly encouraging developers to move to a newer technology they call bookmarks. And, when the App Store, and sandboxing, was released, Apple created a variant of bookmarks called security scoped bookmarks which can only be used by an apps if the user permitted.
Way back in Curio 8...
We started our migration from old-school file aliases to new-school bookmarks back in Curio 8 by storing both an alias and a bookmark.
In fact, the stored bookmarks were actually security scoped bookmarks (SSB) to get us ready for eventual sandboxing if we decided to offer Curio for sale at the Mac App Store in the future, where sandboxing of apps is required.
Then, when we needed to find the file, we would try the bookmark first and, only if it failed, we'd try the alias.
Tweaked in Curio 9...
However, we heard reports that SSB's can be very slow to resolve, which was pretty bad since some of our customers had projects that contained hundreds of references to external files. So in Curio 9 we reversed our logic by resolving the alias first and, only if that failed, would we attempt to resolve the SSB. Geez!
Tweaked again in Curio 10!
Now, in Curio 10, we reversed this again but with a twist!
While we store security scoped bookmarks we can be a bit smarter about resolving them:
- If a non-sandboxed Curio, like Curio sold from our Zengobi website, then we:
- Attempt to resolve the bookmark first but without requesting a security-scoped resolution (since we don't need it since we're not sandboxed) which makes them as fast as a normal alias.
- If the bookmark resolution fails for whatever reason then we fallback to resolving the stored alias information.
- If a sandboxed Curio, like Curio Express sold from the Mac App Store, then we resolve the bookmark in a security-scoped manner, as required.
The other change we made is to store last-resolved path information for several of our items so if the bookmark and alias fail we still have the original path info on hand if we need to display that to the user.
Other Technical Tweaks & Fixes
- Previously Curio would rely on Apple's Grand Central Dispatch to generate some style previews for us on app launch. However, that could result in dozens (~100!) of spawned threads. For Curio 10 this was changed to use Apple's NSOperationQueue where we limit it to 5 threads, and the result is almost just as fast (fewer lock contentions).