The Organizer
Your Curio project can contain hundreds of idea spaces and documents all neatly organized in the Organizer. Curio allows you to organize your idea spaces and other Organizer documents hierarchically. You can also group items into lightweight folders or heavyweight project sections for maximum flexibility.
Curio’s Organizer contains the main “pages” of your project notebook.
There are two main types of items the Organizer can store and organize:
- An idea space is like an amazingly magical piece of paper that can contain notes, files, sketches, images, movies, mind maps, tables, and much, much more.
- An Organizer document is a file dragged in from the Finder, thus turning the Organizer into a versatile binder of notes and documents.
These two types of Organizer items can be arranged, grouped, and hierarchically organized using the Organizer.
Show or Hide the Organizer
- Click the Organizer toolbar button to toggle the display of the Organizer.
Create a New Item in the Organizer
Click the Add Organizer Item toolbar button and, from the popup that appears, choose whether you want:
- A blank idea space,
- A new idea space using the same style or template as the current idea space,
- An idea space from the Idea Space Gallery,
- A blank rich text document (technically RTFD so it can contain graphics, too),
- A folder, used as a lightweight grouping of other Organizer items,
- A section, used as a heavyweight division within your project ,
- An instance of a master idea space template .
Instantly Create an Idea Space with the Same Style as the Current Item
- Hold Shift and press the New Organizer Item toolbar button, or choose Organizer > New Idea Space With Current Style, or right-click in the Organizer and choose New Idea Space With Current Style.
Instantly Create a Blank Idea Space
- Choose Organizer > New Blank Idea Space, or right-click in the Organizer and choose New Blank Idea Space.
Instantly Create and Link to an Idea Space via Text Figure
- Right-click on an existing text figure.
- Choose Create Linked Idea Space.
- A new idea space will be created as a next sibling of the current idea space with the same title as the text figure.
- A jump action to that new idea space will be created and associated with the text figure.
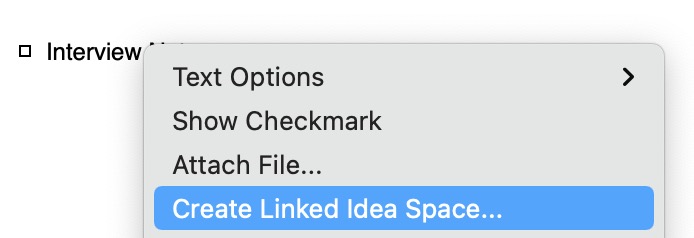
This feature supports several customizations that can be applied via advanced preferences.
Rename an Organizer Item
- Within the Organizer, double-click on the item, or select an item and press Return, or right-click and choose Rename.
Create a Duplicate of an Existing Organizer Item
- There are many ways to duplicate an existing item: Choose Edit > Duplicate, right-click on the Organizer item and choose Duplicate, Copy/Paste, or hold down the Option key while drag-and-dropping Organizer items.
Create an Organizer Alias to an Existing Organizer Item
Drag-and-drop a selection of Organizer items (e.g. idea spaces, Organizer documents, Organizer folders) to another location within the Organizer while holding down the ⌥⌘ (Option-Command) keys on your keyboard. When you release the mouse, aliases for all of those items will be created at the drop location. Here are some notes on Organizer aliases:
- You’ll know it’s an alias because its title is italicized and its preview icon has a little alias curl in the corner.
- The title of the alias can be renamed to anything you wish and it will not change the original.
- Everything else is linked to the original: preview, color label, tags, notes, etc. If you change either the original or an alias then they all change.
- You can right-click on an alias and jump to the original.
- Duplicating an alias creates another alias to the original, it doesn’t create an alias to the alias.
- You can hierarchically organize aliases just as you would any other Organizer item, including adding idea spaces as children under the alias.
- You can delete an alias and this will not impact the original.
- However, if you attempt to delete the original, Curio will warn you that aliases exist and will be broken if you continue. Curio will not auto-remove aliases because they themselves might have children. The alert will also give you the option of jumping to the alias so you can delete it manually.
Delete an Organizer Item
- Within the Organizer, press the Delete key to delete the idea space, or right-click and choose Delete.
Rearrange Organizer Items
- Simply drag-and-drop idea spaces around within the Organizer to re-organize them.
Indent or Outdent an Organizer Item
- Select the idea space within the Organizer and press the Tab key to indent the item or Shift-Tab to outdent. You may also drag-and-drop the idea space into position. You can have any number of hierarchical levels within the Organizer.
Expand or Collapse Organizer Item Hierarchies
- Click the disclosure triangle to expand or collapse an idea space hierarchy or use the Organizer menu’s Expand, Expand All, Collapse, and Collapse All menu items.
Open an Organizer Item in the Secondary View
- Option-click on the item or right-click and choose Open in Secondary View. The secondary view can be placed to the side or under the primary view. Use the View > Secondary View Below / Secondary View On Side menu to configure its placement. You can also Option-click on the splitter control in the navigation area of the inspector bar to do this.
Display Options
- Change the size of the Organizer’s displayed previews by right-clicking in the Organizer and choosing a new size. This new preview size can be global across the entire project or just for the current section.
- Sort Organizer items by right clicking on an item then choosing a sort method from under the Sort Siblings By submenu.
Idea Spaces
We’ll go into great detail on how idea spaces work here.
Organizer Documents
Normally the Organizer contains idea spaces, however it can also act as a flexible binder containing any document type. Simply drag files from the Finder directly to the Organizer to make it available for viewing and editing (if appropriate) within the full bounds of the Curio window.
RTF, RTFD, or plain text documents
Upon viewing, the inspector bar will reveal the appropriate font and text controls. As mentioned above, an RTFD document can also be added via the Add Organizer Item toolbar button.
- Image files. Such as JPEG and PNG.
- PDF files. Upon viewing, the inspector bar will reveal PDF page and annotation controls.
- Web links. Drag them in from your browser, upon viewing, the inspector bar will reveal web surfing controls. Note that Curio from the Mac App Store does not support viewing remote, insecure
httplinks in the Organizer. - All other document types. Will be displayed using a Quick Look viewer which will pull in the appropriate plugin as necessary. For instance, iWork files are displayed so that you can easily browse their contents directly within Curio.
Embed or Alias
By default a copy of the dragged-in file will be embedded into your project. If you hold Command down then the original file with be removed thus moving the file into your project. If Option is held then an alias to the original file is stored instead.
Important
Please note that some sync servers, like Synology Cloud Station servers, do not support aliases to files so any aliases created in Curio will break!
Saving Changes
Changes made to editable documents will be saved automatically when you switch to another item in the Organizer or when you close the project. Renaming the title in the Organizer will rename the underlying file as well, if embedded.
Searching
For Organizer text documents and Organizer web views, pressing ⌘F to will bring up a Find bar so you can search within the document.
Exporting, Printing, and Presenting
One important note is that these Organizer documents cannot be exported or presented from within Curio. The Organizer is simply acting as a binder to collect these documents in your project. However, you can right-click on the item in the Organizer to open or reveal the file in the Finder using the context menu. Curio can selectively print specific Organizer documents via right-click or File > Print Document. Curio will then launch the documents using the applications appropriate for the selected document types, and direct those applications to immediately print.
Sections
To reflect a real-world metaphor, if a Curio project is a binder, then a Curio section is a tabbed section within that binder. However, unlike a real-world section, a Curio section can be arranged into a limitless hierarchy.
For example, let’s say you have a Curio project called “Biology” for a class in college. You could create the following sections to organize your project:
    Classes
    Labs
    Papers
For a more complex example, let’s say you are a product manager in charge of “Super Product”. You could create the following section hierarchy to organize your project:
    General Notes
    Development
        Meetings
        Specs
        Focus Groups
    QA
        Meetings
        Resources
    Marketing
        Meetings
        Analysis
    Sales
        Meetings
        Data
    Support
        Meetings
        Customer Feedback
An important point to consider is that you can’t print or export multiple sections simultaneously. A section really is like a mini-project within your overall project. Even child sections are independent of their parents.
You will see the section name in several places within Curio such as the title bar, the Status shelf task list, and the Search shelf’s result list. You can search within the entire project or just a specific section.
Working with sections listed in the Organizer is just like working with other Organizer items. Thus renaming, deleting, rearranging, indenting, etc, are managed in the same way.
Important
On very rare occasions, a Recovered Items section can appear on project load if Curio finds orphaned Organizer items (idea spaces, folders, documents) in the project’s internal asset library. Generally this only occurs if a project is corrupted perhaps due to an incomplete cloud sync. You can drag items out of this section into another section so they are no longer orphaned.
Display the Sections Panel of the Organizer:
- Click the sections icon on the top of the Organizer (it looks like little tabbed notebook) or choose View > Show Sections. The Sections panel will appear in a split view at the top part of the Organizer. To hide the Sections panel simply click the sections icon again.
Create a New Section
- Use the Add Organizer Item toolbar button and choose Section, or choose the Organizer > New Section menu, or right-click in the Sections panel and choose New Section.
Open a Section
- Click on the section within the Sections panel. The Organizer will refresh itself and display the idea spaces and folders contained in the selected section.
Moving or Copying Items into a Section
- You can use cut/copy/paste to move Organizer items into a section. You can also drag-and-drop those items into a section, holding Option down if you wish to create copies. If you release a drag on top of section then the dropped items will be appended to the end of the section. However, if you pause while hovering over the section then it will automatically open allowing you to place the dropped items into a specific location within that section’s idea space hierarchy.
Folders
To continue the real-world metaphor started above, if a Curio project is a binder and a Curio section is a tabbed section within that binder, then a Curio folder is a folder within a section.
So, if a section is a heavyweight division of your project and is displayed in Status and Search results, a folder is extremely lightweight and is essentially invisible outside of the Organizer.
For example, use a folder to group a series of meeting note idea spaces created on a given day. Or to collect several idea spaces that reflect rough design drafts.
Clicking on a folder won’t display anything within the idea space view because there’s nothing to display. And, if you click on a folder to print or export it, Curio will automatically assume you want to print or export the contents of the folder.
Working with sections listed in the Organizer is just like working with other Organizer items. Thus renaming, deleting, rearranging, indenting, etc, are managed in the same way.
Create a New Folder
- Use the Add Organizer Item toolbar button and choose Folder, or choose the Organizer > New Folder menu, or right-click in the Organizer and choose New Folder or New Folder From Selection.
Moving or Copying Items into a Folder
- You can use cut/copy/paste to move idea spaces or other folders into a folder. You can also drag-and-drop those items into a folder, holding Option down if you wish to create copies.
Trash
When you select and delete any item from the Organizer, including sections, idea spaces, Organizer documents, and folders, they will be moved to a new Trash section in the Organizer. Items in the Trash will be automatically discarded when the project is closed.
Important
The Trash will automatically empty when you close your project. It is only a temporary Trash for the current editing session.
The purpose of this temporary, session Trash is for quick recovery of idea spaces or sections that you may have inadvertently deleted.
Why Not Undo?
When you delete an item from the Organizer, Curio asks you to confirm the deletion, then deletes the item. This is not an undoable action because Curio’s undo systems are independently managed by each idea space. That way you can undo actions performed in one idea space without undoing actions made in another. There is no “global” undo manager. (This is identical to the way Xcode operates, for those familiar with that app.)
Apple’s Keynote app, on the other hand, offers a single, global undo stack. This means undoing will step you back in time changing items in the current slide, other slides, plus slide creations, rearrangements, and deletions. It’s all one big undo stack so you can’t undo only the slide arrangement changes, or only changes to a specific slide, without undoing unrelated actions.
Our Solution
The session Trash is Curio’s solution to this issue. It offers the flexibility of giving the user a way to “undo” a mistaken deletion while still maintaining independent undo stacks for each idea space.
It is important to note this isn’t an ever-growing Trash, like the Finder’s, that would quickly bloat your project requiring you to periodically remember to empty it. Nor is it one that automatically deletes items that are more than x days old, as that adds a number of complexities. For that you might want to learn more about the new Archive section discussed below.
Its purpose is simply for the recovery of Organizer items inadvertently deleted during this session.
Delete Items from the Organizer and Send Them to the Trash
- Select the items you wish to delete then press the Delete key. Alternatively, you can also drag items directly to the Trash section.
- A confirmation alert will appear so you can confirm the deletion, noting that the selected items and any any child items will be moved to the Trash then permanently deleted when you close the project. In this alert you can choose to move items to the Archive section instead, which is discussed below.
- If you confirm the deletion then the items are moved to the Trash and both the Trash icon in the Organizer header area and the Trash section icon will become tinted red to indicate that the Trash now contains items.
Recovering Items from the Trash
- Click the Trash button in the Organizer header area to open the sections display and automatically select the Trash section.
- Drag items out of the Trash and into any section of your project. While dragging you can hover over a section to jump into the section for more precise placement within that section’s contents.
Characteristics of Items in the Trash
- The Search shelf will ignore items in the Trash unless you specifically choose the Trash via the Search shelf’s scope popup.
- The Project Library shelf will ignore items in the Trash unless you specifically choose the Trash via the Library shelf’s scope popup.
- Trashed items are not listed in the Navigator bar’s popup list of project idea spaces.
- Trashed items are not exported or synced along with other project items.
- Trashed items cannot be rearranged, renamed, assigned a color label, or deleted within the section or Organizer areas.
- New Organizer items cannot be created in the Trash.
What Happens to Items in the Trash?
- When you close the project, the project Trash is automatically emptied and everything is sent to the Finder Trash.
Emergency Recovery
- In emergency situations where you’ve deleted idea spaces, confirmed the deletion, and closed the project so the project Trash is emptied, you can now drag an idea space .curioAsset file from the Finder Trash into the Organizer and Curio will be able to restore the idea space and any text figures. However, any other asset figures that existed on the idea space, such as files or images, cannot be restored, as they are not a part of that single .curioAsset file (unless they still exist in the project if another existing idea space references them), but you can drag them out of the Finder Trash as well if you wish.
Archive
Curio includes a special Archive section which can be used for long term storage of items that you may have been tempted to delete but want to hold onto just in case.
The Archive is a perfect long term storage place for items you want to keep around, just in case you need to reference them, but they aren’t active components of your project and therefore don’t need to turn up in searches, exports, etc.
Move Items to the Archive
- Right-click on selected Organizer items and choose Move to Archive.
- Or, drag one or more Organizer items directly to the Archive section.
- Or, press the Delete key then click the Move to Archive button in the confirmation dialog that appears.
Characteristics of Items in the Archive
- Archive items are not loaded into memory on project load but only as needed.
- The Search shelf will ignore items in the Archive unless you specifically choose the Archive via the Search shelf’s scope popup.
- The Project Library shelf will ignore items in the Archive unless you specifically choose the Archive via the Library shelf’s scope popup.
- Archived items are not listed in the Navigator bar’s popup list of project idea spaces.
- Archived items are not exported or synced along with other project items
Filter
You can quickly search the Organizer for specific items using the Organizer Filter.
The filter panel appears at the bottom of the Organizer and allows you to enable one or more filtering criteria to the items displayed in the Organizer.
For instance, you can use the filter bar to show all idea spaces modified in the past 2 weeks; or all with a the label Needs Client Approval; or tagged with the Important tag; or with a title containing the word lecture.
Search Shelf vs Organizer Filter
The Search shelf can search figures and idea space titles. Use the Filter to filter the list of displayed items in the Organizer.
Show the Organizer Filter
- Click the filter button at the top of the Organizer table, or choose View > Show Filter.
Hide/Clear the Organizer Filter
- Click the Filter button in the Organizer header area, or choose View > Hide Filter. This will also clear any specified filter criteria.
Set Filter Criteria
- Date. Click the Date icon to filter the Organizer by when they were last modified.
- You can also select or create a project milestone, like “First Client Demo”, to filter using a specific date.
- Those same project milestones can be selected or created in the Search shelf’s date modified popup, as well.
- Label. Click the Label icon to filter the Organizer by label color.
- Tag. Click the Tag icon to filter the Organizer by tag.
- Title. Enter some text to filter the Organizer by title.
Navigation Controls
At the far right corner of the inspector bar you’ll find a series of navigation controls to help you move around your project and manage what you see in the main content area of the window.
The Splitter Button
- The splitter button is used to open up or close the secondary idea space split view. Option-click on this button to switch the secondary view between the side-by-side and above-below layouts
The Bookmarks Button
- The bookmarks popup button can be used to create bookmarks to easily jump to points within your project. You can either create a bookmark to an Organizer item such as an idea space, or you can create a bookmark figure. A bookmark figure is a positionable figure which is placed into the current idea space and is useful if you want to mark a specific location within an idea space.
- Both bookmarks and bookmark figures can be named and assigned one of eight colors for quick identification. All bookmarks are listed in the bookmarks popup in the navigator bar and can either be sorted by name or color
- To jump to a bookmark or a bookmark figure simply select the item in the bookmarks popup.
- Option-clicking a bookmark figure’s adornment will cycle through the available bookmark colors.
- To remove a bookmark, choose Remove Bookmark from the bookmarks menu. To remove a bookmark figure, select it on the idea space and press Delete.
The Navigator Button
- The navigator is a popup display showing the complete hierarchy of the current section or project so you can select and instantly jump to another Organizer item. In many cases you can leave the Organizer hidden and simply use the Navigator popup instead.
The Back/Forward Buttons
- The back/forward buttons are available to move back in history, to the idea space or Organizer item you were recently viewing, or forward in history. Just like a browser’s back/forward buttons. You can also hold Option while swiping left/right with your mouse or trackpad.
The Previous/Next Buttons
- The previous/next buttons are available to move to the previous or next item in the Organizer. You can also swipe left/right with your mouse or trackpad.
- If you hold Command down then the buttons change to indicate that clicking will move you to the first or last item in the Organizer.
Inspector
To view the inspector panel for the selected Organizer item, make sure a figure on the idea space isn’t selected (click on the background of the current idea space if necessary) then either:
- Click an appropriate icon in the inspector bar, or
- Click the Inspector toolbar button to open the inspector shelf.
Tags
Using tags with idea spaces and other Organizer items is identical to how it works with figure tags.
Labels
To view label associated with the selected Organizer item either click the Meta button in the inspector bar, or see the Meta tab in the inspector shelf. You can also right-click on the Organizer item to make a quick label assignment.
Similar to the Finder’s Label feature, you can associate a label and color with your idea spaces, Organizer documents, sections, and folders. When an item is labeled, the preview or icon displayed in the Organizer displays a border using the label color. This allows you to visually flag certain idea spaces, sections, or folders.
Remember you can also use the Organizer filter to display only Organizer items with an associated label color.
Use the label inspector panel to work with labels.
Assigning Labels
- Click on a label row to set the selected Organizer item to that label. A checkmark will appear next to the label associated with the selected Organizer item. You can also assign a label by right-clicking on an Organizer item and choosing one from the Labels submenu.
Changing Label Color
- Click on the label color well to change the color.
Changing Label Text
- Double-click on the label text to change the text.
Defaults
- Click “Copy to Defaults” to make these labels the new global defaults.
- Click “Restore Defaults” to restore this project’s labels using the global settings.
Notes
To view the notes associated with the selected Organizer item or figure click the Notes button in the inspector bar.
The notes inspector allows you to enter miscellaneous notes that will be associated with the selected item.
Entering a Note
The notes inspector window allows you to enter any rich text, with full support for multiple fonts, sizes, colors, paragraph formatting, and even images.
Note Adornment
When a note is associated with a figure then a little note adornment is displayed next to the figure. If you click the adornment, the notes inspector window will appear allowing you to change notes. If you remove all the contents of the note then the note is deleted entirely and the adornment is removed.
Searching Notes
For figures, notes are searched when using the Search shelf. For Organizer items, notes are searched when using the filter.
Printing Figure Notes
You can print the notes associated with the selected figure via the File > Share menu or Share toolbar button. Note the Include Figure Notes When Copying/Sharing Text item in the Share menu which is useful when you want to include notes with copied or exported figures.
Info
To view info associated with the selected Organizer item or figure click the Info button in the inspector bar.
Organizer items and figures can have various miscellaneous bits of info that Curio collections under the info inspector.
Title
View and edit the title of the selected Organizer item or asset figure.
Identifier
A identifier that you can assign to the item. Currently its only use is with the Master Templates feature in Curio Professional, but we more plans in the future.
Filename and Location
If the item has an underlying file then its name and location appears here.
Date Stats
View the date the item was created, added to Curio, and last modified.
Action Button
The action button allows you open or reveal the underlying asset file using the Finder. If the asset is an alias then you can choose to convert the asset into an embed asset by copying the original file into the project’s internal asset library. You can also choose to swap the underlying file with a new file which you will choose using a standard Mac open dialog.
Restrictions
Specify restrictions such as whether a folder, idea space, or figure is printed, exported, or presented.
Restrictions are automatically inherited by the children of Organizer folders and idea spaces.
For example, say you have an Organizer folder with the “exporting allowed” checkbox unchecked. Any idea spaces or folders hierarchically contained within that folder will automatically inherit that restriction as well. And, since they inherit that restriction, and cannot override it, the restriction checkbox is disabled in their Info inspector.
As another example, if you have an idea space with a “no presenting” restriction, then any child idea spaces hierarchically under that idea space will also be skipped when presenting.
This makes it very easy to quickly restrict or un-restrict an entire hierarchy of items just by nesting the items appropriately.
Advanced Options
An advanced option is whether the underlying file is copied or shared when the asset figure is copied. Normally Curio will share the underlying file thus you can have ten references or instances of a giant Photoshop image file scatter throughout your project, but the underlying file will exist only once within the asset library.
On the other hand, you could specify that when the figure is copied then a unique copy of the underlying file should also be made, thus you’d end up with ten separate copies of the Photoshop file stored internally.