Projects
A real-world project is your class, your thesis, your ad campaign, your next product release, your lab experiment, or your next sermon. Your Curio project is the same thing on your Mac. It contains everything related to your project including notes, sketches, files, web links, images, brainstormings, …, everything!
With a Curio project you keep all that stuff in one easy-to-manage file in the Finder. Everything is stored within that file package. This means backups are a piece of cake and you don’t have to hunt all of your hard disk looking for all the related items.
Create a New Curio Project with an Initial Idea Space
- Choose File > New, or hold Shift and click the Projects toolbar button.
- Choose a personal or bundled idea space style or template to use as your initial idea space.
- Click the Choose button.
Create a New Curio Project with a Blank Initial Idea Space
- Choose File > New Blank Project, or choose File > New and choose the blank bundled idea space style or click the Blank button.
Create a New Curio Project Which Is Absolutely Empty
- Choose File > New.
- Hold the Option key and the Blank button will change to Empty. Click the Empty button.
Create a New Curio Project Based on a Project Template
- Choose File > New From Project Template, or hold Shift-Option and click the Projects toolbar button. This New Project From Template Gallery is described in detail below.
- Choose a personal or bundled project template. Or choose the Blank template to create a project with a blank initial idea space.
- Click the Choose button. Alternatively you can click the Blank Project button to create a project with a blank initial idea space.
Create a New Curio Project with Master Idea Space Templates
- Choose File > New.
- Select a template tag name and click the Use Tagged Set as Masters button.
- A new project will be created where all of the idea spaces in the tagged set will be added to the project as master idea space templates.
Open an Existing Curio Project
- Click the Projects button and choose a previous project. When choosing a project from the Projects popup menu it will be opened in place of the current project, thus acting as a fast project switcher. Hold Option when choosing a project to open it in a separate tab within the current project window.
- Choose File > Open menu to see the standard Open dialog. The project will be opened into a new tab or window depending on your System Preferences > General > “Prefer tabs when opening projects” setting.
- Choose File > Open Recent to instantly choose a recently-opened project. The project will be opened into a new tab or window depending on your System Preferences > General > “Prefer tabs when opening projects” setting.
- Choose File > Open From Gallery or click the Projects toolbar button to see Curio’s Open Project Gallery, which is explained in detail below. The project will be opened into a new tab or window depending on your System Preferences > General > “Prefer tabs when opening projects” setting.
Save a Curio Project
- Your projects will save themselves automatically using the macOS native autosave feature, however you can also choose File > Save at any time to save your project immediately.
Save a Curio Project as a Project Template
- Choose File > Save As Project Template.
Delete a Curio Project
- Within the Finder, drag the Curio project from wherever you saved it to the Trash.
Archive a Curio Project
- Choose the File > Create Archive menu item.
- This will create a copy of your current project with all aliased assets converted into embedded assets, suitable for backup or storage.
Project Gallery
The project gallery is where you can manage and organize all of your Curio projects.
Using the Project Gallery
To reveal the project gallery, click the Projects toolbar button and choose Open From Project Gallery, or choose File > Open From Gallery.
- Your projects can be categorized in one or more custom categories located along the left side of the window.
- Then, on the right side of the window, you will find the projects within the selected category.
Notes
- Smart Categories automatically list projects based on various criteria. For example, the *Recently Opened- smart category lists all projects you’ve opened recently which are also listed in the File > Open Recent menu.
- You can magically turn the Open Project Gallery into the New Project Gallery by clicking the button on the bottom left corner of the window.
- The project gallery window displays useful information about your project under its title. By default it will display the date it was last modified but, if status information about the project exists, it will tell you if a project has a task which is due soon.
Project Categories and Finder Tags
Any projects that you associate with categories will automatically have associated Finder tags as well. For instance, if you associate a project with the categories Active and Personal, then Curio will create “Curio Active” and “Curio Personal” Finder tags and associate them with the projects as well.
With category Finder tags, you can now search for categories of projects in the Finder, outside of Curio. Just enter the search tag, such as Curio Active in a Finder window search field and you’ll find all projects associated with that category. Click the Save button in the Finder window to save the search and even add it to your sidebar for one-click access to those projects. See the “Finding Tagged Files” section on Apple’s site for more information on using Finder tags.
Working with the Open Project Gallery
Details on how to use the project gallery.
Show the Open Project Gallery Window
- Choose the File > Open From Gallery menu, or…
- Hold Option and click the Projects button on the toolbar.
Open a Project
- Double-click the project in the gallery window, or select it and click Open.
See a Quick View of a Project
- Select the project in the gallery window then press spacebar.
Open a Project Not Listed in the Gallery
- Click the Open Other button to show the normal macOS open dialog.
Create a New Project Category
- Click the Add Project Category button then enter the name for your new category.
Rename a Project Category
- Double-click the category in the list and rename it. All affected projects will be associated with the renamed category Finder tag as well.
Delete a Project Category
- Select a category in the list and press the Delete key. This will remove the category but not delete the projects within that category. The corresponding category Finder tag will be dissociated with those projects as well.
Associate a Project with a Project Category
- Select the category then drag-and-drop a file from the Finder to the right side of the window, or…
- Drag a project listed in another category (such as the Recently Opened category) and drop it on top of the target category on the left side of the window, or…
- Right-click on the project as shown on the right side of the window and choose the target category from the popup menu that appears.
Disassociate a Project from a Project Category
- Right-click on the project itself and choose the category that the project should be removed from, or…
- Select the project and press Delete on your keyboard. You will then be asked if it should be simply disassociated from the current category or if it should be sent to your computer’s Trash.
Change How Projects Are Sorted in Gallery
- Right-click on the background of the right side of the window and choose a sort order from any of the following: status, title, last modified date, or date created.
See the Category Finder Tags Associated with a Project
- Right-click on the the project in the gallery and choose Display Category Finder Tags. From the alert that appears you can also remove or reapply those tags.
Add Missing Project Categories to the Gallery
- Right-click in the category list and choose Add Categories Via Category Finder Tags. Curio will use Spotlight to find all Curio projects, checking each for any associated category Finder tags, and then re-add any missing categories and re-associate the projects associated with each category. This is useful if you installed Curio on a brand new machine and didn’t bring the Application Support folder from your old machine.
The New Project Gallery
When creating a new project via File > New, the gallery that appears supports a number of organization features.
Copying Styles and Templates
- You can drag-and-drop styles and templates to your Personal repository or, if using Curio Professional, the Master repository.
Organizing Idea Space Templates with Tags
- Right-click in the Personal repository area on the Personal > Templates item and choose Add Tag.
- Enter a collection tag name. For example, you might organize your idea space templates into “Favorites”, “Work”, and “School”.
Projects Toolbar Button
The Projects toolbar button can be used to quickly access your organized projects.
- Clicking the Projects toolbar button shows a quick pick list of all your projects organized into categories.
- You also have options to bring up the open project gallery, where you can create and organize your project categories, or create a new project with a blank idea space, an initial idea space from the idea space gallery, or from a project template.
- For Curio Professional users, the Status shelf will organize your projects with the same categories.
Project Templates
You can create and reuse your own project templates.
Save the Current Project as a Project Template
- Choose File > Save As Project Template.
Create a New Project from a Project Template
- Choose the File > New From Project Template menu, or…
- Click the Projects button on the toolbar then click the Switch To New Project Gallery button, or…
- Option-Shift-Click the Projects button on the toolbar.
See a Quick View of a Project Template
- Select the project template in the gallery window then press the Spacebar.
Create a Personal Template Folder
- Right-click in the template list and choose Add Template Folder. Curio will create an actual folder on your hard disk with the given name within the ~/Library/Application Support/Curio/Version XX/Repository/Project Templates directory. This is where your templates will be stored on disk.
Rename a Personal Template Folder
- Double-click the template folder in the list and rename it.
Delete a Personal Template Folder
- Select the template folder in the list and press the Delete key. After confirming the template folder and any templates it contains will be sent to the Trash.
Copy a Template to a Personal Template Folder
- Drag a template from another template folder and drop it on the target folder.
Delete a Project Template
- Select a template then press the Delete key to send the template to the Trash.
Inspector
To view the project inspector panel, click on the background of the current idea space then either:
- Click the little briefcase icon in the inspector bar, or
- Click the Inspector toolbar button to open the inspector shelf then look at the Project tab.
Idea Space Margins
Set the top, left, bottom, and right margins for your idea spaces.
You can also check to use the smallest margins possible, given the specified printer in Page Setup. Certain printers may have a minimmum margin where they can’t print.
Project Image
Set an optional image for your project by copying an image and pasting into the provided image well. This image will be used as the project thumbnail in the Finder, the Open Project Gallery window, and the Status shelf.
Next to the image well is a helpful “image assistants” popup menu. Here you will find quick access to popular textures and sample images via Google Image Search which you can drag and drop into the project image. Then you can use the assistance popup menu to apply a binder or journal appearance to the image.
Alternatively, the assistants popup also includes a number of template icons you can use for your project image. A color control sits alongside the assistants popup which you can use to tint the template to any color you wish.
Calendar Sync
If you’re running Curio Standard or Professional you can sync your Curio tasks with the Calendar and Reminders apps, allowing you to manage your tasks even on iOS devices.
Enable Sync
Enable the synchronization of project tasks with your Calendar and Reminders apps by clicking the on/off checkbox.
Pick a Calendar and Reminder List
In the Events popup choose a calendar to sync your event tasks to. By default, an event task is a figure in Curio that has a start date and, optionally, a due date. You need to create the calendar via Calendar app’s New Calendar menu. You can create and use an iCloud-based calendar if you wish.
In the To Dos popup choose a reminder list to sync your to-do tasks to. By default, a to-do task is a figure in Curio that only has a due date or simply a checkboxed item with no dates at all. You need to create the calendar via Reminder app’s New Reminder List menu. You can create and use an iCloud-based list if you wish.
As you noticed the Calendars and Reminders apps require type-specific calendars. This means one calendar for events and one for to-do’s (aka reminders). You cannot use the same calendar for both types of data.
The event and to-do calendars you create must have different names. In other words they can’t both be called “Curio”. Instead perhaps “Curio” for your events and “Curio Tasks” for your reminders. You can either share a calendar list and reminder list between all your projects or create and use a separate list for each of your projects, it’s up to you.
Alerts
For calendar event alerts check the “Enable event alert before start date” checkbox and select when the alarm should go off.
For reminder task alerts check the “Enable to-do alert before due date” checkbox and select when the alarm should go off.
Advanced Options
Click the actions button to see a popup menu appear with various options.
- Reset Events and To Dos will remove then re-create all events and to-do items associated with the project in the selected calendar and reminder lists.
- Remove Events and To Dos this will remove all events and to-do items associated with the project in the selected calendar and reminder lists.
- Figures with start dates map into will determine what these types of figures will turn into. Calendar Events is the default.
- Else figures with only due dates map into will determine what these types of figures will turn into. Reminders is the default.
- Sync unchecked figures with no start or due dates will create reminder tasks for checked items that have no start or due dates.
- Prefix each synced item with project name will prefix the name of your project in front of the title of each synced item. Thus the task “Finish UI design” in the “Cool App” project will become “Cool App: Finish UI design” in Calendar/Reminders. This is a useful feature if you share a common calendar/reminder lists with all your Curio projects.
Important
For safety, you will need to manually remove older files and folders from the PDF mirror location if you change preferences or export options.
Additional Notes
If the Curio figure has a start and/or due date but is checked — that is, completed — then it is not synchronized to Calendar.
When syncing if an event begins and ends at 12:00 midnight then it is considered an all-day event, otherwise the specific times are used when creating the event.
All times are considered floating times, therefore they are time zone independent. This means that a task ending at 4:00 PM will end at that time regardless of where you were when you created the task or where you are currently.
When Does the Sync Occur?
Changes made within Curio will be synchronized only when the project is saved or autosaved.
However, when you first open a project, it will immediately synchronize to retrieve any changes made from within Calendar/Reminders. And while the project is open, if changes continue to be made in Calendar/Reminders, Curio will immediately reflect those changes within the project.
PDF Mirror
Curio can publish a mirror or replica of your project in PDF form to a specified location.
This is very different than a normal PDF export in that each idea space is converted into an unscaled PDF image, with no page breaks or fit-to-page scaling, then all the resulting images are merged into a single PDF document. In addition, this published PDF can include clickable file links as any embedded or aliased assets can optionally be exported into a folder hierarchy alongside the PDF document.
This publishing event can occur either manually via a File > Update PDF Mirror command, or automatically every time an updated project is closed.
This can be useful for several reasons including for backup purposes or, if published to a Dropbox or similar synced folder, a method for you to access your project while on your iPad, iPhone, or another computer.
Important
Please note that the resulting PDF mirror is not password protected even if your project is password protected.
Enable PDF Mirror
Enable the PDF mirror feature by clicking the on/off checkbox.
Location
Specify the folder location for the resulting PDF by clicking the Choose button. This location is where Curio will create a single PDF for each section in your project, if you have multiple sections enabled.
The form of the file names for the resulting PDF’s is ProjectName-SectionName.pdf file, where the section name is only appended if necessary. Curio will create a manifest file alongside each PDF file so it can track what’s inside each PDF.
Options
- Enable the exporting of embedded and aliased assets into a folder alongside the resulting PDF. Curio will also modify the PDF so that clicking or tapping on the asset figure on the PDF will launch and view the exported asset. However, this is highly dependent upon the abilities of the PDF viewer you use so see below for additional notes.
- Normally all idea spaces are mirrored but you can direct Curio to obey the idea space’s exporting privacy restriction if you wish so that some idea spaces are not exported when mirroring. This restriction can be enabled for individual idea spaces via the Options panel of the Info inspector.
- Enable automatic publishing when a changed project is closed (or Curio is quit).
You can click the Publish Now button to instantly publish your project or use the File > Update PDF Mirror menu item to publish.
Advanced Options
Click the actions button to see a popup menu appear with various options. Note that if you change any preferences you will need to manually remove any previously published files. We don’t do this automatically for safety reasons.
- Compress resulting PDF
By default Curio will perform a compression on the resulting PDF, although not as extreme as Apple’s Reduce File Size PDF compressor. You can also create your own compressor using the ColorSync application and an advanced preference. - Keep prior PDF as backup
Curio can optionally make a copy of a preceding day’s PDF as a backup which is useful if you make a catastrophic change and need to recapture that information. - Modify file link paths
The file paths for published asset files can be modified to strip out characters that may interfere with certain PDF viewers, as discussed below. - URL encode
This is a standard technique for encoding spaces, international characters, and other symbols so they turn into numerical codes preceded with a percent sign. Some PDF viewers (like Acrobat) work with URL encoded file path names but others don’t. Ideally all would support this and we wouldn’t need the other character conversions at all. - Strip all potentially unsafe characters
Remove any characters from the file name that might not be cross platform such as slashes. - Convert characters to ASCII only
Changes foreign characters to their simple ASCII equivalents such as á to a. File links with simple characters don’t need to be escaped (such as percent-encoded) which provides greater compatibility with various PDF viewers. - Convert spaces to underscores
Converts a spacebar character into the _ underscore character. - Remove spaces
simple removes any spaces from the file name. - Prefix asset links with file:// scheme
Technically Curio creates relative links paths, which means paths to the asset files are relative to the location of the PDF file itself. Relative paths shouldn’t need a scheme but some PDF viewers require it. - When exporting assets
You can optionally include aliased assets (enabled by default) and image assets (disabled by default). Image assets are normally not exported since the images themselves are visible within the PDF itself so probably will not need the actual standalone image files exported.
Additional Details
Embedded PDF Outline
The PDF generated by PDF Mirror includes embedded PDF document outline for easy navigation using PDF viewers that support that standard PDF feature. In Apple’s Preview app, for example, choose View > Table of Contents to see the PDF’s hierarchical document outline.
The PDF outline is part of the PDF standard so most standards-following PDF readers should support it. Zengobi has tested it with the macOS Preview and Adobe Reader apps as well as the following iOS apps: Dropbox, Readdle’s PDF Export and PDF Viewer, Good.iWare’s GoodReader, Branchfire’s iAnnotate PDF, and LiquidText.
Clickable Links
When you export idea spaces via Export as PDF or PDF Mirror, the resulting PDF will have clickable links for:
- Weblink figures, like a URL dropped from a browser into an idea space.
- Figures with URL actions.
- Weblinks and figure URL actions that are inner project hyperlinks (ex: curio://?ideaspace=062…).
- Idea space links to other inner project idea spaces.
- Jump anchors to inner project locations.
- Figures with jump actions to inner project locations.
- Figures with first, last, previous, or next idea space jump directions.
- For PDF Mirror, you have the option of exporting assets as well, such as images and documents, so those figures would have links to their corresponding exported asset files. See the note below for compatibility details.
Limitations
Curio doesn’t generate PDF links for a selection of text within a text figure that has a link attribute. This is a tricky one to solve as (a) Curio would have to scan all text figures when exporting to find any NSLinkAttribute attributes which could be very slow, (b) the resulting selection may consist of wrapped lines of text complicating the generation of potential PDF annotation link(s).
Supported PDF Viewers
The generated PDF’s have been tested using a number of PDF viewers on both macOS and iOS. Here are some notes regarding their ability to handle various PDF features.
- Text. In general, all PDF viewers, regardless of platform, should display the PDF itself just fine, with text being rendered beautifully. Text should be searchable and selectable allowing you to quickly find and access information anywhere in your project.
- Figure Notes. All PDF viewers should also provide some ability to view figure note annotations usually via a hover, click, or tap of the figure’s note adornment. In Preview, for example, you can hover over a note adornment or bring up the Inspector window (via Tools > Show Inspector) then click the Annotations tab to see all note annotations.
- Web Links. Likewise, all PDF viewers should allow you to launch any web links associated with Curio web link figures or web link actions.
- Clickable Asset Links. Producing clickable assets is a bit tricky. The file links within the PDF are relative links, which means they are relative to the current location of the PDF document itself and should continue to work even if the document is moved to another location/platform either manually or via sync.
- Mac Apps
- PDF Viewer from PSPDFKit works very well with file links.
- PDF Expert from Readdle works very well with file links.
- Acrobat Reader supports relative file links. You may need the following modify file link paths preferences: URL encode. Alternatively, if you wish to also be compatible with iOS readers which don’t support URL encoding yet you may use these instead: Strip all potentially unsafe characters, Convert characters to ASCII only, Convert spaces to underscores. For images they will open in a browser window, otherwise Acrobat simply reveals the file in a Finder window. Presumably for security purposes it doesn’t automatically launch the file.
- Apple Preview on the Mac doesn’t appear to support file links of any kind, perhaps for security reasons.
- iOS Apps
- PDF Expert from Readdle works very well with file links if you store files in their iCloud app-specific folder, called “Documents by Readdle”, as they auto-sync the entire folder hierarchy ensuring access to all linked-to files.
- Otherwise, iOS apps which have adopted Apple’s “document browser” API introduced in iOS 11 to access synced services such as Dropbox, iCloud Drive, Box, etc, may have some issues:
- Apple’s API currently doesn’t give developers access to easily sync a folder hierarchy which is required to handle file links.
- Previously a workaround was to use the File app to copy the PDF file and the subfolder containing the linked-to files into “On My iPad” or “On My iPhone”.
- Then, you could use an app such as PDF Viewer to look into “On My iPad” and open the PDF file and the links would work!
- However, now it seems they either do nothing or show a “no handler found” error.
- So we may need to wait until Apple expands the API with the additional support developers need.
- Mac Apps
Reference Types
References are detailed in the section on creating reference links.
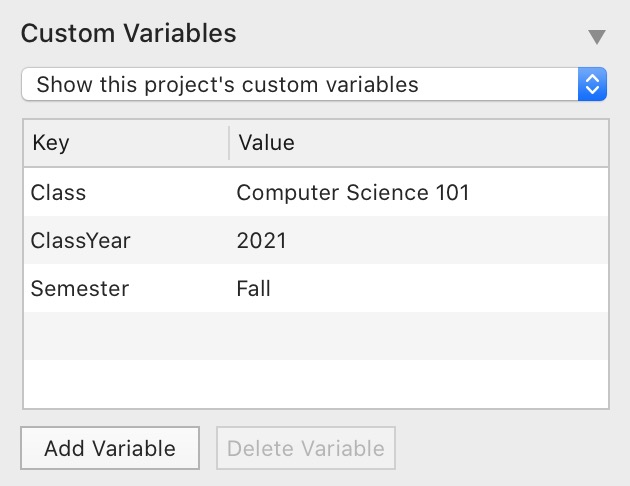
Custom Variables
Curio Professional users can create their own global and per-project custom variables, such as Author and Class, which can then be used within Curio using the variable markup syntax when editing, such as {{Author}}.
Those variables are then replaced dynamically when rendered.
Custom Variables vs Custom Data
A related feature is custom figure data. In short:
- Custom variables are text replacements for variables you create and use throughout your project. For example, you can create a custom variable named Author and give it a value of George, then use the
{{Author}}variable markup syntax in your project’s text figures. - Custom data allows you to create project-wide formatted keys, such as Price or Score, and then assign values to those keys for each figure, adding custom meta data to every figure for searching and export purposes.
Viewing Custom Variables
Use the scope popup to view and create custom variables that are just for this specific project, or that are globally available for all projects.
The variables are always displayed sorted by name.
Adding a Custom Variable
- Choose the scope of the variable: either just for this project, or globally available for all projects.
- Click the Add Variable button and type in a variable name.
- Press Tab to move to the value field and then enter its value.

Naming Conventions
Local project variables will take precedence over globals that have the same.
For example, a project variable named Author will override a global Author variable, created in the past or even in the future.
This precedence can come in handy if you want to override a global on purpose for a specific project, essentially making the global a default value.
However, if you use a lot of global variables that you don’t want to accidentally override, then you may want to come up with a naming convention to make sure those are distinct.
Editing a Custom Variable
To edit a custom variable’s name or value, double-click its name or value field, change the text, and press Return.
Important
Note that changing a variable’s name does not replace any uses of that variable in your project or in other projects. You would still need to manually change those text figures as necessary.
Deleting a Custom Variable
To delete a custom variable, select the variable and click Delete Variable or press the Delete key.
Warning
You cannot undo the deletion of a custom variable, although you can simply re-create it. Any uses of that variable in text figures in this project or other projects will still remain in place.
Using a Custom Variable
You can use your custom variables in several locations within Curio.
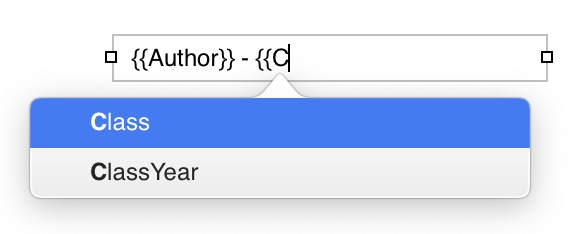
Within Text Figures
When editing a text figure use the {{VariableName}} syntax such as {{Author}}.
Helpfully Curio will show you an autocomplete popover as you start typing within a Curio text figure.
For example type {{a and the popover will show all the custom variables that start with a such as Author.
Use the arrow keys to choose one and press Return and the word is autocompleted for you and the ending }} appended if necessary.
Insert > Custom Variable
You can also select the variable from the Insert > Custom Variable main menu submenu, which will insert the syntax for you, creating a new text figure if one is not currently being edited.
Within Figure Notes
You can also use the {{VariableName}} syntax (as well as normal Curio variables like {%IdeaSpaceName}) in figure notes.
These variables are dynamically replaced when the figure tooltip is displayed, when figure notes are copied or exported as text, and as popup tooltips in PDF exports.
Within Print Headers and Footers
Simply use the {{VariableName}} syntax such as {{Author}}.
Note that autocomplete doesn’t assist here.
Within Idea Space Template Titles
You can also use the {{VariableName}} syntax in personal and master idea space template titles which are then replaced when you add an idea space to your project using one of those templates.
They aren’t replaced dynamically after that point, however.
Optional Formatting Extras
You can optionally append one of the following formatting extras to the variable preceded by a / symbol:
- uppercase
- lowercase
- capitalize
For example, {{Class/uppercase}} will result in COMPUTER SCIENCE 101.
Advanced Project Options
Project Password
Set a password for your project so that it cannot be opened unless the password is re-entered. The contents of your idea spaces and many ancillary files within the project package are then encrypted and decrypted using the AES-128 algorithm.
Note when a project is encrypted you cannot see the status of the project in the Projects Gallery or Status shelf until the project is opened, or use Quick Look in the Finder to see a preview or thumbnail, or use Spotlight to search for items in the project.
Encrypting and decrypting a large project will take a few moments to complete, do not force quit Curio when this is occurring!
Warning
Any embedded assets, including documents, images, and audio and video recordings, will not be encrypted. If you need to encrypt everything in your Curio project — including all embedded assets — we’d recommend using either a volume protected with FileVault, or an encrypted disk image that you use to store your Curio projects (perhaps one disk image per client, for example). Alternatively, you can use an application such as Knox which can automate the creation and sizing of encrypted disk images.
If you forget your password, your data will be lost. Zengobi cannot decrypt the project.
Project Backups
Override the global backup settings specified in Curio’s preferences so this project has unique backup properties. For instance, you might specify that an especially large project is backed up every 3 days.
Asset Library Location
You can tell Curio to use an external asset library folder so it can be indexed by Spotlight.
Normally embedded assets are stored within a file folder located within the project file package, which you can see if you right-click on the project file in the Finder and choose Show Package Contents. However, Spotlight cannot index within package files therefore you can’t use Spotlight to search their contents.
You can choose whether Curio should store your project’s asset library within the project file or external to the project file, in a .curioLibrary folder which sits alongside your .curio project file. Operations within Curio automatically support external library folders such as File > Save As, Save To, Duplicate, and Rename, File > Create Archive, Quick Look, and the automatic project backup feature described elsewhere.
Important
You must make sure both the .curio and .curioLibrary files have the same file name and are kept together, otherwise Curio will be unable to open the project file.
Lock File
A project lock file is useful when sharing a project using a service such as Dropbox or a network file server to make sure more than one person doesn’t attempt to make changes to the project at the same time.
When set to automatic Curio will determine on its own if a lock file should be created. Alternatively, you can force a lock file to be used or not used if you wish.
Mac App Store Restriction
Note that due to sandboxing restrictions both the external asset library and lock file features are only supported for projects stored in the Projects folder specified in Curio’s Preferences.